WELCOME!


It is hard to believe that it was almost ten years ago I witnessed a CNC router in action for the very first time. I was fascinated with what I saw and simply had to have one! Although I had been in the creative end of the three dimensional sign business for most of my life I didn't really know what I would do with one - but I just knew it could do fantastic stuff.

Through extensive research and LOTS of hands-on practice I quickly found out that my MultiCam router was capable of just about anything imaginable.This journal will chronicle that journey to date and continue each week with two or three entries as I continue to explore just what is possible with this wonderful tool... -dan
Showing posts with label What's in a Sign Magic Workshop?. Show all posts

Thursday, March 10, 2011

What's in a Sign Magic Workshop? Part three.

First thing Saturday morning we took a field trip to the MultiCam Western Canada offices. It was a great way to show the things we had learned and talked of in the EnRoute lectures.


As the students began the painting Bec kept a close eye on the projects and answered the many questions to make sure everyone was successful.


Everyone got to try out a variety of techniques.


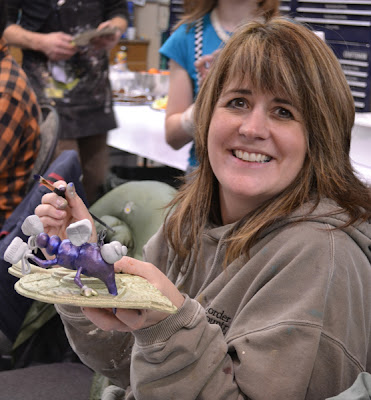
The sculpting project followed a theme we have done a number of times... 'B' is for BUG. Everyone got the same challenge. Use a pre-routed leaf with a letter 'B' on it and create a 3D bug to go with it. The results were as varied as the folks who attended. Every solution was imaginative and GREAT!


When people weren't busy on their bug sculptures they were painting their dimensional letters and practicing their glazing techniques.


Some took advantage of the one-on-one time with Jeff for a private tutorial in EnRoute.


Through every minute people were busy taking endless pictures, looking at the many examples in the shop and studio. Some took the time to browse my library and found some great treasures.


So much more happened through those three magic days, it was not possible to capture it all nor write of it here. It was in a word...  MAGIC!

Thanks to Donna for the wonderful job she did capturing it on her camera.


-dan

What's in a Sign Magic Workshop? Part two.

I looked through all my pictures from the workshops and surprisingly have none of the lectures in progress that were of the quality to post here. So we'll have to go with this one taken before the workshop started. The library is where the formal teaching takes place. Surrounded by thousands of books, periodicals, photographs, models, samples, toys and other trinkets we begin a journey of discovery. Here we explore how I do design, where I get my inspiration, and how I pull things together to make our unique signs. We also delve into the various aspects of Enroute and routing on a CNC machine. 


We take frequent breaks to make sure everyone is alert and awake, able to soak in all we are presenting. And at each break there is a new home made treat,  along with fresh coffee, teas, and cold drinks. We need to feed the mind, soul,and body to the max.


It is wall to wall learning, total immersion in a creative world like none other. And each mealtime fresh, hot, wholesome, home cooked meals await out in the shop. During mealtime we discuss our businesses, family and other important subjects, getting to know each other and the things we care about.


The shop time is also packed with information. We explore the specialized materials, tools and methods we use daily. Better yet it is done hands-on, with some demonstrations and lots of try it yourself time.


We look at every aspect of our craft, from cutting, prepping, gluing, priming, painting and glazing. Every question is answered as best we can within our experience.


Each student is given a number of pre-routed sample pieces to work on. Some are done step-by-step and others are a here's the problem, come up with a solution kind of fashion. All materials and tools are provided.


There are samples done in all stages for reference. And contrary to what is imagined, it is all pretty easy when broken down into small stages.


Rebecca, with more than 15 years of experience is out painting instructor. She describes each step, explains the whys and why-nots, answers questions and demonstrates each step of the process.


Then it is time for everyone to get their hands dirty by actually doing it themselves.

I'll show the results in the next post...

-dan

What's in a Sign Magic Workshop? Part one

I often get asked what we teach at one of our Sign Magic Workshops. In short it is very hard to describe... but let me give it a try. The pictures will help a lot I'm sure.

The purpose of the Sign Magic Workshops is to share not only our routing 'secrets' but also the many other tools and methods we use to finish our signs. We seek to teach as much of the things I have learned and discovered in more than 40 years in this business. The hard part is to do all that in three days.

We generally have a guest instructor from EnRoute come and give us a hand with the technical stuff. This time it was none other than Jeff Hartman, one of the authors of the program. Jeff knows more about EnRoute than almost anybody and is a great teacher too! Jeff also is available in any non-classroom time for one on one instruction, making sure everyone gets their questions answered. In this picture he is showing Mark some of the intricacies of of EnRoute. Mark is a power user of the program and brought some pretty tough questions to the workshop. Jeff is working on the solutions.


Through each day of the workshop Jeff and I gave a series of lectures showing various aspects of sign creation from design through the creation of files. My jog was to inspire and challenge folks, while Jeff took it on himself to provide the answers.


A good portion of the workshop time is done out in the shop in a hands-on fashion. One of the topics is on the basics of welding, plasma cutting and the creation of structural frameworks with metal. For those who haven't ever tried welding or plasma cutting we encourage to try it to prove it is not such a scary thing. 

As outlined in this blog we often use a variety of material on our projects. Sculpted concrete over a welded steel frame is one of those methods. So on Thursday evening we add mesh to a framework and then put on some fiber-glass-reinforced concrete. In this shot I am describing the process while a couple of students do the task behind me.


In this shot Roger is completing the last of the tie wires to firmly fashion the expanded lath to the frame we had previously welded.


We discuss the various formulas of concrete that can be mixed, where they might be used and then it is time to get our hands dirty by actually doing the task. As always it looks easy but takes practice.


The concrete covered stump was set aside while we did other things. We had a lot to cover over the next three long days. But when it was ready everyone gathered around to give the next phase of the project a try... and that was carving the concrete. The rough bark textures, wood rings and knot holes were all painstakingly carved in. These folks would never look at a theme park in the way they had previously. And all were thinking of ways to incorporate this marvelous technique into future projects.


Later in the workshop a base coat of paint was applied as well as a series of glaze coats to make the stump look very natural. The purpose of the exercise was to show how even with the seemingly most complicated things, by breaking it down into simple small steps they could actually do the project.


Most of this project happened Thursday night. The workshop didn't officially begin until Friday morning. Stay tuned for more...

-dan