WELCOME!


It is hard to believe that it was almost ten years ago I witnessed a CNC router in action for the very first time. I was fascinated with what I saw and simply had to have one! Although I had been in the creative end of the three dimensional sign business for most of my life I didn't really know what I would do with one - but I just knew it could do fantastic stuff.

Through extensive research and LOTS of hands-on practice I quickly found out that my MultiCam router was capable of just about anything imaginable.This journal will chronicle that journey to date and continue each week with two or three entries as I continue to explore just what is possible with this wonderful tool... -dan

Friday, August 3, 2012

More trim

There are many files and hundreds (perhaps thousands) of pieces to route for the new house. We are concentrating on the outside trim these day and keeping the MultiCam running day and night. The last few days we've been working on the round window trims. The theme is hearts as an insert in the heavy woodgrain. The hearts will be vertical, no matter what the angle of the trim. This means a lot of the pieces have to be custom designed and cut to fit. The parts were designed entirely in EnRoute. The hundreds of hearts were each randomly placed by hand.


I first selected the backgrounds and created a flat relief that was 0.5" tall. The hearts were then selected individually in three passes making sure the ones selected did not overlap. The three passes were made into flat relief 0.8", 0.7" and 0.6" respectively. After each pass selecting the hearts and creating the reliefs I merged them to the background relief and then deleted them to minimize confusion. In retrospect I could have created the hearts on different layers.


The reliefs that contained the hearts were done on slightly oversize reliefs which would be merged (highest) to the actual heart inserts. This allowed me to create slightly different shaped panels that were custom fit to the front and back windows.


I then selected the larger panels and created a relief that was 0.7" tall.


The curved trim pieces were 5-7 feet long and were to be heavy woodgrain. I imported the sandblasted woodgrain from the TEXTURE MAGIC collection. This was enlarged to fit the curved piece inside a section of grain I liked and then applied at 0.2"


Now it was time to merge (REPLACE) the fancy insert. I could also have used the merge lowest command but there was a chance some of the wood grain might have showed through the higher points.


 Once I loved the original heart inserts out of the way the pieces were ready to be too pathed and sent off to the MultiCam. They will be routed from one inch thick 30 lb Precision Board.


 Some of the pieces are still on the MultiCam but the ones up on the house are looking VERY cool!


Stay tuned for more...

-dan

Sunday, July 29, 2012

2D fun

Now that we use EnRoute and our MultiCam router I couldn't imagine building a house like ours without these marvelous tools. We've designed and cut hundreds of pieces already for the project and will be adding a while bunch more before we are done.

The files we created and cut today were simple 2D shapes that will be combined to form something far more complex.

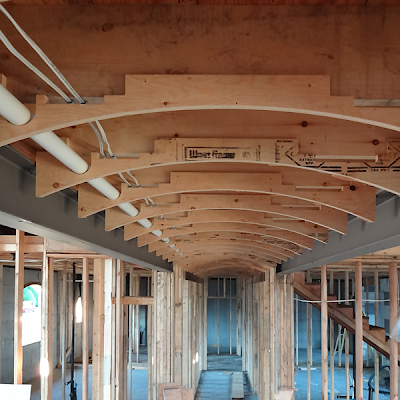
Today's task was to design and cut the arched ceiling supports of the long hallway through the center of the house. The arch supports had to accommodate the wiring (we weren't allowed to drill into the trusses) and the vacuum pipes.

I measured things up and then sat down at my desk to do some designing. I first designed the arched section and then added on all the bits and pieces.


I combined the two outside and center tabs with the arch. These would be used to screw into the ceiling joists.


Then I used he jigsaw tool to remove the cutouts that would hold the vacuum tubes and the wiring.


The resulting pieces were copied and stacked in readiness for cutting. I used a 3/8" cutter to do the cuts in the 3/4" plywood.

It took me a lot longer to screw the many pieces into position than it did to design and cut them.


Next up is the more complex entry way. Stay tuned...

-dan

WORKSHOP dates set

We've set the dates for the next Sign MAGIC Workshop in spring. I've been getting lots of enquiries and with so many folks interested in booking already we decided to firm things up well in advance.

The Sign Magic Workshop will be held Friday, Saturday and Sunday April 19, 20, 21, 2013. As always things will get rolling late afternoon Thursday for those already here.

This workshop deals with all aspects of dimensional sign making, including design, fabrication, finishing, marketing and a whole lot more.  Our guest teacher will be Jeff Hartman, one of the creators of EnRoute Software.

More information is available at Sign MAGIC Workshop


The Sculpture MAGIC Workshop will be held a week later  April 26, 27, 28, 2013

This workshop is all about sculpture. It is a hands-on deal with the students welding, creating armatures, and sculpting using fiberglass reinforced concrete and sculpting epoxy.

More information about this workshop is available at Sculpture MAGIC Workshop


Saturday, July 28, 2012

Vertical house trim

The carpenters are now finished the soffits of the new house, meaning we can start in on our work in a big way. The backing for the trim pieces was first put in place and then the fiberglass reinforced concrete was troweled on. Rock work was sculpted into the bottom. Vertical and horizontal trim will now be installed over that. These pieces will all be routed from 30 lb Precision Board.

The trim will be woodgrain and will also feature an inner panel of layered hearts. The first step was to draw out the panel at the correct size. The insert panels were created separately, first as flat reliefs. I had created the layered heart panels separately as oversized pieces. These were duplicated and then placed over the flat panel inserts and merged highest with them.


 The trim piece was made into a flat relief at 0.7" thick for a start.


I stretched out the sandblasted woodgrain bitmap from the TEXTURE MAGIC collection and then applied it with a value of 0.2". This brought the total thickness of the relief to 0.9" making it easily fit inside the 1" thick Precision Board.


I then rendered it to check it out.


The heart panels were then merged to the base relief using the REPLACE command. I also created a 1" tall square relief in the middle that was also merged to the base relief. We will glue a decorative block in this spot.


I needed three of these pieces so I duplicated the original piece and set them up for routing.  I used a 3/8" ball nose bit to rough them out followed by a pass with a 1/8" ball nose bit and an 80% overlap. Finally, I used a 3/8" cutter to do an offset cut around the piece.


And here's one of the pieces installed on the house.


Now that the test pieces passed muster it is time to put them into full production for all around the house. Stay tuned for more...

-dan

Saturday, July 21, 2012

Richard's plumbing

Our in floor heating contractor decided he too wanted a sign our front of our house. He handed me his business card and said I could start with that idea but had full license to change what I wanted to make it look good as a sign. He would adjust the business card and truck lettering to follow my design. His original design had elements that worked and were worth keeping but the colors were in the wrong order and simply did not read well. Red lettering on a dark blue background is never a good idea. Like the elements of the business card we would simply rearrange the colors. In this fashion the logo would be evolutionary instead of revolutionary. 

I did up the lettering in Illustrator. The RPH in the oval I traced by hand in PhotoShop.


Once I had imported the vectors into EnRoute I first created an apostrophe that was a little closer to his original logo. Then I added the outline around the oval. This was them merged with the rectangular outline of the sign. Everything was slid into place and centered.


Since the sign would be part of a growing set out by our sidewalk I decided to use a similar background to many of the others, The SPLOTCHES bitmap from the TEXTURE MAGIC collection did the trick. It was done with a value of 0.2" of height.


The rectangle was added to the original relief, meaning it too had the same texture as the background


The primary copy was done as separate bevelled reliefs, then positioned vertically and merged highest.


The oval was done in the same fashion using the dome tool. It too was merged highest with the base relief.


Then I added the lettering to the dome by modifying the relief with the letter vectors.


This sign like the others was done in three layers The center layer was routed to create a space for the 1" square tubing frame. I first created the separate elements of the frame design.

 These were merged and then I used the jigsaw tool to create the outlines of the pieces I would need.

 The middle and back pieces were routed from 1" thick Precision Board.


The sign measures just under four feet wide and about two feet tall.


Now it is on to paint!

-dan

Fox and Hounds install

The morning dawned bright and clear- perfect for a delivery. I checked the straps on the load, made sure the lights were working on the trailer and we were off!
We pulled into the parking lot just as John backed into place with the crane. Harold's crew were busy putting their needed tools into the attic. As John leveled his truck and set his outriggers Sarah and I untied the load and set up the ladders. Then it was time to hook up the chain at last. Clearance was tight as the crane head needed to fit under the eaves of the gable. We went without a hook, instead tying the sign to the end of the boom. John, ever the professional was smooth as silk as he guided the sign into position. Sarah was on the guide rope, Benji was on the ladder talking to the guys inside who would screw the fasterers into the sign from the attic. I was John's eyes inside the courtyard, guilding him on the truck controls.


It took a little finesse and pushing to get the sign into place and a few tries to grab it from behind. In the end we were forced to do four bolts through the face of the sign to get it to tighten securely to the wall face as the was was not perfectly flat. I patched and painted the holes while the guys fastened the rest of the fasteners from behind - as per the engineer's instructions. We used a few extra bolts to be sure.
Then it was time to lift the decorative chimney into place. It would fancy up an old kitchen vent that was no longer in service.

Colin and Benji fastened the chimney in place while Sarah and  I headed into the pub to do a little other work on a handrail.


The busy crew had everything tidied up before lunch and we headed back to the house to resume work there. It had been a productive morning that went smoothly - a good thing on install days!

As quick as that this phase of the Fox and Hounds Pub project was at last complete.

-dan

Monday, July 16, 2012

Fox sign ready for transport

After waiting almost twelve weeks for a permit to install the Fox and Hounds Pub sign it is at last time to do the install. Todays task was to first build a giant easel on the flat bed trailer. We used welded steel for maximum strength.


I used my neighbor's trusty little forklift to ease it onto the cradle.


While Sarah painted the areas previously covered (and unfinished) I cinched it to the trailer good and tight.


It will sit in the yard one more night before it's journey home.


 I'll post some pictures tomorrow of the lift in progress as well as some shots of the sign in it's new home.

-dan