WELCOME!


It is hard to believe that it was almost ten years ago I witnessed a CNC router in action for the very first time. I was fascinated with what I saw and simply had to have one! Although I had been in the creative end of the three dimensional sign business for most of my life I didn't really know what I would do with one - but I just knew it could do fantastic stuff.

Through extensive research and LOTS of hands-on practice I quickly found out that my MultiCam router was capable of just about anything imaginable.This journal will chronicle that journey to date and continue each week with two or three entries as I continue to explore just what is possible with this wonderful tool... -dan

Friday, September 7, 2012

Lucky Jim Gold Mine inspiration

The house is a fun project and we've used EnRoute, Precision Board and our MultiCam plenty but lately I've been itching for something a little more creative. With the house we typically don't need one copy of anything but instead keep the router busy making fifty copies of what we need. That is a little too much like production work and that doesn't totally scratch my creative itch after a while. Things have slowed down enough for me to start thinking about some new samples for the display wall.

I've long wanted to do an imaginative piece that incorporated LED lights and even had some ideas in mind. One of those ideas was inspired more than four decades ago when I visited an abandoned gold mine on Quadra Island. It was called Lucky Jim's Gold mine. So that will be my next sample project.

Little about the actual mine I saw long ago will make it into the actual piece with the exception of the name... but it is a cool start. I spent a few minutes online looking for images of mine cars. I found two great photos that gave me the information I needed.


I wanted this display piece to be wider than it is tall. I grabbed my sketch book and started scribbling...   I drew the drawing in two pieces, not concerned about fonts, or even scale at this point.


Then I imported the rough and quick sketches into PhotoShop to tidy things up a tad and then assemble the parts into one image. This is close enough to begin the actual design of the piece using vectors.


Because I'm not sure of the final size of the piece (and it does not matter) I'll build the mine car and figure first and then scale the background sections around that. I started with the vectors of the wheel - all work done using the drawing tools in EnRoute. In the next post I'll show how I created the wheel reliefs. 


Stay tuned...

-dan

Tuesday, September 4, 2012

What happens at a Sign Magic Workshop?


I often get asked what we teach at one of our Sign Magic Workshops. In this short format it is very hard to describe... but let me give it a try. The pictures will help a lot I'm sure. These pictures were taken at a workshop that was held at my studio in Yarrow, British Columbia, Canada.

The purpose of the Sign Magic Workshops is to share not only our routing 'secrets' but also the many other tools and methods we use to finish our signs. We seek to teach as much of the things I have learned and discovered in more than 40 years in this business. The hard part is to do all that in three days.

Everything is provided for the workshop. You don't have to buy any supplies. We'll even provide a sketchbook and pen.

We generally have a guest instructor from EnRoute come and give us a hand with the technical stuff. Generally it is Jeff Hartman, one of the authors of the program or EJ Nordurft, product manager for EnRoute. Jeff and EJ know more about EnRoute than almost anybody and both are great teachers too! These are also available in any non-classroom time for one on one instruction, making sure everyone gets their questions answered. In this picture Jeff is showing Mark some of the intricacies of EnRoute. Mark is a power user of the program and brought some pretty tough questions to the workshop. Jeff is working on the solutions.


Through each day of the workshop we give a series of lectures showing various aspects of sign creation from design through the creation of files. My job was to inspire and challenge folks, while the Enroute person takes it on himself to provide instruction about the creation of routing files.


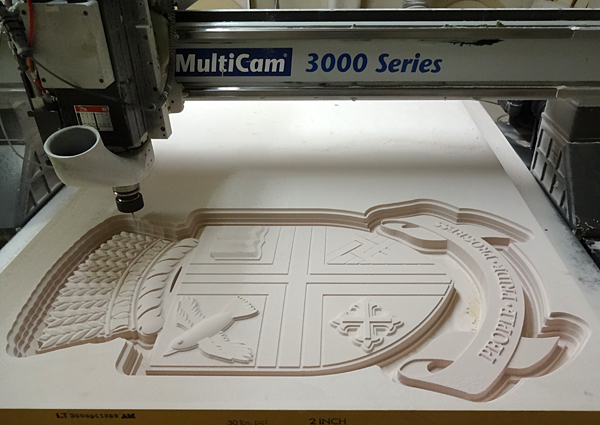
We'll explore how I do design, where I get my inspiration, and how I pull things together to make our unique signs. We also delve into the various aspects of Enroute and routing on a CNC machine. We take frequent breaks to make sure everyone is alert and awake, able to soak in all we are presenting. It is wall to wall learning, total immersion in a creative world like none other.  During breaks we discuss our businesses, family and other important subjects, getting to know each other and the things we care about.


The shop time is also packed with information. We explore the specialized materials, tools and methods we use daily. Better yet it is done hands-on, with some demonstrations and lots of try it yourself time.


We look at every aspect of our craft, from cutting, prepping, gluing, priming, painting and glazing. Every question is answered as best we can within our experience.


Each student is given a number of pre-routed sample pieces to work on. Some are done step-by-step and others are a here's the problem, come up with a solution kind of fashion. All materials and tools are provided.


There are samples done in all stages for reference. And contrary to what is imagined, it is all pretty easy when broken down into small stages.


Then it is time for everyone to get their hands dirty by actually doing it themselves. As the students began the painting we keep a close eye on the projects and answer the many questions to make sure everyone is successful.


Everyone gets to try out a variety of techniques.


The sculpting project follows a theme we have done a number of times... 'B' is for BUG. Everyone got the same challenge. Use a pre-routed leaf with a letter 'B' on it and create a 3D bug to go with it. The results are always as varied as the folks who attended. Every solution was imaginative and GREAT!


When people aren't busy on their bug sculptures they were painting their dimensional letters and practicing their glazing techniques.


Some students take advantage of the one-on-one time with Jeff or EJ for a private tutorial in EnRoute.


Through every minute people were busy taking endless pictures, looking at the many examples in the shop and studio. Some took the time to browse my library and found some great treasures.

So much more happens through those three magic days, it was not possible to capture it all nor write of it here. It was in a word...  MAGIC!

If you want more information drop me an email or give me a buzz. I'll be happy to answer your questions.

-dan

SIgn Magic Workshop at MultiCam East information


The registration information for the Sign Magic Workshop is now posted by the folks at MultiCam East.  I'm personally very excited about this first workshop on the eastern USA. It should be a fun and informative time. We'll be working on all kinds of 3D routing techniques and also talking about marketing, designing, and a whole lot more. We'll also be doing plenty of hands-on work, learning how we do our painting and glazing of the work we do. A little sculpting is also on the menu and it is my bet that each participant will go away knowing they can do a whole lot more than they thought they could going in.

SIGN MAGIC WORKSHOP INFORMATION

The Sign Magic Workshop is to be held in at the MultiCam East Technical Center, Hackensack, New Jersey on Tuesday, Wednesday and Thursday, November 6, 7 and 8, 2012.  Seating is limited.

I hope to see you there!

-dan

Wednesday, August 29, 2012

Painting the routed trim on the house

Our university students are with us a few more days before they head back to their studies. Next week I'll be back in my shop once more and things will get back to normal after a busy summer on the house.

We've been busy starting to install the routed trim and then painting it up in it's final colors. The large round window was the first to be completed. The routed Precision Board trim received three coats of base color and then four layers of ever darker glazes.


The outside of the house is coming together quickly. We've routed hundreds of feet of trim that is yet to go up. That will happen as soon as the windows go in.


The trim for the inside of the house is now in the planning stages. I'll be posting screen captures, pictures and how-to's of that as we begin that work in the next weeks. Stay tuned...

-dan

Thursday, August 23, 2012

City crest on the router

Today I finally had the chance to put a piece of 2" Precision Board onto the MultiCam and route the city crest file I built last week. The file was routed in two passes - one with a 3/8 ball nose bit and a second pass with a tapered flute 1/8" ball nose bit. The piece was about 42" tall in total and 24" wide.

The file ran while I was out doing other projects. It looked pretty good and will need just a little bit of handwork to finish things off.


-dan

NEW JERSEY Sign MAGIC Workshop

We get lots of enquiries regarding workshops away from our studio - especially from the folks on the eastern seaboard. They would rather I travel to them than they come all the way out west. Occasionally I do just that and thanks to the folks at MultiCam East just such an opportunity has again presented itself.


A Sign Magic Workshop is to be held in at the MultiCam East Technical Center, Hackensack, New Jersey on Tuesday, Wednesday and Thursday, November 6, 7 and 8, 2012.  Seating is limited.


Multicam East
61 Voorhis Lane
Hackensack, NJ 07601


For information contact Jeff Goldberg
jeff@multicameast.com

Jeffrey Goldberg
707 N. Howard Street
Baltimore, MD 21201
410-728-6000
410-728-4822  (fax)

The Sign Magic Workshop is also being presented in part by EnRoute Software, Coastal Enterprises (Precision Board) and Abracadabra Sculpting Epoxy.


Tuesday, August 14, 2012

Last steps to build the crest file.

The last two elements were the most complicated or at least appeared so. But as always it is simply a matter of breaking things down into little steps and then putting everything tougher. The bird was first. The wings were be done in two layers, one slightly thicker than the other and then merged together. the tail is done as a flat relief. These were then merged highest to the border relief that circled the bird.


The bird body is done as a domed relief. The beak was done as a bevel relief. Both were merged highest to the outline relief.


The bird was then merged to the shield background by adding it to the base relief.


The last step was to add the eye by modifying the shield relief.


The book was then next step. It took some head scratching as there were a few things that made it tricky... the first being the 45 degree edges on three sides. But after some thinking I figured it out. I created a book shaped vector - shaped like a flying bird. I also made two vertical lines which would be the rails I would use to create the mesh using the sweep two rails function. But first i created a relief using the bevel tool.


The book shape would be created as a mesh using the sweep two rails function.


Both the relief and mesh were selected which allowed me to go to the next step using the merge lowest function.


 I then created a flat relief that was both the book cover and would also be used to define the top edge of the relief when it was merged highest.


The completed book relief was then merged to the crest relief by ADDING it to the base relief.


All those little steps combined have brought us a completed crest relief - easy as that!  :)


I'll send a screen capture to m client for proofing before I send it off to the MultiCam to be routed fron 2" thick Precision Board. I'll post a picture when I'm done.

-dan