WELCOME!


It is hard to believe that it was almost ten years ago I witnessed a CNC router in action for the very first time. I was fascinated with what I saw and simply had to have one! Although I had been in the creative end of the three dimensional sign business for most of my life I didn't really know what I would do with one - but I just knew it could do fantastic stuff.

Through extensive research and LOTS of hands-on practice I quickly found out that my MultiCam router was capable of just about anything imaginable.This journal will chronicle that journey to date and continue each week with two or three entries as I continue to explore just what is possible with this wonderful tool... -dan

Friday, January 3, 2014

Swingin'

I built the file and routed the Wave Swinger sign about a month ago but business with other projects has kept it waiting - until today. The sign was originally designed to be viewed from the front. But things change so we had to get a little creative to make it hang as a blade sign instead.


We started with a welded armature, a few simple 1/4" thick steel rods. These were carefully bent and positioned, then welded up. I had the basic shape which defined the shape and pose of the figure in a couple of minutes.


Then I used Abracadabra Sculpting epoxy to hand form the shape of the figure. I layered sculpting epoxy and crumpled tinfoil to build up the bulk of the figure. 


Once I had the basic shape I wanted I then started in on the detail. This is the fastest layer and after four hours in total working on the figure the basic shape was done and the top half of the figure was fully detailed.


By noon on Monday this little guy should be pretty much complete and ready for paint. Stay tuned for the next report on the progress...

-dan

Wednesday, January 1, 2014

Routing a rock

A fellow recently set me a picture and asked me to help him out to create a routing file that looked like a specific type of rock. He sent me a bitmap file that was pretty grainy and in fact looked a bit like he had salt and peppered it. These are things that affect the results I would get but I decided to give the file a whirl to see what I would get. This is the original file I was sent.


I opened the file in Photoshop and turned it into gray scale.


I then bumped up the contrast a little until it looked like this.


Then I put a new layer on the rock photo and drew masks and then used a big blurry brush to create the edges of the rock. As I worked I kept in mind that black would do nothing and white would be raised up when a applied the bitmap to a relief,


Then it was time to build a relief in EnRoute. I first created a flat relief.


Then I imported the rock bitmap, selected the relief and the bitmap, opened the apply bitmap command and typed in a value of 0.25". The result was very grainy and not at all what I wanted.


The solution was simple. I took the bitmap back into PhotoShop and added a blur. This would get rid of the graininess. Then I applied it to the flat relief once more. The results were much more to my liking.


Then I imported the bitmap I had created using the large fuzzy brushes. I applied this as a second layer.


This created the sharp layered edges in the rock similar to the photograph I had first been given. By creating and applying more layers I could have achieved a much more dramatic effect with more subtleties.


Then I imported a bitmap from my collection called splotches. This too was applied to the relief.


Here's the result.


-dan

Sunday, December 29, 2013

Wagon wheel sign glued

The wagon wheel sign pieces have gathered dust for almost a month as we were so busy with other things. Today the shop was quiet and I finally got the chance to do some assembling. First I had to create a file and cut the center layer to accommodate the steel frame. This frame would be welded up segments of 5/8" steel rod and a piece of horizontal 1.5" square tubing. The slots for the 5/8" tubing would be cut into the material. The square tubing slot was to be cut as part of the offset outline milling.


Here's the shot of the tool paths ready to be sent to the MultiCam.


Once I had cut the piece from 30 lb Precision Board it was ready to assemble with the rest. I cut and laid the steel into the slots and then tacked it in place using the actual wheel as a jig. The pieces were then removed and welded solid.


I then used PB Bond 240 glue, a one part adhesive made by Coastal Enterprises to fasten the components. I also used plenty of screws to clamp things together and keep them in line. These screws will stay in place.

 
The project had six layers in all which makes for a pretty beefy sign!


Once the glue has set up I'll start in on the hand work and then we'll sculpt the prairie dog that will be perched on top. Stay tuned for more progress...

-dan

Monday, December 23, 2013

Painting faux granite or cement

For the big 3D globe logo the client asked to it to look like concrete or granite. There are plenty of ways to do this but the easiest is with paint. The fellow who is making the globe will most likely have the globe hard coated with a bed liner type spray. This will leave a slightly bumpy texture. The piece can then be painted a solid or blended solid color with as many coats as necessary. In our shop we would most likely use a top quality 100% acrylic house paint and brush it on too. For the rocks on a recent project we painted it just this way. Then came the quick magic step.

To get the different colored dots or speckles we use an undercoat gun with only twenty-five pounds of pressure. Higher pressure will give you smaller dots or speckles. Undercoat guns are very inexpensive and available at any auto parts store. They come in a variety of shapes and sizes, some with special pots. We buy the cheapest ones with just a pipe, trigger and handle. They are easy to use and easy to clean.


The dark color (brown in this case) was done first. The key is to take it easy and do multiple passes. It is far too easy to put on too many and then you would have to start over. I like to spray from at least there feet away to get an even pattern. Have a helper keep the hose you are dragging around from rubbing across the finished work.


 I stick the intake pipe into my bucket and spray away.... rinse after the first color and then go on to the next color. Masking takes a whole lot longer than the spraying by far.


Once the spraying of the dots is finished you have to wait for the paint to dry before taking off the masking. 


Then we brush on the grout color between the rocks... and as quick as that you are done.

 -dan

Friday, December 20, 2013

Double sign tree complete

The double sign tree took a while to do because the sculpting and painting were fit around the many other projects underway in the shop. Jenessa did the sculpting and painting on the balloon sign and did a great job too! Amazingly, this was only the second sculpture she has done.


Hailey called first dibs on painting the carousel horse. Every color got three coats - all hand painted. That's a lot of skilled cutting! The horse turned out great!


Once the signs and tree were all painted up they looked pretty cool!


The piece will go outside next week, ready for delivery and installation right after New Years. I can hardly wait to see it on site!

-dan

Friday, December 13, 2013

Slicing and dicing (Creating a 3D logo PART TWO)

With the relief creed and sliced it was time to hollow out each section. It's not hard but it does have to be done in a particular order. First I created an oval inside each section, making sure the border width took into account the slope of the side of the piece. I did this by selecting the new oval vector and then hitting render what I could see the slopes as they related to the size of the oval. I then selected all of the oval vectors and made them into zero height reliefs. They were then dropped to the bottom of the plate to match the sliced sections.


I then zoomed in on the first relief and opened the MERGE function. We would MERGE LOWEST for this operation.  I followed the command prompts selecting the base relief first. then hit the blue arrow...


Then select the relief you wish to merge... the center oval. Hit the green check mark...  This drops the center portion to zero height.


Then I used the slice tool to cut away the zero height portion of the relief.


The end result is the hollow slice of the big logo.

I repeated these steps on each of the slices except for the top there which were too small to save any material by making them hollow.


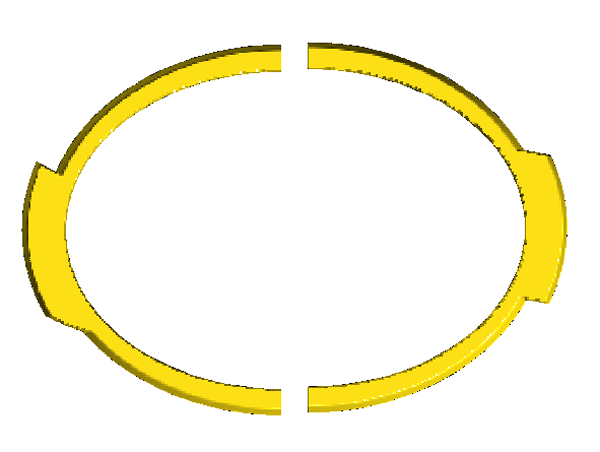
Then it was time to cut the reliefs to make them more efficient to nest. I first drew a vector rectangle around the larges one. I drew a vertical line through it and centered it. I moved the relief out of the way.


I then used the jigsaw tool on each half to form new vectors. I deleted the original rectangle and vertical line.


I then made these two rectangles into zero height reliefs. I duplicated them as many times as I needed to slice all of the oval reliefs


Then I positioned the oval relief inside and opened the MERGE command. This time I would use MERGE HIGHEST.


Then I used the slice command to take away the zero height part.


These operations were duplicated for each relief I wanted sliced. The slices are now ready to be nested and then tool path and send off to the router. Keep in mind that this makes HALF of the 3D logo.


I won't be routing this piece as it was created only to show here but I look forward to seeing what my friend in California does as he recreates these steps for his project there.

-dan