WELCOME!


It is hard to believe that it was almost ten years ago I witnessed a CNC router in action for the very first time. I was fascinated with what I saw and simply had to have one! Although I had been in the creative end of the three dimensional sign business for most of my life I didn't really know what I would do with one - but I just knew it could do fantastic stuff.

Through extensive research and LOTS of hands-on practice I quickly found out that my MultiCam router was capable of just about anything imaginable.This journal will chronicle that journey to date and continue each week with two or three entries as I continue to explore just what is possible with this wonderful tool... -dan

Sunday, October 31, 2010

Last pieces off the router.

I never tire of watching our CNC router magically turn blank Precision Board into a work of art. Whenever my dad visits he goes straight to the router room and watches it too. He's never owned a computer and simply can't comprehend how the machine knows where to go. It's just magic!


The CNC was busy today turning out the last of the pieces for the excavator sign. As soon as the router moved on to the last piece I pulled the first sign face off the table and fastened it to the base. It looked pretty cool - just as I imagined it would. The hydraulic cylinders and hoses have yet to be fashioned and the pile of gravel will yet get some detail but the sign is coming along nicely. It's hand work from here on in.


I'll post more pictures of our progress when I get back to the project after I return from the EnRoute workshop in Denver.

-dan

Assembling the excavator sign...

The files were routed in three stages. First I cut the reliefs using a 3/8" ball nose bit to rough out the shapes. A final pass was done with a 1/8" bit and an 80% overlap. Then I did a second cut file using a 3/8" milling tool to cut the rest of the pieces out.


The pile of pieces resembled a 3D jigsaw puzzle. It wouldn't take long to sort it out however.


First I welded up some 3" square tubing which would form the stand. the top of the 'T' would be glued into the sign making it plenty strong! I used Coastal Enterprises PB Bond-240 glue to do the task. I also used some coarse threaded screws instead of clamps to hold everything secure while things cured.


Then I started in on the pieces of the excavator. The tracks were first, then the body assembly. I hollowed out both sides of the arms to fit in a piece of 3/8" steel which I had bent to shape. Once I had two sides of the arms glued I added the other layers. It went together pretty quick. 


As usual I couldn't resist mocking it up to see how it would look...


This morning everything was good and dry. I cleaned up the glue lines with my die grinder and started in on the assembly. The sides of the 'gravel pile' were whacked to shape with the die grinder. I wanted the excavator to really sit precariously on the top. To give it a cartoon flare I tipped the tracks outward at a jaunty angle, then drilled then and inserted some 1/4" steel rods. It was all glued together with some quick drying epoxy.


I cut a piece of 1" thick Precision Board on the bandsaw, then used my big belt sander to finalize the angle cuts I needed. It took me two tries to get it right. Then I glued it up. When the epoxy had set I broke out my big 5/8" drill and drilled a hole through the track frame and into the sign base.  A nine inch long by 5/8" steel rod was glued in and then a similar hole was drilled into the tractor body. I'll hide the rod underneath with some small rocks as we start the sculpture. The long steel rod will make the sign much stronger than it would have been without it.   High Density Urethane does not have a lot of structural strength, but it is easy to cure that woe.


Then the body was plopped on top. I won't glue it until the painting is done.


The sign faces are still being routed on the MultiCam and looking pretty good. I'll glue them on as soon as they are done. Then its on to the final detailing, primer and paint. It's going to be a wonderful addition to the shop display.


The project has gone pretty quickly so far, with about three hours of design and labor. The routing time will total about six hours once the sign faces are done. Detailing and painting will add another day of labor. 

The end result will be a sign I can easily market for some pretty good dollars, with the price based on the value of the sign - not time and materials. With this type of sign my customers won't be able to go down the block to get a better price for there is only one place that makes signs like this.

I'll be posting one more set of pictures in this series before I head down to Denver for the workshop. I don't think I'll have time to paint the sign before I leave...

-dan

Saturday, October 30, 2010

Creating 'complex' reliefs in EnRoute

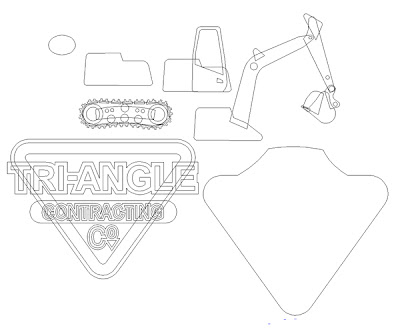
Even what, at first glance, seems like a complex sign element is easily broken down into simple shapes that can easily be routed and then glued together to form much more than simple pieces. Before I started building the reliefs I had done a simple sketch of the top view. It showed how the excavator would be created as vertical slices or layers.


The vector file I created last time was then separated into elements which will form each layer when I route it from 1" thick 30 lb Precision Board. The sign faces with the lettering would be routed from 1.5" thick HDU.
First up was the tracks. The elements were all created separately, with the background being 1/4" thick. The inside mechanical bits were done from 1/2" - 3/4" thick. The cleats of the tracks were 1" thick reliefs. Then I merged them together on a zero thickness background. I had done a tank some time ago in a similar fashion and discovered the tapered 1/8" bit created a wonderful effect when I routed the file. I'm hoping for the same effect this time around - only on purpose. Then I copied the file and flipped it for the back side. Then I created a rectangular block and merged it to the back side of the track. This will be used to glue things together after it is routed.


The cab was done as two pieces which will be glued up back to back. Only the windows and door handle were recessed. The third piece in this section was for the motor cover on the opposite side of the cab.

The boom proved to be a relatively simple piece to execute. Simple reliefs of various depths were created in EnRoute and then merged onto a zero height relief. The file was then copied and flipped for the back side of the boom. The pieces will be glued up with a piece of steel laminated into the middle. The bucket will be made up of four layers of 1" thick Precision Board.


Then it was on to the sign. One again I guilt each element as a separate piece adding some texture to the background of the sign using one of my bitmaps called 'splotches'. The lettering was beveled and raised from the outlines which surround them. These outlines were also raised slightly from the background to make them easier to paint. Once I had everything at the right height I merged everything together, then created a second copy for the back side of the sign.


For the middle of the sign I will laminate five 1" thick pieces of Precision Board. The center three laminations needed to be hollowed out to accommodate the welded steel frame which will hold up the sign. Using the precision input center I created the rectangles to form a 3" wide 'T' shaped hole in the boards. This was centered and then using the jigsaw tool I pulled out the vector I would use to cut the shapes.


With all the files done is was time to nest the pieces and then tool path them for the router.The files that appear yellow are reliefs which will be carved using a 3/8" ball nose bit to rough them and a 1/8" bit to do the final pass. The rest of the files are simple offset cuts, done as a separate pass.


The sign faces were nested in a separate file and tool-pathed for 1.5" stock. I'll route them tomorrow. I'll be starting to piece together the excavator and then glue it up then too. 
Stay tuned...

-dan

Friday, October 29, 2010

Vector step by step

A sign like this would be very intimidating to most sign shops. In fact I don't know too many who would even tackle this type of three dimensional project. The truth is that if we think about it and carefully break it down into manageable steps it really isn't all that hard to do. Although challenging I find these projects very satisfying. Since few others out there do this type of work I can charge what it's worth without any problem. By using modern software, tools and materials they are easier than ever to create. I find no shortage of clients who want these types of signs.

The quick sketch I did at the trade show would be plenty to sell the concept of the sign to most of my customers. It conveys the feeling of the sign but still leaves plenty of room for interpretation when I get down to the business of creating the sign.  If at all possible this is as far as I like to go before money changes hands. Unless we have a history that's good the sketch stays in my book and the customer gets no copies until I see green.

Sometimes more information is needed. At this stage I would take some pictures of the customer's excavator or do some searching on the web. Because I was stuck at the trade show when I did the next step I just winged the color version using my digital drawing pad. The end result was a cute excavator but a little research when I got home proved I was lacking a few details.

I could have built any of a thousand machines but since this sign was for my own display collection I did a quick search to find results that showed pictures of both sides of the same machine. These pictures would provide all the reference material I needed.


The vector tools in EnRoute are quick and easy to use. Because the vectors can be easily edited I drew the shapes quickly, just blocking things out. Scale wasn't critical. While there is still lots missing it was starting to look like a convincing excavator already.

Then I edited and adjusted each piece of the rough vector sketch, using my photos as reference. Since the final sign would feature a cartoonized tractor I could exaggerate certain pieces as needed, The hydraulic cylinders and hoses will be added when I assemble the routed pieces.


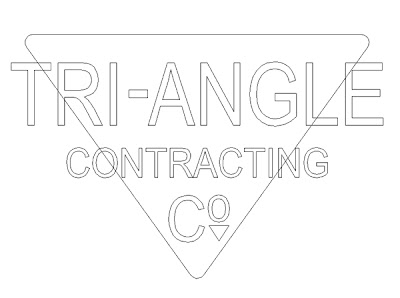
The triangle was constructed by using the jigsaw tool to create a shape inside three intersecting lines. I used the chamfer tool to round the corners of the triangle.


I added the text next. I used a copy of the triangle (re-sized) under the 'O' in Co. 
On looking at the letter vectors I decided that the 'TRI-ANGLE' needed to be bold. Once I was happy with the spacing of the lettering I added outlines around the triangle and lettering using the outline tool. A rectangle was drawn around 'CONTRACTING' and the ends stretched out using the vector adjustment tool. Everything was centered using that tool.

Then I pulled the sign face vectors over to the tractor vectors and resized them to suit. In about half an hour or so I had all the vectors I would need to create the routing files for this sign. The tractor is backwards again but I will flip it around when we start gluing up the project - or perhaps not depending how I feel at the time.


Next time I'll start creating the reliefs, adding and subtracting to get the shapes I need. It shouldn't take much longer than it did to create the vectors.

Stay tuned...

-dan

Monday, October 25, 2010

Another step by step

At the beginning of this year I challenged all my sign making friends, around the world to create one project this year that would take them in the direction they wanted to go in their businesses. The project would be something for their showroom, something fun. It could be of any scale, of any material, but it had to push their limits and build their skills. 

For myself I upped the ante singificantly. My challenge was to do one piece each month. We are now more than half way through the tenth month of the year. I started with the sextant piece for my library. Other projects included the submarine, plane, streetcar, hot rod, fish boat, large wrench, the rooster, and bear signs. Out in the shop the newest personal project, the flying saucer sign is in progress. Each piece is done a bit at a time as I find minutes through each day. My CHALLENGE 2010 projects have already appeared in magazines, won awards, and served as lessons in workshops. They have been proudly displayed in my office, showroom and at trade shows. They have brought us more imaginative work. The projects have been a great way to learn new skills and stretch our selves creatively. The effort has been well worth it by far.

Over the weekend we displayed our work in a local trade show. As I stood there my mind of course started to wander. I thought of an upcoming EnRoute workshop to take place in Denver November 4,6 - only ten days away. I am tasked with leading a couple of the lessons to show people the creative possibilities within the program. As I thought about it I decided I would design and build a project I could show there and also here on the blog. It would kill two birds with one stone and I'd also be able to stay ahead of the game in my personal challenge. 

In the next hour I talked about a sign with a fellow who owned a contracting business. He wanted to know if we could do a sign with an excavator on it. He didn't make a final decision on his sign but I decided such a piece would be my next sample I would create - largely using EnRoute and my MultiCam of course. When he was gone I broke out my sketchbook and started scribbling. The conversation inspired a good base for the sign and I grabbed the idea as a starting point. The excavator perched on top of a pile of dirt provided a pleasing composition. On the way home from the show I saw an excavator and took note that the cab was on the opposite side than I had remembered. When I started drawing the file on my laptop computer the next day at the show I would flip it around.


I took a picture of the rough sketch with my digital camera and then imported the file into Photoshop to do the rendering. While my focus was on people walking by our booth I snuck in a few minutes here and there to whip up a concept for the sign in about an hour or so. I also did three other sign concepts and talked to hundreds of potential customers during that long day.

In the next days I'll document the creation process from start to finish. I'll show how we create this seemingly complex file in EnRoute, then route it from 30 lb Precision Board on the MultiCam, glue it up and paint it. For those who want to go through a step by step process in person I'd advise you to book now for the EnRoute workshop in Denver. I hear there are still seats available. Otherwise...  stay tuned...

-dan


Tuesday, October 19, 2010

What a workshop!

Thursday morning sign folks from all across Canada and the United States started gathering at our shop for three days of intense learning. Officially it didn't start until Friday morning, but this group was intent on learning all they possibly could. They had come a long, long way to do so. Since everyone was already to go we kicked things off right away.

It was our ninth Sign Magic Workshop. Over the last four years, in spring and in fall we proudly host such gatherings. The task is to cram as much sharing of knowledge in three days as we possibly could. Jeff Hartman from Artistic Automation, one of the authors of the EnRoute program was our guest instructor once again. The workshop, as always, consisted of lectures and hands-on learning. 


Friday morning at 8:00 am most were waiting at the door to get into the shop. The rest arrived a few minutes later. As soon as everyone loaded up on coffee and fresh homemade cookies and muffins we were off and running. Over the next days we studied the design and construction of 3D signs - Sawatzky style. We explored the 3D aspects of EnRoute, the creation of files and how to prepare them for the router. 


All the meals were served in the shop. My wife Janis and extended family were busy all weekend preparing and serving up mountains of delicious home cooking. No time would be wasted going to restaurants and no one would go hungry. If we weren't in the classroom we were busy in the shop getting our hands dirty. We welded, cut, bent, sculpted, wired, carved, plastered, painted, glazed and gilded many projects. The theme of this workshop was 'A' is for alien! And no idea was too wild. All hands pitched in on every task.


The knowledge and experience we had gathered over the last 40 years was freely shared. Every aspect of how we design, and build our signs was demonstrated for the attendees. All questions were answered. There was a LOT to cover. Each day we started at 8:00 am and went until 11:00 pm each night. 


We sculpted with concrete and epoxy and carved up plenty of Precision Board - all in the name of learning. By day's end each evening everyone's head was filled to bursting with new ideas and ways of doing things.  

We also formed great friendships as we shared our time together. It was a wonderful time that simply rolled by far too fast.  Thank you to my family and Sarah for making everything flow so smoothly. Out in the shop Rebecca and Donna made sure all the questions were answered. Jeff did a superb job of explaining the workings of EnRoute. Even I learned some new tricks over the weekend.

Thanks to all who travelled so far. Each workshop becomes special by the active participation of the attendees. This one was no different... and the passion to learn was evident through the entire event.

Yesterday I laid low as I caught my breath once again. Tomorrow we begin planning the next Sign Magic Workshop...  March 4-6, 2011.

-dan


Tuesday, October 12, 2010

Almost done!

As we finalize preparations for the upcoming Sign Magic Workshop here at our studio the MultiCam project has been put on hold temporarily. But I did manage to sneak in one last visit to do a little work. The ceiling is now finished at last. The sub sign is hung on the wall and looks like it belongs. With the strong lighting in the center of the room and more subdued lighting around the edges, the LED lights on the submarine really stand out fine. The blue LED lighting we do around the edges of the valence under the large pipes will set things off nicely.

We painted the MultiCam logo in a similar metallic blue as the walls, just to tie everything together. The copper trim over the submarine matches the copper fish reliefs on the walls. the TV surround, the 'door' white board and the double, riveted doors to the room. 


I used EnRoute to create the files and then put the MultiCam to use once more cutting the ornate brackets for the pipes with come down behind the TV. The brackets and rivets were cut from 40 lb Precision Board. One pipe will actually carry the low voltage wires for the LED's which light up the gages around the TV. The rest are purely for decoration. Next time we return to the work site we'll age everything up appropriately with a little paint glazing.


The curved and riveted ceiling look fantastic, well worth the many hours of work it took to accomplish. The cork floor (still very dusty in the photographs here blends into the whole scheme of things marvelously.


We've yet to route, paint and install a base board shoe to cover the edges of the floating cork floor. The laser cut and engraved plexiglass insert for the table is on the way from Texas, done on  MultiCam CNC laser machine. One last finishing touch will be a spectacular but subtle addition. My friend, Shawn, Cherewick of Protowerx  ( www.protowerx.com ) is creating a LED light show for under the boardroom table that will create a shimmering light effect on the plexiglass and also onto the barnacled and rusted pipes below. It will hopefully be the finishing touch to a room like none other out there.

In the meantime we host a workshop in two days... and are looking forward to three days of sharing and learning.

-dan

Monday, October 11, 2010

Rapid texture!

A new feature of EnRoute is Rapid Texture. The premise is simple. By using the profile of a large diameter ball nose or V-groove bit and following a series of vector lines large areas of a surface can be routed in a hurry. Typically, depending on the pattern, a 4' x 8' panel can be done in one - two hours. This represents a huge savings in machine time. The pattern possibilities are endless.

On the MultiCam project I knew exactly where I would use this exciting new tool. My plan was to use four different Rapid Textures in four areas of the building. The entry/reception area would be somewhat formal. I used a 3/4" ball nose bit to create vertical lines in the wainscot panels. But I simply had to add just a teeny bit of wiggle to happy them up just a little. We didn't want to be too formal.


The hall way was treated as a transition area. I wanted to hint at what was coming in the board room but not give it away completely. I used the 3/4" ball nose bit once more and also made the lines wavy this time. The pattern resembled ocean waves as seen from an airplane. The trim was accented with the routed linear gear to keep the 'MultiCam theme' going. The 'M' corner blocks on the windows and doors completed the picture.


For the board room there was nothing held back. The texture was created with a 1.5" V-bit and I made the texture go wild. The patterns resemble a wild sea in a storm. We painted the panels a blue pearl and then applied a dark blue glaze followed by a brown glaze with a touch of black cherry metal flake. The glazes make the texture come alive. Rusted trim and a heavily textures 'M' medallion  complete the theme.


Upstairs the bosses office will sport a Jurassic theme. I wanted the panelling to look like it was hewn from flint. The lines were near vertical but they were tweaked to wiggle both vertically and horizontally. By using a 3/4" ball nose bit I achieved the pattern I wanted.  Once again the 'M' medallion was incorporated into the trim.


We ended up routing about 25 4' x 8' sheets of MDF for the entry, hallway and upper office. In the boardroom I encountered chipping with the V-groove bit and so opted to use 30lb Precision Board instead. The heavy HDU routed clean and crisp and at a very high speed with perfect results. I much preferred the results of the 30 lb Precision Board over the MDF. The HDU did not chip (as did the fiber board). Priming it (with Coastal Enterprises high build primer) also required fewer coats. In my view the superior results and time saved offset the extra cost of materials.

This was my first attempt at using EnRoute's Rapid Texture tool. I was more than pleased with the result. You can bet my brain is buzzing with ideas for future projects...


-dan

Saturday, October 9, 2010

What's in a name?

For each Sign Magic Workshop we design, route and paint up name plates for each guest that attends. Our ninth workshop is scheduled for next week and we're busy with the current batch. There have been about a hundred and twenty-five name plates to date. The hard part is to do a new design for each person. It is a lot like making signs for our customers.

The name plates serve a variety of purposes. They are of course a nice way to welcome our guests to our studio. They are a lasting reminder of a visit here for each participant gets to take them home. Designing the name plates puts each guest firmly in my mind - a great way to remember everyone's name.


The name plates are also a great way to show just what can be done with a router and are a handy teaching aid. Coming up with original designs each time keeps my creative mind exercised and sharp. I would challenge anyone to come up with 10-15 name plates in a hurry - all different and dimensional. Designing the name plates in Enroute certainly hones my skills within the program. The name plates are also a great way for us to experiment with color combinations and painting techniques. Many of the texture bitmaps on my DVD collection were designed for just this purpose as well.

Normally I begin work on the projects for the workshops many weeks in advance. With our large projects on the go and our long hours there things got left a little later than usual. For the last days the MultiCam has been buzzing and I've been busy at the design computer. There's still one or two days of work before we are down to the painting.

The project panels are all designed, routed and ready to go. As always, we will have a few new things this go around, building on our experience in the past. We are counting the days until the next Sign Magic Workshop!

-dan

Thursday, October 7, 2010

Playing with light.

Today was a day for learning. A few days ago I routed the TV surround. I've been itching to do more work on the piece but things were just too busy until today. The first puzzle was the green liquid in the tube beside the TV. I wanted it translucent so I could light it from the bottom but was stumped as to what to use. I mentioned my dilemma to my friend, Shawn Cherewick of Protowerx Design Inc ( www.protowerx.com ) who is working on the very cool lighting for the board room table (more on that soon). He mentioned that his daughter had created a candle using Jell Wax. The wax was clear and formed bubbles when you poured it.  I rushed to our local craft store and purchased the needed supplies.  It took a couple of tries to get the color right. I wanted translucent but not clear. The LED at the bottom of the tube needed to throw light but not be visible through the liquid. In the end I filled the tube, let it harden a little and then poured it out. I then filled the center of the tube with clear wax. The top portion of the tube is a little dark but the light shines the way I wanted near the bottom. I decided it would pass muster.


Then it was on to the TV frame. I hogged out enough space for the Heico LED's in the bottom of the gages and drilled them through to the back. Then I hollowed out a raceway to thread a hidden wire to all the lights, angling them up at a 45 degree angle. I strung the wire through the frame, threading on the Heico LED lights for the lighted tube and the gages. It looked pretty cool when I fired it up for the first time.


I'll let the epoxy harden overnight before the next steps. I'll design and print up the faces of the gages tomorrow and glue them in along with the acrylic lenses. Finally everything will get a coat of paint and aging patina. 

One more thing I have to learn is how to photograph the bright LED's. They look so much better in real life.

-dan