WELCOME!


It is hard to believe that it was almost ten years ago I witnessed a CNC router in action for the very first time. I was fascinated with what I saw and simply had to have one! Although I had been in the creative end of the three dimensional sign business for most of my life I didn't really know what I would do with one - but I just knew it could do fantastic stuff.

Through extensive research and LOTS of hands-on practice I quickly found out that my MultiCam router was capable of just about anything imaginable.This journal will chronicle that journey to date and continue each week with two or three entries as I continue to explore just what is possible with this wonderful tool... -dan

Wednesday, October 31, 2012

Fifty ways to build a relief - Part nine

Routing these two fish panels didn't take very long. Exactly how long I don't really know as it happened fast and I was busy at the time with other things. I did my best to sneak back into the tourer room to take pictures but  I only managed a couple of pics before the two files were routed. Generally I allow 20 - 30 minutes per square foot for these kinds of textured files.

The first picture shows the fish after the rough pass was complete.


The second shows the 1/8" bit at work, about 1/3 of the way through the file.  The bowl shape is clearly visible.


Here's a shot of the first fish relief finished but still on the router.


And here's a shot of the two pieces pulled out of their bowls. I like to route just shy of the spoil board meaning I only surface it  couple of times each year.


And here's a shot of the two fish plaques - right off the router. They measure about 12" wide by 10" tall.


Next time we'll be starting on the finishing of these two reliefs.

-dan

Monday, October 29, 2012

Fifty ways to build a relief - Part Eight

I've been asked to include tool paths in this series of posts. I will be including feeds and speeds but it is important to remember that all machines are not created equal. There are many variables. Motors on various routers are of different power and speeds. Servo or stepper motors, and sturdiness of the machine in general determine the speed at which we can run our files. Typically the reliefs I create have a lot of texture, with many sudden directional changes as it work and need to be programmed. The parameters that the machine is programmed to react to these changes of direction also effect the speed at which we can program our files. With all that said let me show you how I tool path my files.

On most occasions I cut these types of files with two only two tools using two passes. If the piece is thicker than the usual 1.5" - 2"  I program more passes (3/4" - 1" per pass) with the big bit and a single pass with the fine.

I opened the island fill window. I have found that by using the island fill on these kinds of too patching I break fewer bits. This means the cuts start in the center of the piece and work outwards to the edge. I selected the 3/8" ball nose bit first and then the 1/8" ball nose bit. The 1/8" bit I use is a tapered bit (1/4" shaft down to 1/8" at the tip) it has a cutting edge that is 1.5" long.


Then I edit the larger bit perimeters first starting at the top of the form and working my way down. The depth is set first (the thickness of the substrate)  in this case it is 1.5"   The next up we set the offset. This means the rough cut does not go any closer to the final routed surface than 0.1"   The over lap is left at the default of 50%


As we work out way down the next item is number of passes.  In this case I leave it at one pass.

Below that you can see the parameters that were set for the bits in another menu... the bit measurements are set at 2.2" (I actually lied to the machine so I can cut materials up to 2" in one pass, despite the cutting edge of the boot being only 1.5" I did the same thing with the small bit)


Then we are down the menu to feeds and speeds. I know my router can handle 300 inches per minute for the fed rate. The plunge rate is set at roughly half for my router - 150 inches per minute. Spindle speed was set at 14,000 RPM. 30 lb Precision Board cuts smoothly at this speed with the feeds I use.  I hit OK and then this tool was complete.


The final pass with the 1/8" ball nose bit was next. I worked through the parameters in the same manner as the big bit with a couple of changes. Depth was still 1.5 inches. This time there was no offset. Overlap was set at 80%.  For Precision board this gives a pretty nice finish.


In the passes menu I make sure we can do the fine pass in one go.  Because the machine thinks the bit is longer than it really is it which is no problem because we would really only be removing 1/10 of an inch of material that had not been removed with the big bit in the rough pass.


Feeds and speeds were next and were set similar to the big bit. Then we were done.


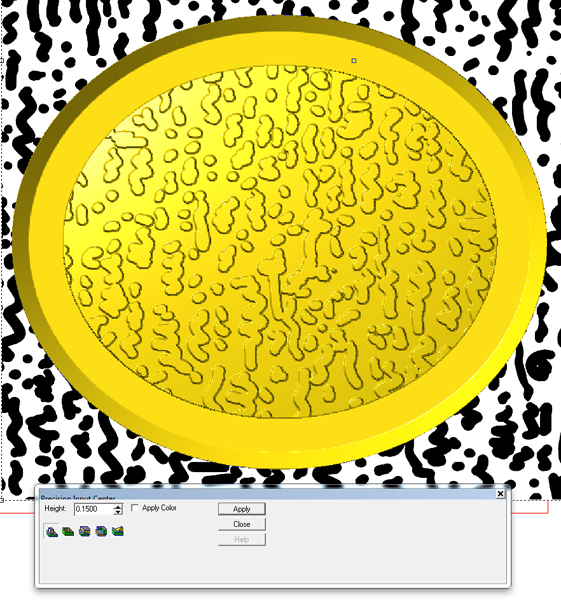
 It only took a few seconds for EnRoute to generate the tool paths and the file looked like this when it was done.


In the front view you can see the rough pass slightly offset above the finish pass.


Next post I'll show a series of shots as it routes on the MultiCam so we can see how our programmed moves happened.

-dan

Fifty ways to build a relief - Part Seven


Before we get to tool pathing I want to show how I prepare many of my piece for routing. The standard way is to tool path and route the piece and then do an offset cut to free them from the substrate. This works well but in doing so a burr, the size of the radius of the smallest tool is left around the top edge. This can be remedied by having the router run past the edge.  But with thick pieces and fine short bits this can be an issue as the deep cut on the outside of this over cut can be longer than the cutting edge of the bit.  After a few broken bits I came up with a solution which I call a bowl.

It is a hard concept to describe but easy to do.  Basically I create a bowl, slightly larger than my piece. The relief I want is floated into the middle and then by merging, it is frozen into the center of the bowl. The sides of the bowl step up as needed to accommodate the length of the router bit. Let me show you how I do it.

We left off last time with the relief aligned to the bottom of the plate and then I stretched it up or down until it fit comfortably within the thickness of my plate (in this case 1.5") Here's a front view both rendered and un-rendered.


I then create an offset vector. The size of this is determined by the size of the tool (bit) you will be using to create your rough cut. Since I am using a 3/8" ball nose with a 50% overlap for this I make the offset 0.7"


Then I add a step for every 3/4" of the thickness we are routing. Since this piece of Precision Board that we will be routing is 1.5" thick it requires one step up on the edge of the bowl.


Then I use these new vectors (starting with the outside one)  to create a flat relief 0.75" tall.


The next step is to modify this outside relief by taking away 3/4" with each step... in this case only one.


After I'm done this step I hit render (light bulb) to see what happened.  The fish relief is not visible (yet) because it has been aligned with the bottom of the plate. The new relief is sitting on top (for now).  Once I am satisfied everything is as it should be I then selected this new relief and aligned it with the bottom of the plate.


Then it is time to merge (highest) the fish relief to the bowl.  Just follow the prompts.


I check onne more time that everything went as planned. A good way to do this is by checking the front view without rendering the relief.I then delete or move the original fish relief to another layer.


The relief is now ready for tool pathing which I'll do on the next post.


-dan

Thursday, October 25, 2012

Fifty ways to build a relief - part six

For our sixth version of the fish relief I did not start at the beginning. The chamfered edge relief with the sunken center was already done. To see the previous steps go back and review the fourth installment of this series.


This time we would be using bitmap textures. The ones I am using are from my TEXTURE MAGIC collection. There are one hundred and five textures on the disk - plenty to choose from. Here's a sampling. To get information about purchasing this collection go to TEXTURE MAGIC COLLECTION


The first texture I used is called 'chicken scratch' Keep in mind that black areas of the bitmap will do nothing. White will raise by whatever value you choose. Grays will do something in-between. Chicken scratch is black and white so the results will be pretty dramatic with sharp edges. When I open the bitmap, by default it sizes to the edge of my plate.


Since my file is relatively small I need to make the bitmap substantially larger for my 1/8" bit to fit into the grooves of the pattern we will create. To access the apply bitmap menu I need to select my relief and the bitmap. I selected AD TO, entered a value of 0.15" and then hit enter. In an instant the bitmap texture was applied to the relief.


Then I opened another texture (one of my favorites) called SPLOTCHES and went through the same procedure, first making it bigger and then applying it to the relief. This time I entered a value of 0.1" making the texture a little more subtle.


In the next few steps I built a flat relief using the fish outline, then domed it up and merged it to the base relief. These steps have been covered previously in this series.


I then used the fish vectors and prism tool to add the fish to the relief. (also covered previously in this series) Then it was time to add the 'SPLOTCHES' texture again but only to the fish this round. I opened the splotches bitmap, selected it, the fish vector (it will act as a mask) and the base relief, then opened the apply bitmap menu. This time I wanted the texture to be subtle so I entered a value of 0.1" and then hit apply.


 Then I created a rope mesh once more using the extrude function. This was nudged into its proper place vertically and then MERGED highest with the base relief. This was covered in a previous post in this series.


 Next time I'll be tool pathing the last two files and getting ready to send them off to the multiCam. Stay tuned...

-dan

Trains!

I've loved steam trains for as long as I can remember. They just have a magic about them. I've panted a bunch of historical murals that featured them and have studied endless historical photos to get the details just right. Instead of building small scale model railroads I have fun building larger scale trains in a cartoon style.

The first train I built was about thirteen years ago. It was for Giggle Ridge Adventure Golf. The train was largely built from welded steel and was a static display and sign.


Nine years ago I started work on the next train - one that would travel around our property. It is dubbed the 'grampa train'. It's not quite done yet, put off by the construction of our new house, but one day soon we'll be riding in style!


Just after we purchased our MultiCam six years ago it was time for another train. This one was for a display piece and sign for an Adventure Golf. The golf was at the Mall of America in Minneapolis, Minnesota. The special challenge this time was to build a train that looked like many tons of steel but actually lightweight materials because it was to be part of the golf on the third floor.  Much of the train would be routed from Precision Board.


The pieces are glued up over a welded steel frame. Many HDU components were substituted for the real thing, all routed in detail by the MultiCam. It only looked heavy.


 Certain parts were steel but they were light gauge. As we worked I painted the parts with an iron paint and then sprayed them with an oxidizer creating instant rust.


Hundreds of parts were designed in EnRoute and cut on the MultiCam from 30 lb Precision Board. This made everything still very strong but lightweight.


Amazingly, with the help of EnRoute and our MultiCam this project went from design to ready to ship in only ten days!


Today I started design work on yet another train. It also will be a static display and sign for another Adventure Golf. The theme will be logging once more. I first dug into the local history and found that in the early days of this community they used a Shay Locomotive to haul the logs out of the woods. This would be the starting point.


Like the others, the train we would build this time would be about half scale vertically but drastically shortened horizontally to give it a quaint cartoon style. I quickly drew out my ideas in my sketch book and then scanned it into my computer to do the final rendering. I used my Wacom digital drawing pad to draw freehand, using my initial sketches as a guide. In a couple of hours I had the plan in hand. Like the train for Mall of America, we'll route many of the detailed components on our MultiCam from Precision Board. All of the files will be built using EnRoute of course. It will be a while before we physically start the project but you can bet you will be able to follow it step by step here.


Stay tuned...

-dan