WELCOME!


It is hard to believe that it was almost ten years ago I witnessed a CNC router in action for the very first time. I was fascinated with what I saw and simply had to have one! Although I had been in the creative end of the three dimensional sign business for most of my life I didn't really know what I would do with one - but I just knew it could do fantastic stuff.

Through extensive research and LOTS of hands-on practice I quickly found out that my MultiCam router was capable of just about anything imaginable.This journal will chronicle that journey to date and continue each week with two or three entries as I continue to explore just what is possible with this wonderful tool... -dan
Showing posts with label How-to excavator sign. Show all posts

Sunday, November 28, 2010

Finished excavator sign

Yesterday Rebecca put the finishing touches on the excavator sign. She did an awesome job on the paint!  This thing looks like it has been digging holes for a long while! It has a lot of character.


I'll be at the USSC (United States Sign Council) show in Atlantic City this coming week doing three seminar presentations there. One of the presentations will be a lecture on how we create our dimensional signs using modern materials, software and tools. I'll be using this sign as the project and I'll be going through the process step by step from start to finish.

When I'm not presenting I'll be on the floor show most likely around the EnRoute or MultiCam booths. 

If any readers are going to that show I'd love to meet you!

-dan

Thursday, November 25, 2010

Paint progress on excavator sign

Since the last time I posted about this project we've made a little progress. First a coat of Coastal Enterprises heavy bodied, water based primer was brushed on. Extra texture was created in key areas, such as the lettering, in the process.


Then base coats of color were brushed on. Finally layers of glaze were brushed on and gently wiped off to create the weathering, grime and dirt we needed to make this sign look believable.  In this shot Rebecca is putting the finishing touches to the load of gravel in the bucket.


I couldn't resist showing a closeup of the tracks and pile of dirt to show the rich colors Bec was able to achieve. It makes me smile every time I walk by!


Tomorrow the lettering will get its last coats of paint, making the sign ready for it's debut (in pictures) just in time for my talks at the Atlantic City United States Sign Conference next week.

-dan

Monday, November 1, 2010

Final assembly and details

I had plenty to do today, too much really - as always. But with the help of Bec, Donna and Sarah we made good progress on our other projects which had deadlines. To reward myself I decided to sneak in a few minutes of work on the excavator. The sculpt was already mixed and left over from the parade float so I quickly filled in the screw holes and then added the front and back cab window frames. Then by simply rolling the sculpting epoxy into balls of various sizes I pressed on the rocks onto the dirt pile. It didn't take long.


After supper I snuck back out to the ship for a few more minutes of fun. While I could have used some PVC or acrylic rods for the hydraulic cylinders I knew this sign would always be indoors. Wooden dowels were on hand and worked swell. a few pieces of 1/8"metal rod were bent to shape and glued in place for the hydraulic hoses. Some bits of an old plastic face shield were cut to shape and pressed into service for the mechanical linkage on the bucket. A piece of 3/18" steel rod formed the exhaust pipe. Since the primer bucket was handy I also whipped in some primer. The sign is now ready for paint.


Now I am really getting pressed for time but at least I will be able to give our students a better idea of how a sign like this comes together quickly when you break it down into little bits.

As always doing this project have given me five new ideas...

Stay tuned for the fun has just begun!

-dan

Sunday, October 31, 2010

Last pieces off the router.

I never tire of watching our CNC router magically turn blank Precision Board into a work of art. Whenever my dad visits he goes straight to the router room and watches it too. He's never owned a computer and simply can't comprehend how the machine knows where to go. It's just magic!


The CNC was busy today turning out the last of the pieces for the excavator sign. As soon as the router moved on to the last piece I pulled the first sign face off the table and fastened it to the base. It looked pretty cool - just as I imagined it would. The hydraulic cylinders and hoses have yet to be fashioned and the pile of gravel will yet get some detail but the sign is coming along nicely. It's hand work from here on in.


I'll post more pictures of our progress when I get back to the project after I return from the EnRoute workshop in Denver.

-dan

Assembling the excavator sign...

The files were routed in three stages. First I cut the reliefs using a 3/8" ball nose bit to rough out the shapes. A final pass was done with a 1/8" bit and an 80% overlap. Then I did a second cut file using a 3/8" milling tool to cut the rest of the pieces out.


The pile of pieces resembled a 3D jigsaw puzzle. It wouldn't take long to sort it out however.


First I welded up some 3" square tubing which would form the stand. the top of the 'T' would be glued into the sign making it plenty strong! I used Coastal Enterprises PB Bond-240 glue to do the task. I also used some coarse threaded screws instead of clamps to hold everything secure while things cured.


Then I started in on the pieces of the excavator. The tracks were first, then the body assembly. I hollowed out both sides of the arms to fit in a piece of 3/8" steel which I had bent to shape. Once I had two sides of the arms glued I added the other layers. It went together pretty quick. 


As usual I couldn't resist mocking it up to see how it would look...


This morning everything was good and dry. I cleaned up the glue lines with my die grinder and started in on the assembly. The sides of the 'gravel pile' were whacked to shape with the die grinder. I wanted the excavator to really sit precariously on the top. To give it a cartoon flare I tipped the tracks outward at a jaunty angle, then drilled then and inserted some 1/4" steel rods. It was all glued together with some quick drying epoxy.


I cut a piece of 1" thick Precision Board on the bandsaw, then used my big belt sander to finalize the angle cuts I needed. It took me two tries to get it right. Then I glued it up. When the epoxy had set I broke out my big 5/8" drill and drilled a hole through the track frame and into the sign base.  A nine inch long by 5/8" steel rod was glued in and then a similar hole was drilled into the tractor body. I'll hide the rod underneath with some small rocks as we start the sculpture. The long steel rod will make the sign much stronger than it would have been without it.   High Density Urethane does not have a lot of structural strength, but it is easy to cure that woe.


Then the body was plopped on top. I won't glue it until the painting is done.


The sign faces are still being routed on the MultiCam and looking pretty good. I'll glue them on as soon as they are done. Then its on to the final detailing, primer and paint. It's going to be a wonderful addition to the shop display.


The project has gone pretty quickly so far, with about three hours of design and labor. The routing time will total about six hours once the sign faces are done. Detailing and painting will add another day of labor. 

The end result will be a sign I can easily market for some pretty good dollars, with the price based on the value of the sign - not time and materials. With this type of sign my customers won't be able to go down the block to get a better price for there is only one place that makes signs like this.

I'll be posting one more set of pictures in this series before I head down to Denver for the workshop. I don't think I'll have time to paint the sign before I leave...

-dan

Saturday, October 30, 2010

Creating 'complex' reliefs in EnRoute

Even what, at first glance, seems like a complex sign element is easily broken down into simple shapes that can easily be routed and then glued together to form much more than simple pieces. Before I started building the reliefs I had done a simple sketch of the top view. It showed how the excavator would be created as vertical slices or layers.


The vector file I created last time was then separated into elements which will form each layer when I route it from 1" thick 30 lb Precision Board. The sign faces with the lettering would be routed from 1.5" thick HDU.
First up was the tracks. The elements were all created separately, with the background being 1/4" thick. The inside mechanical bits were done from 1/2" - 3/4" thick. The cleats of the tracks were 1" thick reliefs. Then I merged them together on a zero thickness background. I had done a tank some time ago in a similar fashion and discovered the tapered 1/8" bit created a wonderful effect when I routed the file. I'm hoping for the same effect this time around - only on purpose. Then I copied the file and flipped it for the back side. Then I created a rectangular block and merged it to the back side of the track. This will be used to glue things together after it is routed.


The cab was done as two pieces which will be glued up back to back. Only the windows and door handle were recessed. The third piece in this section was for the motor cover on the opposite side of the cab.

The boom proved to be a relatively simple piece to execute. Simple reliefs of various depths were created in EnRoute and then merged onto a zero height relief. The file was then copied and flipped for the back side of the boom. The pieces will be glued up with a piece of steel laminated into the middle. The bucket will be made up of four layers of 1" thick Precision Board.


Then it was on to the sign. One again I guilt each element as a separate piece adding some texture to the background of the sign using one of my bitmaps called 'splotches'. The lettering was beveled and raised from the outlines which surround them. These outlines were also raised slightly from the background to make them easier to paint. Once I had everything at the right height I merged everything together, then created a second copy for the back side of the sign.


For the middle of the sign I will laminate five 1" thick pieces of Precision Board. The center three laminations needed to be hollowed out to accommodate the welded steel frame which will hold up the sign. Using the precision input center I created the rectangles to form a 3" wide 'T' shaped hole in the boards. This was centered and then using the jigsaw tool I pulled out the vector I would use to cut the shapes.


With all the files done is was time to nest the pieces and then tool path them for the router.The files that appear yellow are reliefs which will be carved using a 3/8" ball nose bit to rough them and a 1/8" bit to do the final pass. The rest of the files are simple offset cuts, done as a separate pass.


The sign faces were nested in a separate file and tool-pathed for 1.5" stock. I'll route them tomorrow. I'll be starting to piece together the excavator and then glue it up then too. 
Stay tuned...

-dan

Friday, October 29, 2010

Vector step by step

A sign like this would be very intimidating to most sign shops. In fact I don't know too many who would even tackle this type of three dimensional project. The truth is that if we think about it and carefully break it down into manageable steps it really isn't all that hard to do. Although challenging I find these projects very satisfying. Since few others out there do this type of work I can charge what it's worth without any problem. By using modern software, tools and materials they are easier than ever to create. I find no shortage of clients who want these types of signs.

The quick sketch I did at the trade show would be plenty to sell the concept of the sign to most of my customers. It conveys the feeling of the sign but still leaves plenty of room for interpretation when I get down to the business of creating the sign.  If at all possible this is as far as I like to go before money changes hands. Unless we have a history that's good the sketch stays in my book and the customer gets no copies until I see green.

Sometimes more information is needed. At this stage I would take some pictures of the customer's excavator or do some searching on the web. Because I was stuck at the trade show when I did the next step I just winged the color version using my digital drawing pad. The end result was a cute excavator but a little research when I got home proved I was lacking a few details.

I could have built any of a thousand machines but since this sign was for my own display collection I did a quick search to find results that showed pictures of both sides of the same machine. These pictures would provide all the reference material I needed.


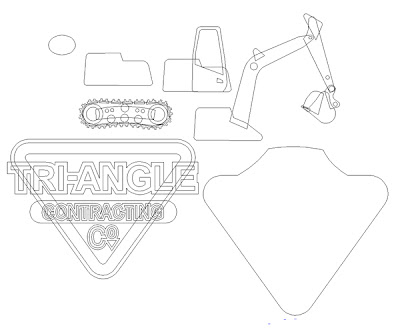
The vector tools in EnRoute are quick and easy to use. Because the vectors can be easily edited I drew the shapes quickly, just blocking things out. Scale wasn't critical. While there is still lots missing it was starting to look like a convincing excavator already.

Then I edited and adjusted each piece of the rough vector sketch, using my photos as reference. Since the final sign would feature a cartoonized tractor I could exaggerate certain pieces as needed, The hydraulic cylinders and hoses will be added when I assemble the routed pieces.


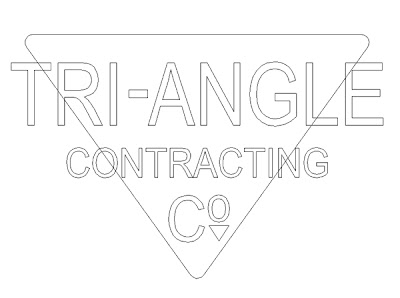
The triangle was constructed by using the jigsaw tool to create a shape inside three intersecting lines. I used the chamfer tool to round the corners of the triangle.


I added the text next. I used a copy of the triangle (re-sized) under the 'O' in Co. 
On looking at the letter vectors I decided that the 'TRI-ANGLE' needed to be bold. Once I was happy with the spacing of the lettering I added outlines around the triangle and lettering using the outline tool. A rectangle was drawn around 'CONTRACTING' and the ends stretched out using the vector adjustment tool. Everything was centered using that tool.

Then I pulled the sign face vectors over to the tractor vectors and resized them to suit. In about half an hour or so I had all the vectors I would need to create the routing files for this sign. The tractor is backwards again but I will flip it around when we start gluing up the project - or perhaps not depending how I feel at the time.


Next time I'll start creating the reliefs, adding and subtracting to get the shapes I need. It shouldn't take much longer than it did to create the vectors.

Stay tuned...

-dan

Monday, October 25, 2010

Another step by step

At the beginning of this year I challenged all my sign making friends, around the world to create one project this year that would take them in the direction they wanted to go in their businesses. The project would be something for their showroom, something fun. It could be of any scale, of any material, but it had to push their limits and build their skills. 

For myself I upped the ante singificantly. My challenge was to do one piece each month. We are now more than half way through the tenth month of the year. I started with the sextant piece for my library. Other projects included the submarine, plane, streetcar, hot rod, fish boat, large wrench, the rooster, and bear signs. Out in the shop the newest personal project, the flying saucer sign is in progress. Each piece is done a bit at a time as I find minutes through each day. My CHALLENGE 2010 projects have already appeared in magazines, won awards, and served as lessons in workshops. They have been proudly displayed in my office, showroom and at trade shows. They have brought us more imaginative work. The projects have been a great way to learn new skills and stretch our selves creatively. The effort has been well worth it by far.

Over the weekend we displayed our work in a local trade show. As I stood there my mind of course started to wander. I thought of an upcoming EnRoute workshop to take place in Denver November 4,6 - only ten days away. I am tasked with leading a couple of the lessons to show people the creative possibilities within the program. As I thought about it I decided I would design and build a project I could show there and also here on the blog. It would kill two birds with one stone and I'd also be able to stay ahead of the game in my personal challenge. 

In the next hour I talked about a sign with a fellow who owned a contracting business. He wanted to know if we could do a sign with an excavator on it. He didn't make a final decision on his sign but I decided such a piece would be my next sample I would create - largely using EnRoute and my MultiCam of course. When he was gone I broke out my sketchbook and started scribbling. The conversation inspired a good base for the sign and I grabbed the idea as a starting point. The excavator perched on top of a pile of dirt provided a pleasing composition. On the way home from the show I saw an excavator and took note that the cab was on the opposite side than I had remembered. When I started drawing the file on my laptop computer the next day at the show I would flip it around.


I took a picture of the rough sketch with my digital camera and then imported the file into Photoshop to do the rendering. While my focus was on people walking by our booth I snuck in a few minutes here and there to whip up a concept for the sign in about an hour or so. I also did three other sign concepts and talked to hundreds of potential customers during that long day.

In the next days I'll document the creation process from start to finish. I'll show how we create this seemingly complex file in EnRoute, then route it from 30 lb Precision Board on the MultiCam, glue it up and paint it. For those who want to go through a step by step process in person I'd advise you to book now for the EnRoute workshop in Denver. I hear there are still seats available. Otherwise...  stay tuned...

-dan