
Showing posts with label Cultus Lake Adventure Park - part two. Show all posts
Showing posts with label Cultus Lake Adventure Park - part two. Show all posts
Monday, July 13, 2015
2016 TEA Award Nomination Video
We are pleased to announce that Cultus Lake Adventure Park has been nominated for a THEA award via the Themed Entertainment Association. We had to submit photos and a video to support the nomination and here's the video. It shows the park at it's best. There are many nominations for this prestigious award and it will be some time before we find out the results.
Monday, June 22, 2015
Cultus Lake Adventure Park finished!
The Cultus Lake Adventure Park project is now wrapped up and operational. After so many months of work on the project it is great to see the park in operation. The signs look great in their intended setting!

The rides in this section of the park are much more extreme and the theme work is a little more sparse. The big steel dominates the scene. This makes the sign work even more important. The sign for the roundup was mounted to the giant coaster framework.


We took this shot yesterday as the Round-Up ride was in action. The expression on the snake suddenly is very fitting!


Wednesday, June 3, 2015
Paint paint paint
The last few weeks have been largely all about paint as we near the end of the second phase of the Cultus Lake Adventure Park. For that project there were three main signs. I've posted the various phases of the project in the last weeks. Here's a series of pictures showing the painting of these projects by our talented crew. Tomorrow these signs get delivered and installed.


Each color received three base coats and then a series of glazed. The various layers of lettering and borders made it easy to paint, starting from the bottom layer and working up towards the top surface layer of the sign.


Thursday, May 14, 2015
Saving the best for last
The last sign for the Cultus Lake Adventure Park was designed and routed earlier this week. Similar to most of our signs it was routed in there layers to allow us to laminate a welded steel frame inside. Then it was time for a little hand sculpting fun. A 5/8" steel rod was formed and glued up into the top of the sign and then we used Abracadabra Sculpting Epoxy to do the snake. To save some material I crunched up some heavy duty tin foil to bulk out the body. The rope was created in a similar manner. The entire sculpt took about four hours.


Wednesday, May 13, 2015
Just one more little thing
We take great pride in taking each and every one of the signs we craft way over the top. Often this means putting in more than the original design called for. We've found that by building to our personal standards (and raising the bar each time) we always exceed the expectations of our customers. It also keeps all of our projects exciting and FUN!
The Runaway Mine Train sign is a good example. I had a blast hand sculpting the miner and adding the woodgrain and metal trim to the mine cars. But as I looked at the finished result it needed a little more. The second mine car seemed empty. I asked our crew for suggestions and one of them came up with the crazy idea of putting a burrow in the second car. This of course meant we would spend at least four or five extra hours on the project. I didn't hesitate. The extra figure would balance the design and add interest no matter which direction the reader approached. It also took the sign way over the top. There was no real choice.


The Runaway Mine Train sign is a good example. I had a blast hand sculpting the miner and adding the woodgrain and metal trim to the mine cars. But as I looked at the finished result it needed a little more. The second mine car seemed empty. I asked our crew for suggestions and one of them came up with the crazy idea of putting a burrow in the second car. This of course meant we would spend at least four or five extra hours on the project. I didn't hesitate. The extra figure would balance the design and add interest no matter which direction the reader approached. It also took the sign way over the top. There was no real choice.
Thursday, May 7, 2015
Runaway mine train sign part 3
Once I had the parts all routed it was a simple matter of gluing up the three layers with the welded steel framework encased inside. Two tubular arms stuck out the back for mounting to the building structure. I used the die grinder to even out the edges, purposely leaving a little texture of course. This same texture was done to the back of the sign as well. Bits of it will show through the timber frame building when it is mounted.
We then filled in the screw holes with Abracadabra Sculpting Epoxy. I used the same epoxy sculpt to the railway ties and beam and pressed in some wood grain. This epoxy is about one eighth of an inch thick. Then I added the join plate on the rails and the anchor plates and spikes to each tie.
I used my jig saw to cut some scrap block of Precision Board for the mine car frames. The wheels were them mounted to the frame using some quarter inch steel rods for axles. Some laminated blocks will form the armature for the cars and then it will be time for some more sculpting. Stay tuned for the next installment.
Monday, May 4, 2015
Mine car wheels (Revisited)
About three years ago I started a demo sign project that featured a mine and mining car. Just about then we got really busy and it languished until last year. Then I used the parts to create a little mining car that became the weather vane for the water tower of the Cultus Lake Adventure Park.
Now with the addition of the Runaway mine train I needed another set of mine car wheels. I didn't have to start from scratch for it was a simple matter of reopening the saved file and enlarging them to suit the slightly larger scale current project. They are five inches in diameter this go around.
I'll be referencing the assembly of the car and sign in the next post so I thought I would repost the wheel creation again for this one.
I'll be referencing the assembly of the car and sign in the next post so I thought I would repost the wheel creation again for this one.
The wheels of the little mine car are a great exercise to practice our building of various shaped reliefs and how to merge them into a final shape which we want. As we build the reliefs we have to keep in mind the final result and then think of what we have to add or take away to get exactly that. There are many ways we could have achieved a similar effect.
We start with the vectors of course - all created inside EnRoute. The wheel will be four inches in diameter (including the flange) and 1" deep.

The back flanges on railway wheels are sloped so the first task was to create a disk using the largest vector circle. I kept it fairly shallow.


Then I selected the next vector and created a flat disk 0.9" tall. This was then merged with the first tapered disk I created.


Then it was time to knock out the center to make room for the spokes and the hub of the wheel. I created a zero height relief which was then merged to the base relief.


Next up was the spokes. I first created flat reliefs in the shape of the spokes.

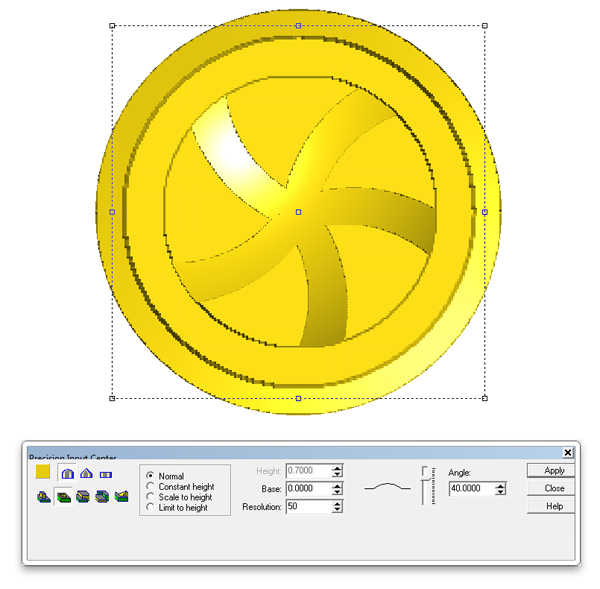
The spokes looked good but I wanted them to be curved on top and higher in the center. THis would need to be done in a couple of moved by modifying these reliefs. First ‘I used the done tool to puch down the center in a bowl shape.


Then I used the prism tool to modify the reliefs once more by building them over a cone shape.


These spokes were them merged highest with the base relief.


The last step was to add the center section of the hub by adding to the relief.


Then I selected the next vector and created a flat disk 0.9" tall. This was then merged with the first tapered disk I created.


Then it was time to knock out the center to make room for the spokes and the hub of the wheel. I created a zero height relief which was then merged to the base relief.


Next up was the spokes. I first created flat reliefs in the shape of the spokes.

The spokes looked good but I wanted them to be curved on top and higher in the center. THis would need to be done in a couple of moved by modifying these reliefs. First ‘I used the done tool to puch down the center in a bowl shape.


These spokes were them merged highest with the base relief.

Next up was the hub of the wheel. I created a flat relief 0.9" tall. This was then merged (replace) with the base relief.


The last step was to add the center section of the hub by adding to the relief.


I then duplicated the wheel to make a set of four. This was tool pathed using a 3/8" ball nose bit for a rough pass at a 50% overlap. A final pass was then added using a 1/8" tapered ball nose bit with an 80% overlap. I'll post some pictures as soon as I put the file on the MultiCam. It will be routed from 1" 30 lb Precision Board.
Stay tuned...
Wednesday, April 29, 2015
Runaway train sign
The next project to be created is the Runaway Mine Train sign. The file wasn't difficult but it had a lot of pieces.


Then I began modifying this relief by adding the letter borders starting with the lowest level.

Then it was the next border layer.


Then it was time to raise the letters.

Then it was time to build the curved beam and tracks. These reliefs were built separately. The beam and rail center were done at the same height.

The rail ties were next.

Then came the bottom flange of the rail.


Then it was a simple matter of merging (highest) everything to the background relief.


I tool pathed the file and then sent it off to the MultiCam. It was routed from a 1.25" thick piece of 30 lb Precision Board.

There's still the middle piece and the back files to create as well as the mining car. Those will be next. Stay tuned...
Subscribe to:
Posts (Atom)