WELCOME!


It is hard to believe that it was almost ten years ago I witnessed a CNC router in action for the very first time. I was fascinated with what I saw and simply had to have one! Although I had been in the creative end of the three dimensional sign business for most of my life I didn't really know what I would do with one - but I just knew it could do fantastic stuff.

Through extensive research and LOTS of hands-on practice I quickly found out that my MultiCam router was capable of just about anything imaginable.This journal will chronicle that journey to date and continue each week with two or three entries as I continue to explore just what is possible with this wonderful tool... -dan

Wednesday, August 29, 2012

Painting the routed trim on the house

Our university students are with us a few more days before they head back to their studies. Next week I'll be back in my shop once more and things will get back to normal after a busy summer on the house.

We've been busy starting to install the routed trim and then painting it up in it's final colors. The large round window was the first to be completed. The routed Precision Board trim received three coats of base color and then four layers of ever darker glazes.


The outside of the house is coming together quickly. We've routed hundreds of feet of trim that is yet to go up. That will happen as soon as the windows go in.


The trim for the inside of the house is now in the planning stages. I'll be posting screen captures, pictures and how-to's of that as we begin that work in the next weeks. Stay tuned...

-dan

Thursday, August 23, 2012

City crest on the router

Today I finally had the chance to put a piece of 2" Precision Board onto the MultiCam and route the city crest file I built last week. The file was routed in two passes - one with a 3/8 ball nose bit and a second pass with a tapered flute 1/8" ball nose bit. The piece was about 42" tall in total and 24" wide.

The file ran while I was out doing other projects. It looked pretty good and will need just a little bit of handwork to finish things off.


-dan

NEW JERSEY Sign MAGIC Workshop

We get lots of enquiries regarding workshops away from our studio - especially from the folks on the eastern seaboard. They would rather I travel to them than they come all the way out west. Occasionally I do just that and thanks to the folks at MultiCam East just such an opportunity has again presented itself.


A Sign Magic Workshop is to be held in at the MultiCam East Technical Center, Hackensack, New Jersey on Tuesday, Wednesday and Thursday, November 6, 7 and 8, 2012.  Seating is limited.


Multicam East
61 Voorhis Lane
Hackensack, NJ 07601


For information contact Jeff Goldberg
jeff@multicameast.com

Jeffrey Goldberg
707 N. Howard Street
Baltimore, MD 21201
410-728-6000
410-728-4822  (fax)

The Sign Magic Workshop is also being presented in part by EnRoute Software, Coastal Enterprises (Precision Board) and Abracadabra Sculpting Epoxy.


Tuesday, August 14, 2012

Last steps to build the crest file.

The last two elements were the most complicated or at least appeared so. But as always it is simply a matter of breaking things down into little steps and then putting everything tougher. The bird was first. The wings were be done in two layers, one slightly thicker than the other and then merged together. the tail is done as a flat relief. These were then merged highest to the border relief that circled the bird.


The bird body is done as a domed relief. The beak was done as a bevel relief. Both were merged highest to the outline relief.


The bird was then merged to the shield background by adding it to the base relief.


The last step was to add the eye by modifying the shield relief.


The book was then next step. It took some head scratching as there were a few things that made it tricky... the first being the 45 degree edges on three sides. But after some thinking I figured it out. I created a book shaped vector - shaped like a flying bird. I also made two vertical lines which would be the rails I would use to create the mesh using the sweep two rails function. But first i created a relief using the bevel tool.


The book shape would be created as a mesh using the sweep two rails function.


Both the relief and mesh were selected which allowed me to go to the next step using the merge lowest function.


 I then created a flat relief that was both the book cover and would also be used to define the top edge of the relief when it was merged highest.


The completed book relief was then merged to the crest relief by ADDING it to the base relief.


All those little steps combined have brought us a completed crest relief - easy as that!  :)


I'll send a screen capture to m client for proofing before I send it off to the MultiCam to be routed fron 2" thick Precision Board. I'll post a picture when I'm done.

-dan

Monday, August 13, 2012

More steps on the crest

The wheat crown on the top of the crest was the next part of the relief puzzle. It like the rest of the relief would use a variety of tool in the EnRoute bag. The vector was fine as is with the exception of the two drop shaped pieces at each end. I cut and pasted two drops into place and then drew two shapes that cut them in half. This would allow me to trim them to shape in a bit. 


I forgot to grab a screen shot of the next step but I selected the top wheat shapes. I used the prism tool to make the reliefs. The drops and the bars of the crown were next. These elements were domed with a base of 0.15 inches.


The spaces between the drops was to be flat. I used the create relief tool for this task.


To trim the end drop shaped reliefs I created zero height reliefs These would be merged lowest to the drop shaped reliefs. The operation has to be done one piece at a time.


With all the reliefs created it was time to add them to the crest. I used the merge reliefs tool for this task but selected the add to command.


Then it was time to modify the base relief by adding to it using a bunch of the vectors. These were simple shapes - nothing fancy or difficult here.


This leaves only the bird and book to go. I'll be whipping those shapes up in the next post.


Stay tuned...

-dan

Friday, August 10, 2012

Simple steps to a complicated design

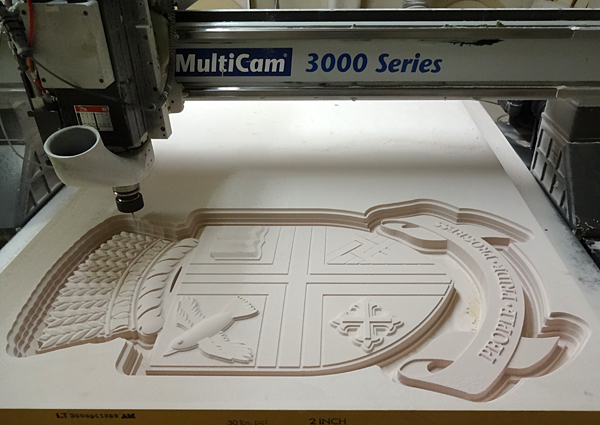
 A current project in the shop is a three dimensional crest for a city. The file is somewhat complicated, mostly because it involves so many steps and procedures to build the file using a wide variety of techniques. The most important thing is that they be done in the right order.I received the file from another sign maker who has taken one of our workshops. It was an Illustrator file designed for printing. My job was to adapt it for a dimensional plaque. The piece will be relatively small - measuring approximately 24 inch wide by 36 inches tall and will be routed from a two inch thick 30 lb Precision Board.


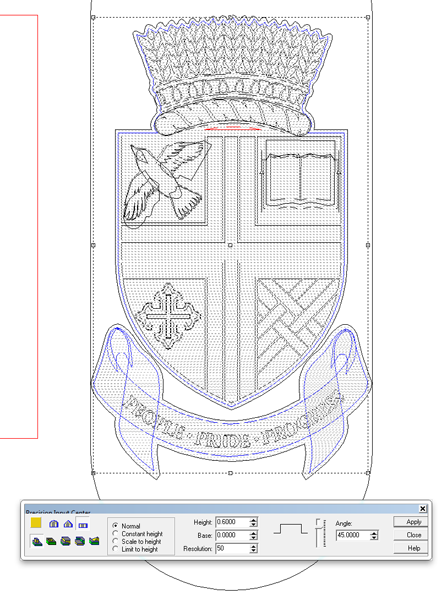
The first task was to simplify the AI file, taking out the double and triple borders as well as the highlights and shadows of the printed version. Some parts like the bird and book had extra vectors added to allow me to create the 3D file.


I also added a late pill shaped vector around the image which I would use to round the shield face.


The first step was to create the base vectors as flat shapes.


I forgot to grab a screen shot of the next step but I selected the base reliefs and also the large pill shaped vector which was used to modify the base relief using the dome tool.

Once we had the base relief I created more flat reliefs for the scroll that was under the shield. This was done in five pieces of various heights. These were then merged highest with the background.


The lettering on the scroll was created by selecting the base relief and he lettering vectors and then adding to the relief.


The shield base relief was also modified by adding to it using the next vector.


Then it was time to begin work on the individual shapes of the shield. I first created a flat relief.  Then using the wiener shape vector around it I modified the original reliefs using the dome tool.


The relief was then merged by ADDING it to the base relief. This shaped it to the domed shield.


The shield is now well underway and looking great.


Stay tuned for the next installment as I create and add more elements to the crest...

-dan