WELCOME!


It is hard to believe that it was almost ten years ago I witnessed a CNC router in action for the very first time. I was fascinated with what I saw and simply had to have one! Although I had been in the creative end of the three dimensional sign business for most of my life I didn't really know what I would do with one - but I just knew it could do fantastic stuff.

Through extensive research and LOTS of hands-on practice I quickly found out that my MultiCam router was capable of just about anything imaginable.This journal will chronicle that journey to date and continue each week with two or three entries as I continue to explore just what is possible with this wonderful tool... -dan
Showing posts with label cap-it. Show all posts

Monday, August 3, 2015

Finishing off the dog

We often get comments about how hard it must be to do the detailed painting of our pieces. The truth is the process is actually very simple and quick. The key is to design it so it works that way. Painting the pieces in the correct order also minimizes the cutting we need to do. While some like to paint individual pieces and then do the final assembly we like to paint fully assembled pieces most of the time. Although I posted the first two pictures previously I thought it would be best to show them once more as I talked about the painting processes. We start with a primer, FSC-88-WB made by Coastal Enterprises, the same folks who make our Precision Board. The primer is thick, between cream and sour cream...  we brush it on fairly thick with a small brush and purposely leave brush strokes to add a little more texture where desired.


When the primer dries we brush on two coats of a base color over the entire piece. Then a blended coat is done, once more using a small artist's brush. This shot show that stage. Then the dark brown was brushed on for the eyes and nose. The darker areas around the mouth, nose and eyes was dry brushed on. The brush is lightly loaded and then brushed on a towel to remove most of the paint before gently being added, layer after layer where needed. This takes patience mostly but still happens in a few minutes of work.  


Everything is then allowed to dry under a fan for at least three hours. The last stage of the dog is he glaze. We mix our own glazes using a clear base and whatever color paint we wish to use. Generally they are mixed fifty-fifty but in this case we wanted the glaze to be really transparent so we mixed three parts clear base with one part dark brown. We first got our clean, soft towels in place and made our plan of attack, for once the glaze begins to dry you are hooped. I started brushing the glaze on with a large brush and when I got partway done my helper began to gently rub it off, leaving it in the deeper parts of the texture. The key is to keep a wet line on the glaze and wipe off quickly. There is no going back for a second try. Once the glazing on the dog was done the piece is put under the fans once more to cure.

When the paint was dry I came back with the red. The only cutting was around the dog which was relatively simple. I put on three coats of red paint over a period of two hours. I let it dry overnight and then came back and painted the lettering. Because I had designed it to be raised from the background it was easy to just paint the tops. Three coats of white paint, done in about ten minutes (allowing to dry in between) did the trick. This piece is now ready for delivery.


Wednesday, July 29, 2015

Revisiting cap-it

A little more than four years ago I built some fun displays for a local company called Cap-it. The stands were used too hold their catalogues near the entrance to their stores. The step by step is posted here...   Cap-it trucks posts


Now they are launching a new advertising campaign featuring a British bulldog mascot. And so I got the call for a new display. This time we are only fabricating the top portion of the display.  The beauty of EnRoute and our MultiCam is that I didn't have to build a new file for the sign portion of the display. I simply searched back through my archives and dug up the old one. It had to be resized slightly and then it was ready to go. Once routed it was a simple matter to sculpt the bulky dog behind it. That process took less than a day using Abracadabra Sculpt and my trust helper Sarah mixing for me.


Today we began the painting process and the dog instantly began to come to life.

Saturday, March 26, 2011

Truckin!

The last of the paint went on the Cap-it signs this morning. I pulled them out onto the porch for some photos. They will stay there to greet the client on Monday morning as he drives up. I am more than pleased with the results of our work. The catalogue display/stands turned out to be everything I imagined. Hopefully the client feels the same way.

I would have a hard time choosing a favorite between the two pieces as each has it's charms. Working on the little Jeep got me wishing I had a full size one to tootle around town in. Perhaps some day...


The little Pickup reminded me of my hot rod days and the vehicles I built in my youth. I enjoyed adding the many details and needed no reference material as I was very familiar with similar vehicles.


The result of my labors reinforced my desire to do more of this kind of work in the future. As people see the displays some will undoubtably want a similar sign for themselves. There is only one place I know that can design and build this kind of sign. I'll be waiting for the call...

-dan

Wednesday, March 23, 2011

Beautiful body

Our EnRoute Software and the MultiCam router are powerful tools which I use extensively in our work. They make things easier and speed it up considerably. And while I would never want to give them up I also like to do some things by hand. Sculpting the body of the truck is a good example of how we combine modern tools with old world skills. And while I use Precision Board for the bulk of this project, a thin layer of Magic Sculpt give me the easiest way to finish this job. It shows the best of all worlds. The truck came off the router and required a little hand work with the die grinder to get it into the rough shape I needed. Hand work was limited to about 30 minutes after gluing the pieces right off the MultiCam.


Then it was time for some old fashioned hand sculpting. I use Abracadabra Sculpt in our shop. It dries rock hard in about three hours. It is the perfect medium for my slightly bent, cartoon style of work which is difficult to mimic with a machine alone.


I worked on the cab from the top down, then worked around the front of the truck and did the box (the easiest part) last. I did it this way because it was easiest to hold still there without fear of damaging the freshly sculpted parts. For the seam lines like the doors and hood I used a sharpened, wooden stir stick.


The truck is definitely hand sculpted and looks like it has been well used through the years. The paint job will feature lots of weathering and dirt to enhance this look to the max. The end result is a truck with a lot of character.


Tomorrow I begin the final paint and assembly at long last.

-dan

Tuesday, March 22, 2011

Coming together...

I finished the second chassis detail yesterday. This morning Kirsten was tasked with putting on a coat of paint.


While she labored on the painting I finished roughing out the body of the truck. I had done one half before the Sign magic Workshop a couple of weeks ago. I had left the second half as it had been assembled after routing. The hood line had been marked out.


The first job was to remove the screws as I would be cutting into these areas with the die grinder.


Then I rounded off the corners quickly and shaped them to match the first side. Even though the 30 lb Precision Board is pretty tough it didn't take long - about 15 minutes per side. I then measured and drilled in two holes for headlights. I inserted two 1" dowels.


The I pressed on and smoothed out a thin coat of sculpting epoxy over the headlights and windshield area and put on the center bar of the windshield. This would make it easier for the parts that come tomorrow.


As always I mocked everything up to check progress. The sign owner was sent a copy of progress via email as well. I know he is anxiously awaiting their completion.


The trucks are now much closer to the final look. Tomorrow will be a big day with lots of visible progress, seemingly in an instant.


Tomorrow night we will be down to final paint at long last.

-dan 

Thursday, March 17, 2011

Blizzard in the shop!

The local kids are on spring break in these parts and so my grand daughter Phoebe and her cousins are visiting for a few days. My work is always fun, but even more so when the kids are helping. And what could be more fun than generating a blizzard in the workshop?


We went over tool safety and outfitted the gang with safety glasses and then let everyone have a turn - with me very close by - just in case. The oldest child (14) was dubbed official photographer. 


 In less than 20 minutes we had scattered styrofoam bits from one end of the shop to the other - and all over ourselves too, much to the delight of Phoebe. I did the last tweaking of the design to make sure everything looked like rocks.


Tomorrow we will finish coating everything with the sculpting epoxy after getting a good start today.

If you looked closely in the background of the above pictures you would have caught a glimpse of the next routing project to be done.  Stay tuned...

-dan


Tuesday, March 15, 2011

Stick with me...

When I did up the jeep I neglected to get pictures of the blocks of foam after I had glued them up. With the truck I took the time. I had some bits of 2" and 1.5" blocks tucked away in the storage area... saved for just such a project. These were glued on using PL3000 a construction adhesive designed for foam. It doesn't eat into it. I pinned the blocks of foam to the wood box and to each other with some screws. Otherwise they tend to slide out of position.


Once the glue dries these blocks will be carved down to rock shapes using a hot wire rig and my die grinder.


Then I gave the foam a rough coat of sculpting epoxy ( www.abracadabrasigns.com ) followed by a final coat into which I carved the detail. The rough rock texture was achieved by pressing in some crumpled, heavy duty tinfoil. I let it cure overnight and then applied a base coat of acrylic paint.


While the paint dried I sculpted a few more details on the jeep. The windshield 'glass' is a piece of lexan cut from a face shield.


Then it was time for some more paint fun. I enlisted the help of my ten year old niece (who is staying with us for spring break) to help me out. Then painting out of three different colored buckets of glaze I started slopping on the color. Recessed areas got the darkest color. We sloshed on the paint, spritzed with a water sprayer, and toweled things off wit ha shop rag. It was glorious fun for about twenty minutes as we made it look like rock. My m=niece thinks it is more fun than watching cartoons!


While we were busy on the rocks my older niece had put the first coat of bright yellow paint on the jeep. With the rock and undercarriage of the Jeep done I glued the wheels permanently to the steel studs sticking out of the rock. The body still lifts off until it is done.


This project is coming together quickly now... 

-dan

Friday, March 11, 2011

Sculpting progress

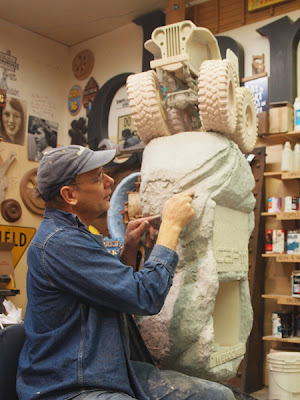
At the workshop my project served as filler. When I had a few minutes I would sit down with it at the table and do a little work. The students would watch, ask questions and see how it was done. With the big class and a busy schedule I only had time to work on one truck.


The black spots on the Precision Board chassis are from welding splatter - only surface burns. I worked up the springs first, then the differentials. The exhaust system was next and then the bits and pieces of detail. I probably spent about half to three quarters of an hour on the undercarriage in total. The holes drilled in the bottom of the tires match up with short pieces of threaded rod which are glued into the rock base under the truck. After the pieces are painted I'll drop some epoxy in the holes and slide the truck on the top permanently.


The styrofoam needed to be hard coated before I could sculpt the rock over it. This involved pressing a thin layer of Abracadabra Sculpt over the foam and letting it harden. I wasn't worried about getting things too smooth at this point, only covering the foam.


The final layer of rock was sculpted under the tires to look as if it was there before the tires. This involved keeping it at the same angle as the wheels.


While Sarah mixed the sculpting epoxy I put a little on at a time, carving in the cracks and fissures.


Then I used a ball of heavy duty foil, which I crumpled up to press into the soft sculpt to create the texture.


We made good progress in a couple of hours. This thing is coming together pretty nice. The old Willys Jeep looks pretty dramatic perched precariously on the top of the rock.


Stay tuned for more progress...

-dan

Wednesday, March 2, 2011

Ready to roll.

The two trucks are worked up enough that I can do some sculpting on them during the workshop to demonstrate our techniques effectively. I have left them in various stages of finish to be able to show just how they go together. I've been itching to get to work on the details... but all in good time.


I'll be posting some more pictures as we progress.


-dan

Sunday, February 27, 2011

Four wheeling fun!

As I work on this latest project it reminds me of my own four wheeling days so long ago. I owned an old Toyota Land Cruiser which we had stuffed a big V-8 into. It sported large tires, a winch, full roll cage and many other modifications. If was a pretty potent vehicle that could go just about anywhere - no matter how steel or rough. I painted it bright yellow and dubbed it 'BIONIC BANANA'. Those were fun days.

We designed and cut the last of the pieces for the Cap-It signs today. The pressure is on to get them to a point I can work on them as for the Sign Magic Workshop. From here on it the piece will involve mostly handwork.


As the pieces came off the MultiCam I couldn't resist mocking them up to see how everything would look. It's still easy to make changes and adjustments at this stage.


I then drilled some holes in the frame and glued in some steel rods. These would be the mounting points for the springs which I fashioned by bending some flat bar. I welded them on securely.


Then I drilled the wheels and inserted some heavy steel rod. More rod formed the lift kits under the springs. Some steel driveshafts were the last step with the metal. A few more steel bits will come tomorrow, like the shock absorbers, tie rods and the exhaust system. After that it will be time to break out the sculpting epoxy to add in the detail. That work will be done during the workshop.


On the body I'll trim out the rear wheel wells, and the open doorways, then start adding the front fenders, windshield, seats, roll bar and anything else I can think of. We'll be bulking out the plywood box with blocks and scraps of styrofoam and then hacking it into rock shape, After that we'll add a coat of sculpting epoxy to give it strength and then add the details. The piece tops out at a little over six and a half feet tall now and will get even higher with the windshield and roll bar. It makes me smile already!


Stay tuned for progress...

-dan