WELCOME!


It is hard to believe that it was almost ten years ago I witnessed a CNC router in action for the very first time. I was fascinated with what I saw and simply had to have one! Although I had been in the creative end of the three dimensional sign business for most of my life I didn't really know what I would do with one - but I just knew it could do fantastic stuff.

Through extensive research and LOTS of hands-on practice I quickly found out that my MultiCam router was capable of just about anything imaginable.This journal will chronicle that journey to date and continue each week with two or three entries as I continue to explore just what is possible with this wonderful tool... -dan
Showing posts with label The Institute for Study of Mechanical Marine Life. Show all posts

Wednesday, August 28, 2013

Mechanical fish is COMPLETE.

As soon as my regular work was done I rewarded myself by packing the heavy mechanical fish sign into my office and placed it in it's permanent home on the bookshelf next to my desk. A few minutes with a small brush polished off the last of the painted details and I declared the fish officially DONE.


It's been almost three months since I did the first sketches on the plane home from Indiana. I worked on the mechanical fish between other projects, seldom more than an hour or two at most in any sitting and instead of having my helpers assist did everything with my own hands - a rarity.  Although I am sure I might do some things a little differently the next time I am very pleased with the piece.

The result is a spectacular sample piece for my studio. Clients and visitors to my studio shop were always taken with the piece as I worked on it and I believe it has already helped as a marketing piece and will continue to for years to come.

This piece, along with the many other samples on display in my shop and studio are extremely valuable sales tools for me. One look around the place and my clients instantly understand that there isn't much we can't imagine and build. This customer confidence allows us to get the exactly the kind of work we desire. Samples work!

-dan

Sunday, August 25, 2013

All done - except for...

With the sculpting now all done it was down to paint and small details. It wouldn't take long. I spent about an hour putting on the rest of the base coats on the rocks. Then it was down to the final glazes. I did the dock first as it was very manageable with areas separated by the barnacles. The submarine, however, had to be done in one go as join lines would be visible afterwards if I stopped. It took about twenty minutes to polish off the submarine, quickly slopping on the glaze and then carefully wiping it off and keeping a wet line for the next area.


The submarine is now permanently glued into place, leaving some small bits to paint like the chains and hoists. The top wires will be positioned and fed through the dock to look like supply hoses. With that the piece will be done. It should't take longer than half an hour to wrap this project up. 

Stay tuned...

-dan

Saturday, August 24, 2013

Saturday morning fishing time

This morning I spent some relaxing time doing the last of the sculpting on the mechanical fish. I also did some more painting of the base coats. The fish is looking pretty good now. Two or three more hours should pretty much tidy this little fellow up.


I'll be also readying the display space in my studio for this piece. It will be on a long, low bookcase adjacent to my desk. The lighting is subdued and directional in that location - perfect for this piece. It is almost like it was designed to go exactly there.  :)

-dan

Monday, August 5, 2013

Paint!

This weekend is a statutory holiday in our province so the crew is off this Monday. This gives me a little more time to catch up on some personal projects - one of which is the mechanical fish of course. With Labor Day now less than a month distant the 'competition' deadline is looming. Looking at my schedule for the rest of the month means I had to put a few hours in to make sure I don't get behind.

Today was the day to apply some paint to the dock. I disassembled the dock one last time to make painting easier. I decided the background needed a good coat of primer before it's last paint, then I started in on the rocks. I painted out of multiple buckets of paint at once, randomly dipping my brush in the various colours. The rock work was a little bright but I knew with the application of the dark glaze , yet to come, everything would be toned down considerably. The look I was going for was a facility built in the 30's, used heavily for three decades and then left abandoned. There would be plenty of industrial grunge and grime. The heavy duty cast iron bits  would all sport a heavy coat of rust.


Once the base colours on the rocks were done it was time for the dark glaze. I kept things a little lighter at the top, darkening towards the base to add weight and age. The dark will frame the fish beautifully when we are done.


There is still some rock work to do on the bottom of the dock but it had to wait until the back was on permanently.


The textured blue background then recked it's final coat of metallic blue to make it ready for final assembly. With the lights turned on the contrast between the dark frame and the bright blue was amazing!


While I wait for everything to harden up properly and for the last rust to form (a 24 hour process) I hung the mechanical fish in place to see how everything looks together. The fish is still much too bright but that will tone down when I apply the glazes soon.


Now it is time to spend some time on other projects...  but I'll be back soon. Stay tuned...

-dan

Thursday, July 18, 2013

Looks like a fancy hubcap

For such a small and seemingly simple piece the medallion for the Mechanical fish involved lots of steps and procedures. It also meant that I would need a 1/16" ballnose bit - something I don't use very often.

The bulk of the file, save for the scroll lettering was done in EnRoute Pro. Each point for the compass star would be built individually as things turn out better that way.


Once all of my guide lines were eliminated the vectors I needed for my reliefs were much easier to see. 


With the point reliefs created it was time to start on the center ring of the compass. I built the ring and center dome separately.


Then I added an upper case 'D' to the centre. Before I created the 'D' relief I first did an offset so the thing lined of the letter were a little beefier.


I was no happy with the compass and it was time to make the background gear and circle reliefs. I used the star drawing tool to create an eight pointed star. Then I used the inner circle to trim the inside points. The outside points were trimmed using the jigsaw cutting tool.


I built up the relief in sequence, adding rivets as a second step.


I wanted a gear with a bevelled edge and so I used the limit to height command to do this for me.


Then I added a little texture with a bitmap from the TEXTURE MAGIC collection.


Then everything was positioned vertically and merged highest to form my final relief.


Building and adding the scroll was the final step. I did the lettering and basic lines for the scroll in Illustrator, then imported them into EnRoute.

I positioned and sized the scroll over the previous relief, then built the final scroll and the underlying folds. These were then made into flat reliefs of varying heights. Once all of the scroll bits were built I combined them to form one relief.


When I hit render I had what I was looking for but it needed to be arched to come over the gear and star. I would use an oval vector to modify the scroll relief. It took a bit of experimentation to get what I was looking for.


The last step was to sink in the lettering.

 The name plate was then sent off to the MultiCam for routing from 1.5" thick 30 lb Precision Board.


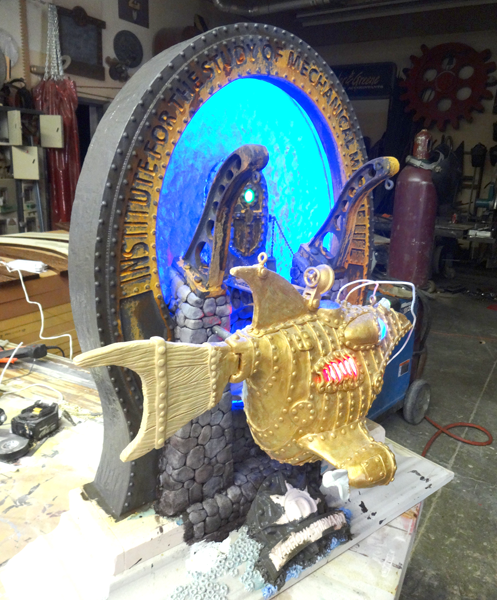
The name plaque will fit right in with the whole piece as I sculpt it in. I'll be adding some barnacles and sea life to add a little more theme and make the base part of the overall sculpture. Stay tuned...

-dan

Wednesday, July 17, 2013

Finally an idea I like.

Designing projects, especially one for myself can be challenging at times. When it's for me I tend to second guess myself more. I've been trying to come up with a medallion on the frame under the mechanical fish for some time. Over the last days I've done numerous sketches and a lot of research. Finally I just buckled down, determined to come up with something cool. It took four pages of scribbles in my sketchbook before the idea came together.

The design had to be highly decorative and yet not overpower the fish above. Finally I settled on five elements to the design. A riveted ring tied the design to the oval around the fish. A gear signified the mechanical theme. A compass rose made it nautical. The scroll provided a place for the shipyard name. And a 'D' plopped in the middle was a fun way to sign it (this being a 'D-CLASS' vessel and all.

The drawing below is the ten minute scribble - right out of my sketchbook, done with a ballpoint pen. It would make a fine tattoo on the captain's arm I'm sure.


As always it will be refined and altered as necessary as I build the 3D files in EnRoute and Illustrator. Once I'm done routing  hand work and sculpting will embellish and refine it even more. I look forward to the process of bringing this idea to life. 

Stay tuned...

-dan

Tuesday, July 16, 2013

Grand entry

Something as cool as a mechanical fish submarine needs a dock with a grand entry system. A drawbridge is just the ticket. Today I added the hinges and mounting plates for the chains (yet to be added) The rock work also was applied today. The key to finding the time to accomplish a project like this is to do a little each day. It's a great reward at the end of the day. The 'D' in the 'cast iron' drawbridge is to signify the class of submarine I am modeling - the legendary D-CLASS submersible. More to come on that later.


Tomorrow this will be ready for paint and then final assembly. Stay tuned...

-dan

Monday, July 15, 2013

Rockin'

This week is one of sadness for our family as we lost my father-in-law after a long and hard fight against cancer. Spend time with those you love while they are with you. Tell them you love them often.

A little work was done in the shop but only in small bits and pieces. The mechanical fish got a little attention in-between all the other things. I finished the sculpting of the fish's riveted skin and couldn't resist putting on the first of many coats of paint..


Next up was the rock work on the dock pillars. I used Abracadabra sculpting epoxy to form smaller rocks at the top and slightly larger ones as I worked my way down. This is a form of forced perspective to make the pillars appear taller than they really are. The larger stones also give weight to the bottom of the wall and just make it look right.


The ramp to the fish was the next order of business. I built the files entirely in EnRoute Pro. To keep things simple and easy to track I built everything separately and then used the merge commands to make the final relief. The holes in the floor grate were first as zero height reliefs.


Then came the deck plate as a 0.25" thick flat relief. The circle surrounding the 'D' was then created by using the subtract from relief command.


Then I created a half inch thick flat relief for the side beams.


The center portion was subtracted from this relief 0.30". The oval cutouts were created as separate zero height reliefs.


The ovals were then MERGED LOWEST to create the cutouts in the beam.


As a last step I also MERGED LOWEST on the floor grate relief to create the holes.


The small pieces didn't take long to route. I glued them up with a two part (five minute cure time) epoxy. One more piece of the puzzle is in place.


Later I'll add some faux hinges to the top and some chains with a counter balance dead weight on each side. The door handle is also to come along with a few other details. It won't be long until this section is ready for final paint and assembly. Stay tuned...

-dan

Monday, July 8, 2013

This thing has TEETH

The new house has been dominating my working schedule in the last days, mainly laying floor tile. The good news is there are only four or five more days of work until that task is behind me.

We keep work going in the shop however with various small projects underway. The Mechanical fish is on that list of course. I've started on the sculpting of the detail, beginning with the mechanical fish. Because of the overlapping riveted plates it is necessary to start at the back and then work forward. So far I've managed two one-hours sessions of sculpting and made pretty good progress. The routed form as a base makes the sculpting very fast and minimizes the amount of sculpting epoxy I need to use.


Stay tuned for more progress...

-dan

Thursday, July 4, 2013

More lights!

I've been busy for the last while on other projects but tonight I managed to squeeze in a few minutes on the mechanical fish project. Todays task was to hollow out the eye sockets, inside the hatch, gill and mouth areas of the fish. In each of these areas I inserted LED lights that would add a magical glow. Ping pong balls cut in half proved to be perfect solution for the eye balls as the blue lights glow through beautifully and with just the right intensity.


I still have to design and route the ramp from the door to submarine hatch but other than that the upper portions of piece are now ready for hand sculpting of the details and then paint. I can hardly wait!

There will still be some details on the bottom that need to be routed but that will have to wait until the upper portions are complete. I like to design on the go, making modifications and additions as necessary.

Stay tuned as the next series of posts (on this project) will bring it all together.

-dan

Tuesday, July 2, 2013

Fishing derby for all


Our little mechanical fish sign 'competition' is getting lots of interest. And I'm geting lots of emails and messages asking if others can play and if so what the rules are. The answer is YES!
It all started as a dare of sorts. Jamie Oxenham built a nice little sign for his own studio. Doug Haffner and I were sitting with Jamie at the workshop in Indiana and we commented how we liked his fish. Jokingly we also said we thought he could do better and that we knew we certainly could. The challenge was instantly on.
Every challenge needs a few 'rules' of course. Our signs needed to include the words 'The institute for study of mechanical marine life' and also a dimensional mechanical fish of some sort. Ideas needed to be original. A dealine was also set for Labor Day - September 2, 2013.
Since then there has been a flurry of exchanged emails, with plenty of friendly banter  and rib poking - all in good fun of course. The 'competition' is FIERCE. Who will win, how will things be judged, does any of this matter? The whole idea is to build a fun, creative piece and to push our own personal limits. The end result for all who participate is to have a cool display piece in our own studio/showroom at the end of it all. Doug, Jamie and I will be posting step by steps on our blogs with the purpose of sharing with others the various techniques we use.
I've posted a number of journal entries here and also on the other blogs I write which, as expected has gotten quite the response. Since the the start where the three of us sat down in Indiana and began this thing others have also joined the fishing expedition. Mechanical fish are now being designed and built by nine people I know of across Canada and the USA, and I'm sure a bunch more I don't. That's all good.
What is happening is exactly what I have long wished for. People are creating some pretty cool artworks and having fun and learning in the process. It sure beats working! I sincerely hope you and many many more join in.
There are going to be some very wonderful mechanical fish created from what I've seen so far. Yesterday, I recieved an email from Wray Basset today from Pennsylvania. His fish will be a crab. (well withing the 'rules' I would think) He sent a bunch of pictures of progress to date and it's looking great!
So if you are up for a little fun and want to create a mechanical fish of your own - well go ahead. Bring it on - just bring your 'A' game.  :)
-dan