WELCOME!


It is hard to believe that it was almost ten years ago I witnessed a CNC router in action for the very first time. I was fascinated with what I saw and simply had to have one! Although I had been in the creative end of the three dimensional sign business for most of my life I didn't really know what I would do with one - but I just knew it could do fantastic stuff.

Through extensive research and LOTS of hands-on practice I quickly found out that my MultiCam router was capable of just about anything imaginable.This journal will chronicle that journey to date and continue each week with two or three entries as I continue to explore just what is possible with this wonderful tool... -dan
Showing posts with label complex reliefs. Show all posts

Friday, February 25, 2011

Saving the best for last?

Almost 30 years ago I read of a new technique to sandblast wood to raise the grain on the background of signs. The article was written by Mike Jackson. I rushed out and bought a large compressor, a sandblast pot and the gear I needed. I remember watching with AWE as the softer wood melted away leaving he raised grain behind. The very first piece I did was a sample that hangs in my shop to this day.  Five years ago as I explored what was possible with EnRoute and our MultiCam router I looked up at that old sample on the wall and wondered...  could I duplicate the magic of so long ago?  It took me  while to figure out the best way to light and photograph the ancient wooden sample. It took a while longer to figure out how to manipulate and enhance the photograph to best work as a bitmap in EnRoute. I remember well watching in AWE once more as this magical machine turned a sheet of Precision Board into that same beautiful raised woodgrain. More experimentation with modern acrylic paints eventually meant that we could duplicate the rich colors of the original wood as well. Only this time our sample would not split, weather, lose it's finish or deteriorate like the wood did so quickly. This was better!

The last name started with the sandblasted redwood bitmap.


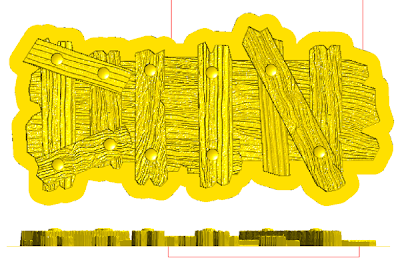
Because our name plaque was relatively small I first stretched out the bitmap vertically. Then using the drawing tool I created some board shaped vectors.


I created flat reliefs from the vectors and then added the texture with the bitmap. 


Then I used the rotate tool to build the letters of Don's name. Since he's a cabinet guy (who most likely builds very accurately most of the time) I decided to loosen things up some. Lastly I used the dome relief tool to create some routed nails to 'hold' it all together. I then merged it all together over a zero height background.


In retrospect the back board should have been stretched out a little to the left but it will be OK. We'll use our glazing techniques to build up the rich colors of my sandblasted redwood sign of old.


The name plaques got their base colors today. Over the next few days Rebecca will work her magic on them to bring them to life. Stay tuned...


-dan

Thursday, February 24, 2011

Things you can do with bitmaps

Parametric textures are cool and I sometimes use them to good effect. But many times the textures I want to create can only be done with bitmaps. In this case for Khai's panel I could easily have created a vector of the design. It was done as an oversize belt buckle sign background. With the powerful tools in EnRoute it could have been traced in an instant, and this file used to achieve pretty much the same effect as the bitmap I used. But this would have only added one more step to the process. The present parametric textures could not create this texture.


When it came to the extra texture on the background and the lettering it could easily have been done with a parametric texture. I find it so easy to use the bitmaps which I am familiar with but I am the first to admit it's not the only way. That is the beauty of a program like EnRoute.


For Kirsten's name plaque we are back in Bitmap texture territory. The vector files were done in EnRoute.


The bitmap file was created in PhotoShop and is a lot simpler than it initially appears.  The leaves are cut and pasted, adjusted for value and rotated randomly. The effect achieved inside EnRoute with the file is amazing! 


Every user (myself included) has favorite methods they tend to use given the choice. The program is powerful enough to allow us to do so. My advice is to try them all and become familiar with all the tools available. As you continually push the boundaries you will find occasion to use them all.

-dan

Two more done

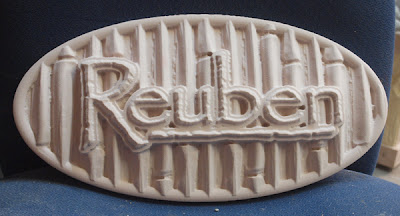
Joyce's and Reuben's panels are relatively simple, but great exercises for those just starting with the textures in EnRoute. The vectors were simple. I needed to build the border and frame separately to make things simple.


I worked on the border first, a simple dome relief with the rivets added in the net step/ I them imported the splotches bitmap and applied it to the file to instantly create a rough surface. 


Then I created a slightly domed relief, added the letter border and texture. Lastly I added the lettering and added the woodgrain texture  to the background


It routed up to become a very cool name plaque. I know Joyce has done a lot of sandblasted signs and I wanted to show her just how easy it is to do with a router.


Reuben's was a similarly simple plaque. I created the border and the background reliefs as slightly domed files. Then I added the bamboo bitmap texture. Since the frame, background and lettering border were separate I could then nudge them up and down into position before combining/merging them together. 


As a final step I added the lettering as a beveled relief.


The files were cut on the MultiCam router into 1.5" thick 30 lb Precision Board.


-dan

Using bitmaps to shape panels

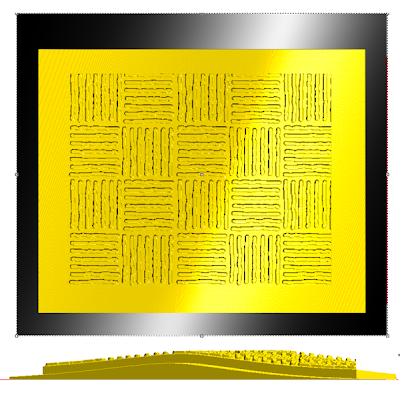
I probably use bitmaps more than most folks who use EnRoute, but they can be used for so many cool effects. This name plaque is another good example. I started with some squiggly lines, sized them so the 1/8" bit would fit comfortably then created my vectors based on this size so no squares were cut. I created a relief and added the squiggly line checkerboard pattern. 


Then I imported the next bitmap. a dark to light to dark fade which I had created in PhotoShop. this creates a pleasing wave when applied to a relief.


I had created a border around John's name which I created as a flat relief, then applied this same wave bitmap. This ensured the two files would match.


I built a panel/border then merged everything. Then I used the dome tool to add the lettering vectors.


The panel was then tool pathed and sent to the MultiCam to be routed from 30 lb Precision Board.


Another panel was ready for the paint shop...

-dan

Tuesday, February 22, 2011

Tropical delight

Shawn (Mark's wife) is also soon to be from Hawaii and I decided on a palm frond for her name as well. I knew she is a fan of Disney and so I made her letter style extra playful. I constructed the elements as vectors bisected the leaves with a line and then used the jigsaw puzzle tool to create the two halves. The stems matched the middle sections.


I then lined everything up in preparation of the creation of the reliefs.


First up was the background plate as a flat relief.


This was modified using an oval vector. The lettering was created as a separate relief and also modified with the dome tool using the oval.


Then I selected the background plate and created the leaves using the dome tool. The letter borders were nudged into position and everything was merged (highest) together.


The stems of the leaf were created as a separate relief and then modified using the dome tool and the oval relief. If you look close I missed one of the stems (second from the right) I didn't catch it until after the panel was routed. but I can easily add it by hand with some sculpting epoxy.As a last step, and using the dome tool I added the lettering. 


The file was then tool pathed using EnRoute and sent to the router.


-dan

Elegance

My daughter Rebecca who helps paint our name panels for our Sign Magic Workshops is always delighted when ladies take our workshops. It gives her a chance to do 'some girlie' flavored panels. I try and oblige with the designs. The panel had to feature a flowing script of course, a letter style from Letterhead Fonts. The bottom border was created as a flat relief, then a domed center was added. The outline of the lettering was also created as a flat relief and then modified using a similar sized oval. I did the lettering border and the plaque separately so I could float them to final position after the texture was applied.


The maple leaf bitmap texture is another from my DVD of textures. The whites raise the highest, then the grays and the black does nothing. 


With only one click of the mouse a stunning texture was instantly created. The lettering border was then nudged into position vertically and then merged with the background.


Finally the bevelled script lettering was added finishing the file. 


I routed the panel on the MultiCam from 1.5" 30 lb Precision Board in about 30 minutes. This heavy board leaved superb detail and required little finishing.


We are making great progress on the plaques... but then four more people signed up today filling our workshop to the max in an instant.

-dan

Using a bitmap to slope a relief

Bill's name plaque is a great example of how I sometimes like to use bitmaps to create complex shapes in EnRoute. While it could be accomplished using sweep two rails I like the more organic look achieved with this method. Since the final results are to look like beaten copper plates riveted together it is even more appropriate to do it this way. 

We started as always with the vectors. I used a casual lettering and sized it ti fit the rivets between the two 'L's which are always tricky to kern.


Once I had create the four reliefs of the plates I imported a bitmap from my collection called uneven fade. It was sized and placed over each of the quadrants in turn and a value of .3" was inputed before executing. this effectively sloped each section so they could appear to overlap. 


I nudged them up or down a click or two to make each joint even, checking in the 3D render window.


Then I applied a second bitmap called Splotches over all four sections to make the panels look like hammered and aged metal.


I combined the four panels and then added to the relief using the dome tool to create the rivets.


The lettering border was built as a separate relief, and then nudged into position vertically.


Finally the bevelled lettering was added to complete the file


I always like to check it in the 3D render window one last time before I tool path it and send it to the MultiCam.


The routed panel is a great contrast in smooth bevelled letters and a textured panel. Painting this up will be fast and easy!


-dan