WELCOME!


It is hard to believe that it was almost ten years ago I witnessed a CNC router in action for the very first time. I was fascinated with what I saw and simply had to have one! Although I had been in the creative end of the three dimensional sign business for most of my life I didn't really know what I would do with one - but I just knew it could do fantastic stuff.

Through extensive research and LOTS of hands-on practice I quickly found out that my MultiCam router was capable of just about anything imaginable.This journal will chronicle that journey to date and continue each week with two or three entries as I continue to explore just what is possible with this wonderful tool... -dan
Showing posts with label Sonbuilt logo relief. Show all posts

Monday, February 7, 2011

Flat Sonbuilt logo

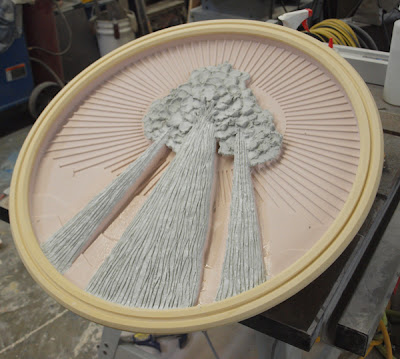
The flat (in my terms) Sonbuilt logo was routed in two copies. One measured 24" across and will be inserted in a door as part of a trade show display. Ot was routed from a piece of 2" thick 30 lb Precision Board. I did a rough pass with  3/8" bit and a final with a 1/8" tapered ball nose bit.


The 3D logo was routed as one piece. The top round trim piece was routed separately and glued on with epoxy. this will allow the logo to just pop into the door nice and clean.


It took minimal sanding to get things ready for paint. I then applied a thing layer of sculpting epoxy to the tree. For the bark texture I used crumpled up tinfoil and then used a sharp stick to scribe in the vertical lines. It only took a few minutes.


The second version of the 3D logo was as part of a 20" tall x 48" wide sign. The round emblem measured about 15" across. I created the final tree texture by hand sculpting it as well. This sign face was routed from 2" HDU leaving a final thickness of about 1.5" on the sign. I laminated another 1" piece of Precision Board behind it to give the sign substantial look.


The final two small signs for this project are two builder's association logos. They were routed from 1" 30 lb Precision Board and then glued up with some 1.5" board to make them a similar thickness as the sign pictured above.


Next will come primer and the final coats of paint - just in time for the fast approaching deadline.

-grampa dan

Tuesday, January 25, 2011

Same logo - different challenge!

My customer want dimensional logos in a variety of places and sizes for his display. One will be on a dimensional sign overhead and one will be routed as an insert for the door. No doubt there will be more made for other purposes in the future too. But these were to be routed as comparatively shallow reliefs. The first file was to be about 36" across and 2" deep. So it was back to the original file to see what we could use this time. I  decided most the the vectors were usable with the exception of the starburst. It would be too fragile as a routed file. 


The hills/clouds were resized and tweaked to make sure they were bigger than the circle. Then I substituted the sunburst I had created for the diorama, resized it, and then using the jigsaw puzzle tool cut it out to the right shape.


The I created a bowl shaped relief using the circle vector. This relief was modified four time using the three hill/cloud shapes and the starburst. I added .15" of depth each time.


Then it was time to add the trees. The tree tops were simple reliefs which were toggled to the right height using the arrow keys in the bottom view. The tree trunks were rounded reliefs which were then modified using the vertical bark vectors to create  .15 difference in height. 


They tapered nicely but I needed to tip them into the center of the picture. In our workshops I've seen Jeff Hartman do this in seconds... but I couldn't remember how he did it. I struggled for a while before I decided to do it my way instead.  I created a vertical blend in PhotoShop and imported the bitmap file into EnRoute. I resized it to suite and then used it to modify the tree reliefs. I applied a value of .75" meaning the black would do nothing, the white would change .75" and the grays would be somewhere in between. It effectively tipped them just what I needed. Then, using the down arrow key in the side view I pulled the trees down into the picture just the right amount.

This side shop is of the file after I tipped the trees using the bitmap file. The difference in height where the bottom of the bitmap file was is very obvious. This will be cut off when I merge the files to the round disk.


Then I merged everything together and the file was ready to tool path. My customer is bringing me the door tomorrow with a hole already cut into it. I'll measure carefully, then resize my file and send it to the MultiCam. 


The file will take a little handwork to finish, especially at the top of the tree and perhaps a little die grinder work in the sides of the tree trunks. But with only a few minutes of work by hand the logo is scaleable and relatively quick to do.

-dan