WELCOME!


It is hard to believe that it was almost ten years ago I witnessed a CNC router in action for the very first time. I was fascinated with what I saw and simply had to have one! Although I had been in the creative end of the three dimensional sign business for most of my life I didn't really know what I would do with one - but I just knew it could do fantastic stuff.

Through extensive research and LOTS of hands-on practice I quickly found out that my MultiCam router was capable of just about anything imaginable.This journal will chronicle that journey to date and continue each week with two or three entries as I continue to explore just what is possible with this wonderful tool... -dan
Showing posts with label Workshop name tags. Show all posts

Tuesday, June 13, 2017

Another name plaque

With the arrival of a guest in our shop tomorrow it was time to create a name plaque. Julio wants to learn how we do our finishing and there's no better way than doing it hands on! In order to demonstrate our techniques we needed a second name plaque as well, so Grant (my soon to be son-in-law) is getting a name plaque as well. Both plaques are to be identical save for the name.

I started by building the vectors for the plaque components


I then selected the plaque outline and created a flat relief. 0.45" tall.


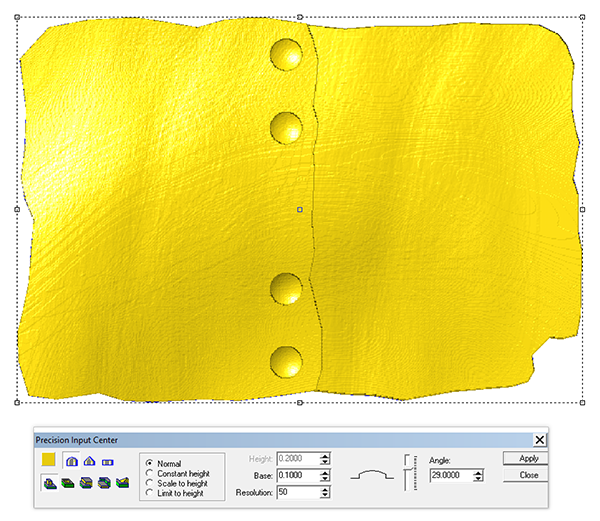
I then imported a sandblasted woodgrain bitmap which I sized to fit on the board. I applied it with a value of 0.2" tall.


The metal bands were next, created as flat reliefs.


I imported a second bitmap to add some texture to this band. I input a value of 0.1" for this procedure.


Then I modified these two reliefs by using the add to tool. This created the flat washers.


The bolt heads were next and I used a value of 0.3" tall.


I then selected the metal band reliefs and the board relief and combined them into one relief.


The lettering outlines were next, also created as individual reliefs. Note I did both names at once to save time.


The lettering outline reliefs were then modified by adding the lettering - also a flat relief.


I then duplicated the wood relief and positioned the second name appropriately onto it. The last step was join the letters by merging highest with the wood plaque base relief. The two plaques were done separately.


I could then tool path the two plaques and send them to the router. They were routed from a piece of 1.5" thick 30 lb Precision Board.

Monday, April 25, 2016

Last name plaque for the workshops

We've decided (after much deliberation) that the Sculpture Magic Workshop we are holding at the end of this week will be the last. After ten years and hundreds of eager students it's time we give it a rest. It was a difficult decision as I am aware of many who still wanted to come.

The last workshop (like most of them) will be a full house. We had a flurry of last minute sign-ups and so we are busy making a few more name plaques. That too has been a fun and learning experience with over 300 unique name plaques designed and routed through that decade. The last name plaque for the workshops belonged to Ron. Like most of the others the design is one that makes me think a little and used a variety of functions in EnRoute. The vectors were created in EnRoute of course.


I first created a flat relief that was 0.6" tall.


Then I modified this flat relief using the dome tool and a pill shaped vector that was drawn around our relief.


I then used the subtract from (flat relief) tool to drop the centre portions around the diamonds and lettering outline.


I then imported a sandblasted woodgrain bitmap (from the TEXTURE MAGIC COLLECTION ) and enlarged it before applying it to the sunken portion of the relief.


I then used the bevel tool to create the diamonds at each end of the name plaque.


The last step was to use the bevel tool to shape the letters.


Monday, March 14, 2016

Five more and the painting begins

The name plaques are all making their way through the painting process now. Craig's is the last one raw off the router. Because we use 30 lb Precision Board priming isn't necessary.


Over the next while I'll be posting some progress shots of how the name plaques come alive through the painting steps. Even though pricing is not necessary we still do it to ad some subtle texture. The secret of course is to use Coastal Enterprises thick bodied FSC-88 WB primer. WB stands for water base. We brush it on. Generally we have two gallons of primer on the go. As we work our way down into the first gallon it tends to get real thick - like sour cream. This is perfect for adding texture with a brush. The second gallon is a fresh one, which brushes out nice and smooth when we need it.


Those small bumps and ridges on the edges of your CNC cuts are easily smoothed out with the primer. They recommend (and we do too) that we put the pieces under a fan for a couple of hours to drive out the moisture.


Then when the primer has cured it is time for the base colours. We always triple coat and use a top quality acrylic house paint. We allow it to dry between coats, most often with a fan blowing on the piece.


Stay tuned for more progress shots as the glazes go on.

Sunday, March 13, 2016

Four more name plaques

With the first Sculpting Magic Workshop now only four and a half weeks away we are in full get ready mode. Most of the name plaques are routed and sample boards are almost done. About one third of the name plaques are making their way through the painting department with more to follow soon.

I thought a picture update of a few more of the plaques would be of interest. It is fun to come up with endless new ideas.


Tuesday, March 1, 2016

Six more routed

With all of the other things going on in our shop these days we manage to design and route three or four name plaques each day. There are still six weeks until the workshops so we will have time to do them at a somewhat leisurely pace. Six more are now ready for paint.


Simon

Simon's name plaque was all about using texture bitmaps to manipulate the relief in cool ways. I wanted the finished name plaque to resemble two plates riveted together with the lettering raised over the top. The first step was to create the necessary vectors.


I then created two separate fat reliefs.


When I hit the render button they appeared as one relief but this is because they were the same height.


I then used a freehand shade to create a slightly sloped and irregular warp. The same bitmap was applied to the second relief (on the left) - one at a time.


Once I had applied the bitmaps I checked out the front view to make sure I had the results I was looking for.


I created a rectangle vector (bigger than the lettering outline and then applied a second bitmap of a random fade. This will create a twist in the relief. I combined the two riveted plate vectors and applied the same twisted bitmap to them with the same value of 0.6" (which is quite large and will produce a dramatic result.


The rectangle was hidden below the combined plate reliefs.  I would deal with that a little later.


The rivets were created next using the dome tool.


I then modified the rectangle relief by adding to it using the lettering border as a mask. I hit the render and it was peeking out a little but not enough.


The solution was to add more height to the modification. I thought I had added enough but when I added the texture to age the plate I had the same problem and so I added more height to the lettering outline another time.


Once everything was nudged vertically into position it was time to MERGE HIGHEST with the base relief and the lettering outline relief.


The last step was to add the raised dome lettering.


I tool pathed the relief and then sent it to the MultiCam to be routed from 30 lb Precision Board.  The raw plaque looked pretty cool!