WELCOME!


It is hard to believe that it was almost ten years ago I witnessed a CNC router in action for the very first time. I was fascinated with what I saw and simply had to have one! Although I had been in the creative end of the three dimensional sign business for most of my life I didn't really know what I would do with one - but I just knew it could do fantastic stuff.

Through extensive research and LOTS of hands-on practice I quickly found out that my MultiCam router was capable of just about anything imaginable.This journal will chronicle that journey to date and continue each week with two or three entries as I continue to explore just what is possible with this wonderful tool... -dan
Showing posts with label small house marker. Show all posts

Friday, December 23, 2011

Hailey's first sign is done

Hailey was actually off today but at 8:00 am when I unlocked the shop doors she was there waiting. today was the day she would put the finishing touches to her first sign. It used all the tricks and techniques we have used for the Fox and Hounds project. She used the die grinder, sander, she sculpted, primed and painted. The there was a little twisting of wire for the knarly tree and layers of colored glaze to tone it all down, tie it together and make it look old.


Christmas morning Hailey will proudly give it away to her beloved grandparents. The sign is for the family cottage by the ocean. She has a right to be proud too for it is a nice looking sign. 

Well done!

-dan

Thursday, December 22, 2011

Ready for paint

This morning Hailey was at the shop bright and early, eager to work on her Christmas present. That was good for it meant I would be kept on schedule as well.  We decided I would work on mine and then she would follow, doing as much as possible on hers. I cleaned up the glue line between the front and back pieces with the die grinder, then added a little texture to the sides and back of the base.  She followed as soon as I was done. Then we mixed up a little Abracadabra Sculpting epoxy to fashion the bush along side of the lighthouse. We used an old tooth brush to add in the texture. The shingles were the next addition to the roof, also done with sculpting epoxy.

Then I took nine strands of tie wire and clamped them in my vice. I used a pair of pliers to twist them into a tree shape, branching out as we got towards the ends. Once the the was formed I drilled a hole in the rocks, filled it with sculpt and then pushed in my wire tree. Some twisted bits of sculpt formed some convincing roots around the base. As quick as that the sign was ready for paint.

Here's a pic of Hailey sculpting the roots of her tree...


And here's a shot of my sign ready to be primed and painted.


I'll post some more pictures later of it being painted.

-dan

Wednesday, December 21, 2011

Never too late

With Christmas mere days away now it is almost past time to get the last of the Christmas presents ready for the big day. Hailey, one of our employees reminded me today that I had promised to help her make a lighthouse name plate for someone on her Christmas list. This year I have my sister-in-law as my person to buy/make a gift for and I just hadn't got there yet. I know she loves lighthouses as well so this was a golden opportunity to kill two birds with a single stone.

I first built the vectors for the two different names. I would add the same lighthouse to both plaques as a second step. The lighthouse would be created using the rotate/extrude  tool. The lighthouse profile is simply wound around an axis to create a mesh.


Since meshes can't be tool pathed the next step was to create a flat, zero height relief and then merge the mesh to the relief. The menu is made live by selecting both the relief and the mesh. If you look close at the menu in the picture you will see I have not yet selected MERGE HIGHEST instead of add to relief.


After you do the merging the file will look like this. Then I selected the mesh (which is still there) and deleted it.


Then I opened the create slices menu to slice the flat relief from the lighthouse as shown below.


Slicing the rleif creates new slices without destroying or modifying the original file.


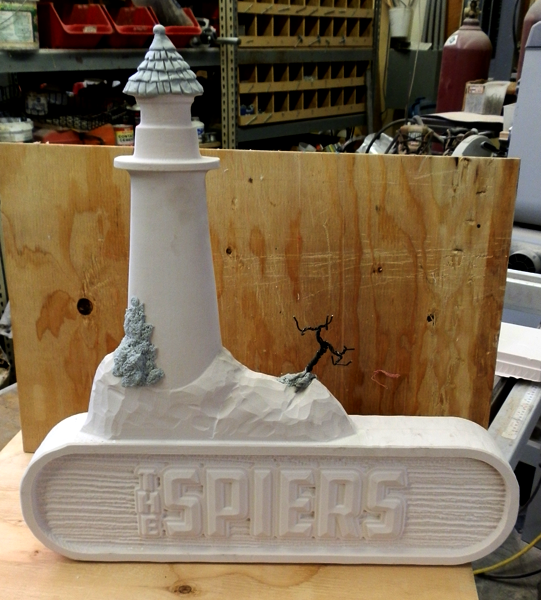
The lighthouse was then resized and places where I wanted it to be in relation to the rest of the sign. To create a faceted rock I created an irregular vector shape, then created a beveled relief using the limit to height command. This slices off the top nicely at a specified height.


The last relief I made was the name tags of he sign. I've shown this process many times before. If you wish to see it select 'Name plaques' from the previous posts. Before I did this step I also created a blank copy which would be flipped to form the back side of the plaques. The next step was to merge everything together onto a single background.


The two plaques were slightly different sizes. I then arranged and tool pathed the reliefs before sending them to the MultiCam. I let the machine do its job while we went out to supper to celebrate my grand daughter Phoebe's seventh birthday.


The files had been routed from 30 lb 1.5" thick Precision Board. I blew off the dust and using the PB Bond-240 one part glue I fastened and clamped the pieces together. By morning they will be plenty ready to finish up and paint - just in time for the big day.


Stay tuned for the finished pieces tomorrow.

-dan