WELCOME!


It is hard to believe that it was almost ten years ago I witnessed a CNC router in action for the very first time. I was fascinated with what I saw and simply had to have one! Although I had been in the creative end of the three dimensional sign business for most of my life I didn't really know what I would do with one - but I just knew it could do fantastic stuff.

Through extensive research and LOTS of hands-on practice I quickly found out that my MultiCam router was capable of just about anything imaginable.This journal will chronicle that journey to date and continue each week with two or three entries as I continue to explore just what is possible with this wonderful tool... -dan

Saturday, March 30, 2013

Building a train - part sixteen

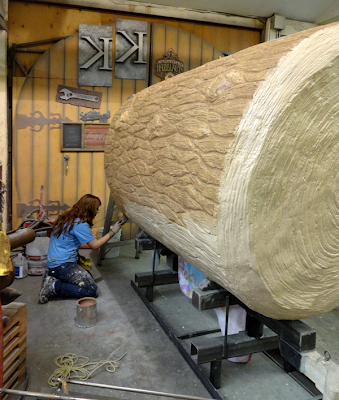
I posted pictures and a small writeup of the log car that would accompany the steam locomotive on the Whistle Punk Hollow Adventure Golf project. That article covered creating and routing the face of the log which would act as a giant sign. Around that we welded up a framework of quarter inch thick steel bar, then attached expanded lath to that framework. Over this we troweled on a thick coat of fibreglass reinforced concrete and then as it dried carved in the woodgrain and bark textures. This was allowed to cure for a few days.


We then primed the Precision Board face of the sign with FSC-88 WB primer. This too was allowed to cure before we began painting the log with two base coats of acrylic paint. 


We then applied a couple of coats of darker brown glazes. wiping off the excess and leaving the crevices dark.


The lettering was painted and then all of the undercarriage assembled. Today was the time at last to drag the piece from the shop and load it onto the trailer in readiness to transport to the site.


We transported the locomotive last week. As always the journey was fun!


Stay tuned for more instalments...

-dan

Friday, March 29, 2013

Assembling the pieces

As I sorted and transferred my old files to a new computer this past week I put all of the router files I had created for the new house in one place. I was surprised to see that there were more than 200 files so far. I haven't figured out how many pieces we have routed but it is many times the two hundred files.

This past week we began installation of the big crown moldings we made a while back. The backs were first hollowed out to accommodate the Heico LED modules. The moldings looked very cool as they were installed.


It took lots of imagination to figure out how to transition the various wall components. Now the wainscot, window trim and upper crown moldings.


We have also finished painting the samples that show the various colors.


I couldn't resist installing a few of the LED's into place to see how it would look at night when it is done.


The butterfly theme continues on the door corner blocks as well.


 The many pieces are quickly coming together in the house. It is just a matter of weeks now until we will move in at last!

-dan

Going to ISA

Next week is the International Sign Association show in Las Vegas. It is the largest sign show in the world with more than 20,000 attendees. I'll be there once more at the MultiCam booth. They will have a place for me to speak and a MultiCam 3000 series router, very similar to the one I use in my shop. I'll be talking about the many cool projects we've done on the machine and showing pictures too. I'll also be showing how I create our files in EnRoute and I'll be firing up the MultiCam there to actually create some cool stuff.


The little green truck we built last week will be on display at the Coastal Enterprises booth.

If you are at the show please drop by and say hi!

-dan

Lasso another

Don's name plaque employs a variety of techniques.  I started with a dome relief, then modified it by adding a raised center. I used an enlarged sandblasted woodgrain bitmap from the TEXTURE MAGIC collection to add a cool texture to the piece.

Then I built a cross section of rope which we would use for a border.


To create the rope I used the extrude command to make a mesh file. I just followed the prompts.


I went into the front view and nudged the mesh vertically until it looked good. Then I selected both the mesh and relief which allowed me to access the menu at would merge the two types of files.


I then created a flat relief of the letter outlines. This relief was modified with a dome shape (to match the woodgrain relief) by using the circle vector I had used to create the relief.

Once gain I went to the front view to nudge the relief vertically and then MERGED HIGHEST to the base relief.


Then I raised the lettering by modifying the base relief.


I thought it looked a little plain and so I imported the splotches bitmap and added a little texture to just the letters.


The file was now ready for tool pathing and then was sent to the MultiCam. It was machined from 1.5" thick 30 lb Precision Board.

-dan

Wednesday, March 20, 2013

Celtic delight

The build of this name plaque started a little different than most. We would start with the bitmap and let it determine the shape and proportions of our plaque. The Celtic weave bitmap is part of the TEXTURE MAGIC COLLECTION I imported that into EnRoute as a first step. Although I wanted the plaque to be horizontal format it is not yet possible to rotate bitmaps inside EnRoute. So it was a simple matter of building the file vertically and then rotating it 90 degrees for later steps. I built the vector around the bitmap and then created a flat relief that was 0.3" thick, then adding the texture bitmap at 0.2" thick.


Then I rotated the relief 90 degrees and inserted the lettering and outline. I also built the border as a separate relief using the dome tool with a 1" vertical edge.


I created a separate flat relief of the lettering border. Then I imported the splotches texture and applied it with a value of 0.1"  The Celtic weave looks so much better with a little texture to age it down a little.


I made sure everything fit vertically inside my 1.5" thick Precision Board and then merged highest onto a zero height relief. The last step was to modify this relief by adding the lettering. It was domed slightly with a base (vertical side) on the lettering of 0.15"


Then it was time to tool path the file 3/8" ballnose bit for the rough pass and a final pass using the 1/8" tapered ball nose bit with a 80% overlap.


The texture catches the light beautifully and will paint up in a spectacular fashion.

Stay tuned for more...

-dan

Tuesday, March 19, 2013

Killer of fish

A perfect name plaque for a fisherman on your list would be this next one. I made it for John from Colorado. There are a couple tricky steps in making this plaque as I wanted the fish texture to go through his name but not through the border around it. The files were created in EnRoute Pro 5. The vectors are first.  I started with the letters and simple oval. I then created an offset oval (to the inside. This vector was distorted using the distortion tool to create a slightly wavy line.


I created a comes relief using the outside vector, modifying it by adding the center oval as a raised relief ( 0.15" )


I then added a texture using 'SPLOTCHES' from the TEXTURE MAGIC collection using a value of 0.1".


The fish texture was next, again from the TEXTURE MAGIC collection, this time with a value of 0.15".


The lettering border was first created as a flat relief 0.5" tall. I then modified it using an oval vector and the dome tool to make the border the same radius as the base relief. I then went to the front view and using the up/down keys positioned the letter outline relief to the right place in relation to the base relief.

Then I selected the lettering (not the lettering outline) and the base relief and modified the base relief by raising the lettering. It had the fish texture through it. it.


I could then merge highest the lettering outline and the base relief creating the effect I desired.


I tool pathed the file using the 3/8" ball nose bit with a 50% overlap as a rough pass. The final pass was with a 1/8" tapered bit at 80% overlap. It was then sent to the MultiCam at 300 inches per minute to be routed from 30 lb Precision Board.


The finished plaque measures 9.5" tall by 15" wide by 1.5" thick and tool about 35 minutes to route.

Stay tuned for the next plaque...

-dan

A star is born

As with all of our workshops we host here in Yarrow, we are making name plaques for all of our attendees. Each will be unique. The name plaques serve a variety of important purposes. They are a wet of welcoming our guests and showing our appreciation for them traveling to our studio for our workshops. They demonstrate the variety of routing techniques we can achieve using EnRoute Software.

The name plaques also serve to sharpen my own design skills and re-acquaint myself with every aspect of the software. Each time I sit down to design and create twenty-five (or more) plaques I find I learn  lot in a hurry. The challenge was to create similar sized but unique name plaques, each measuring about a foot square and one and a half inches thick. Each was milled from 30 lb Precision Board.

Though the next series of posts I will take you through a number of the name plaque projects. I encourage everyone who wants to learn to use EnRoute proficiently to do similar projects for family and friends. The more you do the better!

The first plaque is a simple one that uses a variety of techniques. It was for Ed. I decided a star shape was the starting point. This file was created entirely in EnRoute Pro 5. I didn't grab a screen shot of the starting vectors but they are shown below in other shots.

The first step was to use the bevel tool to create a star relief. I recall it was at a shallow angle of about ten degrees. The sides (base) of the star were 0.35" tall.


Then I added a splotches texture from the TEXTURE MAGIC collection. I used a value of 0.15"


Then I created the letter outline as a separate flat relief with a thickness of 0.6"


 I then modified this flat relief using the circle vector. Once I had my rounded relief I went to the front view and nudged it into place vertically.


I then merged (highest) the letter outline with the star relief.


Then, again using the bevel tool I created the prismatic lettering. Make sure you select the base relief and modify it with the lettering vectors. The base (vertical sides) of the letter was 0.15 and the angle was relatively shallow at 18 degrees.


 I cut the star from 30 lb Precision Board using two bits. The first roughing pass was a 3/8" ball nose bit with a 50% overlap. The final pass was using a 1/8" tapered bit at 80% overlap. Both tools were set at 300 inches per minute on our MultiCam. The file tool about twenty minutes to run.


Stay tuned for a whole series of similar projects - all unique.

-dan