WELCOME!


It is hard to believe that it was almost ten years ago I witnessed a CNC router in action for the very first time. I was fascinated with what I saw and simply had to have one! Although I had been in the creative end of the three dimensional sign business for most of my life I didn't really know what I would do with one - but I just knew it could do fantastic stuff.

Through extensive research and LOTS of hands-on practice I quickly found out that my MultiCam router was capable of just about anything imaginable.This journal will chronicle that journey to date and continue each week with two or three entries as I continue to explore just what is possible with this wonderful tool... -dan

Saturday, November 30, 2013

Rolling along

The wagon wheel was created in EnRoute and routed in five layers which will be glued up afterwards. Because of this I created copies of various parts of the files as I went. I also created each element separately and then merged them afterwards. I started with the spokes of the wheels which were created with the dome tool.


The rim of the wheel was next.


The letter outline was next along with the wheel hubs.


The outer portion of the hubs was tapered. To accomplish this we used the bevel tool at a very steep angle and limited the height.


Then to put in the axle holes I created a zero hight circle and then merged lowest with the height.


The rim of the wheel was also raised and rounded using the dome tool.


Lastly I created the lettering in various layers.


The layers were then tool pathed and sent to the MultiCam for routing from 1.5" thick 30 lb Precision Board.


In the next post I'll show how it all went together with a structural steel frame inside.

Stay tuned...

-dan

Friday, November 29, 2013

Wagon wheel vector creation

The next sign we are routing is the is for the wagon wheel attraction. A gopher will be perched on top of an old wagon wheel, eyes wide, mouth agape as he stares up at the giant wheel looming overhead. We'll make the bulk of the sign on the MultiCam from 30 lb Precision Board. It will be layered and have a sturdy welded steel frame inside, as always. Today, I'll show how I put the vectors together in readiness to create the routing file. This is the rendering we started with. It was done as a sketch in my sketch book, scanned and then reworked in PhotoShop, using my Wacom pen and drawing tablet.


The starting vectors were done in Illustrator. I spent about fifteen minutes creating the starting file I wanted. The vectors were then imported to EnRoute to be modified and then to create a routing file.


I separated the spokes of the wheel and then used the jigsaw tool (on each segment) to pull out the center.


I then used the point edit tool to round out the ends. This would make the spoked round - without any bulges or sharp edges.


After re-centering the spokes I added the axle hole and wheel ring. Borders and an outline were also added to the letters.


That made the vectors ready to create the reliefs. I'll post that process tomorrow.

-dan

Tuesday, November 26, 2013

Mining for GOLD

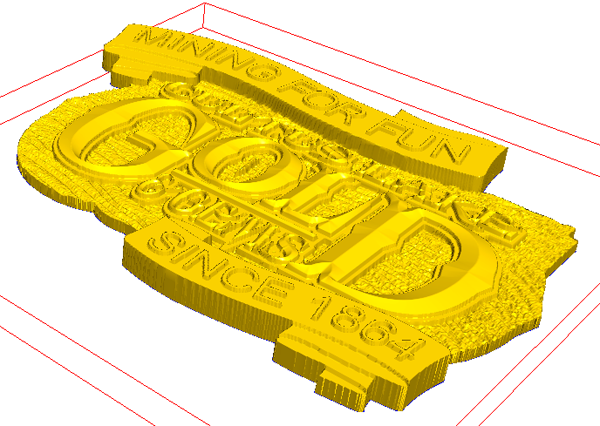
The old time logo was drawn in Illustrator and then imported into EnRoute. It was a bit rough, especially on the droll but I planned to redraw that portion in any case.


The first order of business was to add a border around the letters. This was done using the outline tool.


A second, much wider outline was added to form part of the outline of the sign.


I then traced the various layers of the scroll.


Then it was time to start building reliefs beginning with the sign background.


I aded a bitmap texture to the background using a small portion of the horizontal sandblasted wood pattern.


The letter border was then created as a new relief, nudged to the proper height in relation to the background relief and then merged highest.


The small lettering was then created by modifying the base relief using the bevel tool.


Then it was time to create the big lettering making the bevel a little larger.


 Then I created the various levels of the scroll, one level at a time. Once I was done they were combined with each other and then the base relief.


The last item of business was to add the lettering on the scroll.


The file is now ready to tool path and then send to the MultiCam. I'll be routing two of these from a 2" thick piece of 30 lb Precision Board. Once they are routed I have a trick up my sleeve to do something different to the cut pieces. Stay tuned...

-dan

Striking GOLD at 35,000 feet!

I was in Florida last week with my client for a business conference and trade show. We gathered ideas at the trade show and it was well worth the effort. But the time I enjoyed most was riding back and forth beside him on the plane. During that time no phones rang, there was no internet. It was a chance to get to know him better and also discus at length the project we were working on. As we talked of the various areas in the park and the things we might do I drew furiously in my sketchbook, illustrating our inspiration and ideas.
One of the areas we discussed was the Wilderness Trail - a play area for kids (and their parents). We had seen a gold panning attraction at the trade show and we discussed incorporating it into this area. The thing is however that we didn't want to do it like we saw at the trade show, but rather in the same style as the rest of the park. No problem, I knew just what to do and I drew a quick sketch ti illustrate how it might look. My client watched me scribble down my idea and loved what he saw. He bought off on the concept right there at 35,000 feet somewhere between Orlando and Denver.


On my return I spent a couple of hours refining the drawings, working out the logo artwork that would appear on the sign and on the packaging/advertising material. I also did a finished drawing of the tower to better illustrate the concept to him and his wife.


I also worked out the vectors I would need to create the routing file. The date on the logo is significant... it's my client's birth year (minus 100 years to fit in the proper era)


 I arrived back home on Thursday evening. Friday, after getting the crew going, answering my emails, and getting through necessary meetings I needed a fun little project to get my head back in construction mode. I scrounged through the back forty scrap pile and found just the right pieces for what I needed. Then I fired up the welder and got to work. Four hours later the frame was ready on the mining car for the attraction. We'll sculpt the wooden and metal box on the rig later this week.


In the next post I'll show how I built the routing file for the signs. It's a fun project!

-dan

Saturday, November 23, 2013

Swingin'

This past week I was gone from my studio for four days while on a quick business trip to Florida. I'm almost over the jet lag now and back at my desk once more. We are currently working our way through the signs for the theme park. Today's task was the Wave Swinger sign. As always we start with the concept art to sell the sign to the client. The beaver will be a hand sculpt while the rest will be done in EnRoute and on the MultiCam.


The vectors were pretty easy and done in Illustrator and then imported into EnRoute. I did a bit of kerning and had to shorten the bottom of the 'V' to make it fit but nothing major was required. I also added a lettering outline using the offset tool.


I selected the inner and outer ring and made a donut shaped relief using the dome tool.

 I then modified the base relief by selecting the relief and the lettering outline vectors.


Lastly I added the letters by modifying the base relief once more using the letter vectors and the dome tool. This finished the reliefs I needed.


But I needed a five foot ring and my Precision Board comes in four foot widths. This meant I had to cut the relief to make it fit. I would do this by creating two (cut) pie shaped  zero height reliefs, merging them together and then cutting off the extra zero height portions using the slice tool.


I could then rotate them and nest them to fit both pieces onto a 4' x 8' piece of 2" thick Precision Board.

I'll be gluing these up in the next while and I'll show that process and how everything fit together to make an easy assembly and mounting procedure. Stay tuned...
-dan