WELCOME!


It is hard to believe that it was almost ten years ago I witnessed a CNC router in action for the very first time. I was fascinated with what I saw and simply had to have one! Although I had been in the creative end of the three dimensional sign business for most of my life I didn't really know what I would do with one - but I just knew it could do fantastic stuff.

Through extensive research and LOTS of hands-on practice I quickly found out that my MultiCam router was capable of just about anything imaginable.This journal will chronicle that journey to date and continue each week with two or three entries as I continue to explore just what is possible with this wonderful tool... -dan

Wednesday, December 30, 2015

Rolling start

I've loved working with metal since I learned to weld more than two decades ago. Almost anything we can imagine can be fashioned with welded steel, or at least the structural framework to go inside. Using EnRoute to design files and the new MultiCam plasma cutter to cut the pieces has raised the art to a whole new level. It takes minutes to design the cutting files and only minutes more to cut the pieces. Best of all they only need a touch with a sanding disk to make them ready for production.

The jet pack studio chair is now in progress. I popped a sheet of 1/8" steel on the plasma this morning and set the machine in motion. I waited for the first to cut and then started work at the welding table.

The edge pieces for the curvy web legs were hand formed from 1.5" x  0.125" mild steel. These pieces were cut a few inches long, formed and then tacked into place. I then used the MIG to throw a quick bead on each side. Once they had cooled I trimmed off the excess.


Once I had all five sub structures done I welded them to the centre pipe.


I the cut a couple of large pieces with right sized holes to slide in the chair cylinder. As quick as that the rolling chassis for the chair was complete. Next up is the back frame assembly for the twin fuel tanks and the jet motor mounts. Once they are complete the hand sculpting will commence which will give the chair a whole lot more character. Stay tuned...


Tuesday, December 29, 2015

Magic chairs - just for fun

Many people who know me well claim I do things far too fast. It's sims not true. The truth is I have so many ideas and projects I simply need to hurry to get them all done. :)

In my studio I have two office chairs which are well worn and somewhat broken. Rather than toss them I figured I would rebuild them in such a fashion that they serve me better. I decided to combine them with two things I love - steampunk and rocket engines. I bought new castors today and began designing the needed files using EnRoute software for the MultiCam plasma cutter. The chairs will get totally new undercarriages complete with some funky new hardware and two jet engines. Once complete I should be able to complete my work in record time and do it with a great deal of style!

Here's the quick concept rendering for the magic chairs. Stay tuned for progress...

Monday, December 28, 2015

More plasma cutter eye candy

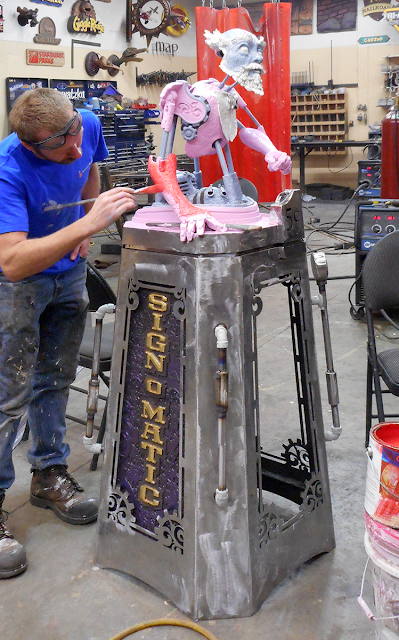
 Peter's Sign Challenge piece would have been almost impossible to accomplish without the new MultiCam plasma cutter. At the very east it made things ten times faster. The speed of the design in EnRoute and the precision of the cutting made fitting the pieces dead easy.


The plasma cutter also allowed a complexity which wouldn't have been possible any other way.


The top section of the box is removable and slides up into the box from the bottom. The coin operating mechanism was built in sections to facilitate this.


Other bits done using the plasma cutter include the gauge on the side which was cut from three pieces of steel and then welded into a section of pipe.


Peter's piece is now finished. He used it as a project to learn EnRoute and the operation of the MultiCam plasma cutter and router. I'd say he's a quick learner without a doubt. I look forward to many more projects from his creative hand and mind in the future!


Thursday, December 24, 2015

Plasma cutter ease

When we took delivery of our MultiCam plasma cutter we weren't sure how much we would use it. Prior to that acquisition we had many base plates cut and the occasional shaped piece but it wasn't too often. Having the plasma cutter handy close at hand changed the way we do many things in the same manner that the CNC router did ten years ago. Few projects are done with the plasma cutter alone but rather the many cut metal pieces are integrated into larger projects which also use other tools along with our hand methods.

A current project is a great example. We are building a foot cart shaped like a large rowboat. We used the plasma cutter to shape the steel we needed for various parts of the primary structure. As we built the heavy frame it was an easy matter to have the machine cut the end covers for the forklift pockets to ensure the operator doesn't poke the forks through our decorative concrete in the front. The bottom plates for the fridge and the freezer were quickly cut from 3/8" thick plate. There is no worry they will ever rust out.


Once the welding was finished on the main frame we built a subframe of pencil rod. This was wired and then coated with the fibreglass-reinforced-concrete and carved as we often do. That workwas done in stages, tipping the boat on it's side to do the under parts. It just made things easier and quicker.


The plasma cutter again came in handy as we built the mast and upper rigging. It was so fast to measure the required pieces up and then let the machine cut them in seconds. Best of all they required little more than a touch of the grinder to make them ready.


Friday, December 18, 2015

Trade show booth - part six

Work continues on the trade show booth. The last of the sculpted concrete was done yesterday. This meant we could get on with the final coats of paint and glazes.


Once the glazes were done we started fastening the shelves onto the backdrop. We took a few of the samples off the wall and fashioned brackets to fix them permanently in place. Then we experimented with the layout of the booth, fitting the display together. We still have a ways to go but the booth is quickly coming together. Next week we'll do our best to wrap this thing up.

Wednesday, December 16, 2015

Wired to the max!

Peter is making great progress on his Sign Challenge piece. He's now finished glazing and aging the top section and has moved on to the wiring.  It is amazing to see how the addition of the various coloured wired changes the piece in such a dramatic fashion. The wires ties everything together beautifully and give the impression of incredible detail.


Tuesday, December 15, 2015

Trade show booth - part five

As we design any project I feel that two things can do a great deal to make it stand out. These are colour and texture. On the trade show booth we will use both to best advantage in a variety of mediums. Warm rust and weathered patinas will play against cool worn teals and smooth riveted steel against the deep gnarly texture of weathered wood. We are still in the early stages of the finishes but the project is already starting to look pretty cool. Today the crew sculpted the first of the woodgrain surfaces. Look closely and you can see the recessed steel letters cut into the lower deck.


Monday, December 14, 2015

Trade show booth - part four

With addition of the top faux I-beam along the top of the back wall the welding done on the front of the booth and it was time to begin the painting process. We had originally planned to have the steel all exposed and rusty but changed our mind to have it a weathered teal green instead. Before we got to that we first had to add the rivets and textured primer coat to make the back paneling look live steel. We used Abracadabra Sculpting epoxy to fashion the rivets.


I carefully laid on three coats of teal green on a steel shelf and allowed it to dry. Then I brought out the finish sander and judiciously went at the corners and edges to scrub off the paint. A little acid sprayed on and we had instant authentic old. I loved it!


With the test successful it was time to recreate that same look on a grand scale. We'll first brush on three coats, then add glazes and weathering and some real rust. The sculpted concrete work  on the pillar supports and floor will soon begin. We are also busy on the pieces which will be showcased in the booth. It's going to be a wonderful display!

Wednesday, December 9, 2015

Sign Challenge progress

Peter has now finished the sculpting on his Sign Challenge piece and has moved on to the painting process. It is looking pretty amazing!By the end of day tomorrow he should be into the glazing and aging process.


My piece has most of the base colours finished but we still have to do a little sculpting on one small element. Once that is painted we will move on to the aging and glazes.

Friday, December 4, 2015

Trade show booth - part three

The current large project underway in our shop has used our MultiCam plasma cutter in a large way. It has in fact caused me to fall in love with the handy, dandy machine and the ease in which we can create custom metal parts. We've taken the design/build approach. Each piece is first sized up visually. I make a few measurements and a quick sketch before heading to my desk. I fire up EnRoute and in a few minutes build the needed vector. I then grab the file and head to the plasma cutter computer to generate the tool paths and then it's off to the keypad to set the machine in motion. While the parts are cut I am sizing up the next part of the puzzle. Before heading to my desk to design again I tack the freshly cut steel parts in place, ready for our welder to make them permanent. The process is repeated many times through each day.

In less than a week we have completed a very complicated build of the heavy duty trade show booth. We've made a few alterations from the design to make it more versatile in the future.


On one of the corner posts we built a table/chair combination. It is our intention to do painting demonstrations (on a small 3D model) during the show. The table/chair pivot on the corner post to swing inside the booth during transport.


There are still a myriad of large and small details yet to add to the booth to make it a standout at the show. Stay tuned...

Wednesday, December 2, 2015

Mechanical marvel - part one

Peter (my son) is also entering a piece in the 2016 Sign Challenge. He says someone has to keep me in line. :)  It was a chance for him to learn and practice EnRoute software and also get up to speed at operating both the MultiCam router and plasma cutter. It is the first time he has worked on the high tech stuff. I am amazed at how fast he became proficient at designing in the software and operation machines. I looked over his shoulder and coached him a little when he was stuck the first few days but now he is totally off and running - at full speed!


Peter is building an automatic, artistic android with steampunk styling. The years that he spent as an animator came in handy as he adds that spark of life to the mechanical marvel! 


Tuesday, December 1, 2015

Trade show booth - part two

I drew up concept plans for an entire West Coast town more than five years ago. Every building and structure was styled in an energetic, steampunk/nautical flavour. I had a lot of fun creating the concepts but unfortunately the group was not able to get the funding necessary to proceed and the plan died. Those concepts (which I still own) have lain dormant in my files ever since. I am still confident that those initial ideas will some day actually be built as first envisioned. As we talked about the trade show booth I knew it was time to dust those old ideas off and showcase them once more.


Our MultiCam CNC plasma cutter and EnRoute software made designing and fabrication of the parts very easy and quick. Forming. fitting and welding up the flanges on the curved beams is still being done by hand. Our large hydraulic press makes it easier but it is still about eyeballing the curves, forming, fitting, forming, fitting until we get it right. Then everything is carefully measured, clamped into place and then welded up. The first beam will be finished tomorrow and the second one begun.


Saturday, November 28, 2015

Trade show booth - part one

We have decided to take part in next years expo hosted by the International Association of Amusement Parks and Attractions. It is no small investment to take part as a vendor and so we want to make sure we go all out. After giving it a lot of thought we have decided to create a small studio there showcasing the best of our many samples. We'll also play our videos and have hand out materials. As we thought about transporting everything down and setting up we decided to build a giant box with a canvas cover. It will be a simple matter of placing it in the booth, taking off the cover and with a little rearranging be ready for the show. The box needs to be part of the display of course and display the same magic we create on a daily basis. The new MultiCam Plasma cutter will play a large part in it's construction as will the router. Peter and I designed the booth this past week.


Then it was time to begin cutting some steel. Since we won't be present when the trade show staff unloads and handles our booth we knew we had to make it foolproof and extra sturdy. We designed forklift pockets that go through the booth floor in both directions, making it possible to lift it safely from any side. The primary steel tubing frame measures  4" x 8".  


I designed the vectors for the plasma cutter in EnRoute and then cut them from 3/8" plate steel.Stay tuned for progress reports as this thing comes together.


I then began fabrication by welding the pieces into position. 6" x 3/8 flat bar will be welded to the edges to form I-beams


Tuesday, November 24, 2015

Train models done

Today Jenessa glued on the last small bits and and painted on the last brush strokes to finish both train models. They look spectacular! As soon as we get the final measurements from the train chassis builder we will start in on the full size version.


Saturday, November 21, 2015

Arms and legs

Each time I get a few minutes I add more pieces to the Sign Challenge piece. It is largely hand sculpting at this point. The latest additions are the rocket legs and the rocket engine.


The piece is a parody of the sign making industry and makes commentary on two long standing issues. The first is the old time 'snapper'. This itinerant sign painter would travel from town to town and snap up the good jobs, much to the chagrin of the local tradesmen. Our sign maker is such a worker, only he travels from planet to planet. He also uses the latest computerized sign making equipment, the boon of all old school sign makers in the galaxy.