WELCOME!


It is hard to believe that it was almost ten years ago I witnessed a CNC router in action for the very first time. I was fascinated with what I saw and simply had to have one! Although I had been in the creative end of the three dimensional sign business for most of my life I didn't really know what I would do with one - but I just knew it could do fantastic stuff.

Through extensive research and LOTS of hands-on practice I quickly found out that my MultiCam router was capable of just about anything imaginable.This journal will chronicle that journey to date and continue each week with two or three entries as I continue to explore just what is possible with this wonderful tool... -dan

Sunday, December 31, 2017

It's time to say goodbye!

Back in March of 2010 I posted the first entry to this blog. At that point I had been using a router about four years and was still very much at the beginning of a learning adventure that continues to this day. I know that learning adventure will never end.

Here's that first post.
________________________________________________________________


It is hard to believe that it was less than five years ago I witnessed a CNC router in action for the very first time. I was fascinated and simply had to have one! Although I had been in the creative end of the three dimensional sign business for most of my life I didn't really know what I would do with one - but I just knew it could do fantastic stuff.

Through extensive research I quickly found out that the CNC routers were capable of just about anything imaginable. The software was capable of the same. But amazingly, in the sign world, everyone I talked with was using their routers as fancy jigsaws. I wanted to do so much more! I wanted to create textures and wonderful 3D objects and this was just the machine to take us there.

After months of research I determined that MultiCam made one of the very best routers around and I wanted the very best I could possibly have. They had delivered hundreds of these machines around the world. They offered a bullet proof machine and backed it up with first rate support. Twelve weeks after I placed my order our machine arrived at our shop and we began a journey of discovery that continues to this day. This journal will chronicle that journey to date and continue each week with two or three entries as we continue to explore just what is possible with this wonderful tool...

-dan
________________________________________________

Back then information on CNC routers and how to use them was hard to come by.  I had so many questions which needed answering and I knew many others did too. I approached MultiCam to sponsor this endeavour and thankfully, they happily did.

Over the last eight years I have posted 1,299 entries to this blog (and sister blogs sponsored by EnRoute Software and Precision Board.) Those many hundreds of project step by steps, videos and drawings have been viewed more than 653,000 times. That's a whole lot more than I ever imagined possible and it is gratifying to have achieved that kind of following.

As we turn the corner into 2018 MultiCam has decided to discontinue this project. The blog will stay live, with all that valuable information archived and still accessible. It is my hope that readers will still use the archived material as they need to in the future.

I want to say a BIG thank you to MultiCam for supporting this adventure for the last eight years! And thanks to all of our readers as well!

MultiCam now has a blog of their own at http://www.multicam.com/blog/

And you can always check out our latest projects on our journal at http://www.imaginationcorporation.com/journal/

Robot table sculpt done

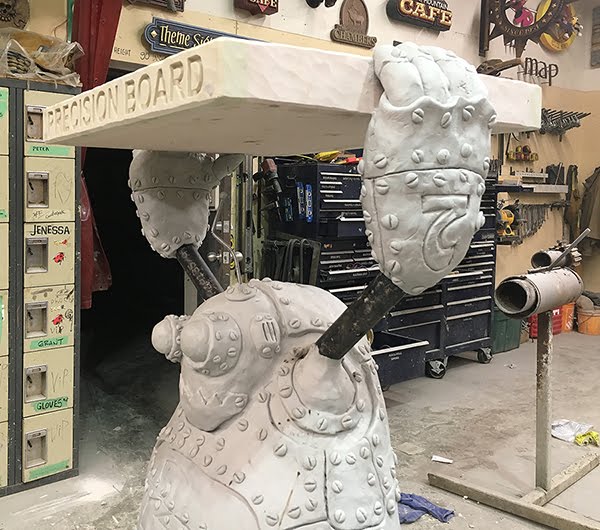
On the last day of 2017 I spent a little more time in the shop finishing up the sculpt of the Coastal Enterprises' robot table. This included the robot's head, arms and hands. The fingers were sculpted in such a fashion as to hide the structure of the table top. 


With the integral welded steel frame inside the top and through the hands and arms this thing is plenty strong!


As I was rummaging through the electrical parts drawer yesterday I came across a spare switch which I decided to include on the back of the robot. I used a couple of chain links to build a guard on each side.


With the sculpt now finished we'll move on to paint later this week. We will go with retro colours and plenty of wear, aging and grime to bring it to life. If you happen to be going to the ISA show in Orlando drop by the Coastal Enterprises' booth to take a look.


Saturday, December 30, 2017

Topped out

Today it was time for some more router work on the MultiCam. The upper arms were first and routed from two pieces of 1" thick 30 lb Precision Board. I routed a slot into them to fit around the 1" X 2"structural steel.

I routed the table top in four pieces. The main part of the top was built as a lower and upper section. I routed a cross slot in the top to accept a welded 1" X 1" square tubing frame. I applied some PB Bond fast set glue to the two halves and then served them together. Two more pieces for the front and back of the table top were then fastened to the top. These two pieces had the words 'Precision Board' routed into them. 

Tomorrow I'll sculpt a layer of sculpting epoxy over them to add detail and add the figures and thumb to each arm. I'll also texture the top on all sides with the die grinder. That leaves only a little sculpting on the upper body and head to go before the painting begins.


Friday, December 29, 2017

Fun details - just for fun

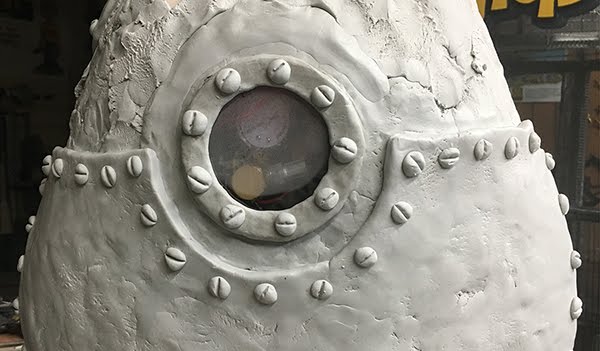
I managed a couple of hours in the shop this afternoon. In that time I finished the bottom of the back of the robot. As an extra little feature I added a window hatch which some small details in side using short lengths of wire, a spare air pressure gauge and some bits of hose. The small viewing window fogged up as the fresh paint inside dried but it should clear up overnight. The detail will be a reward for the few who take the time to look at the back of the robot table. I'll also be adding an on/off switch above it as well - just for fun.


Thursday, December 28, 2017

Building the body

I've stated many times that we use 30 lb Precision Board exclusively in our shop. This is true when it pertains to CNC routing... but when we are hand sculpting high density urethane that will be coated with sculpting epoxy we sometimes use four pound foam. It is so soft I can practically carve it with my hands.

The rough armature for the robot body was a great place to use this less dense foam. It needed to be fit around the welded steel armature and then roughed into shape. I used there layers of 3" four pound foam. Since I was going to coat it in sculpting epoxy I wasn't concerned with gaps or rough edges. I used PB Bond fat set which cures in only one hour. I glued it up before I went to lunch and when I returned I was able to remove the clamps and get busy sculpting over the new form.


I used crumpled tinfoil to fill the gaps and holes and then pressed on a layer of sculpting epoxy. Once this had set I did another layer that was detailed. In a few hours I did the legs and the bulk of the front of the robot body. Rather than my usual rivets I opted to sculpt flat head screws for more of a retro feel. Tomorrow the bulk of the sculpt should be done. Stay tuned...

A fun little table

As per usual the shop is quiet between Christmas and the New Year. The crew is taking some deserved time off to be with their families. With Christmas falling on a Monday it meant we had a couple of days to do our final shopping and ready the house for two days of company. Then it was time to kick back and enjoy family and lots of good eating. By the time Wednesday rolled around I needed to burn off some energy and get active.

Last night I designed the display piece for our friends at Coastal Enterprises' booth at the International Sign Association EXPO in Orlando in March. I just knew that as soon as we got going again after the New Year we'll be busy until our big projects are finished in May. I enjoy getting my hands dirty in the shop and without crew and other interruptions I can get a lot done in a hurry.

As always space in a trade show booth is in short supply. I decided a small 24" x 24" table to display samples of their products would be just the ticket. Coastal Enterprises makes Precision Board, glues and primers which we use in our shop exclusively.

The project is made of three pieces... a base pedestal with their logo routed into each side, the strongman robot, and the tabletop.

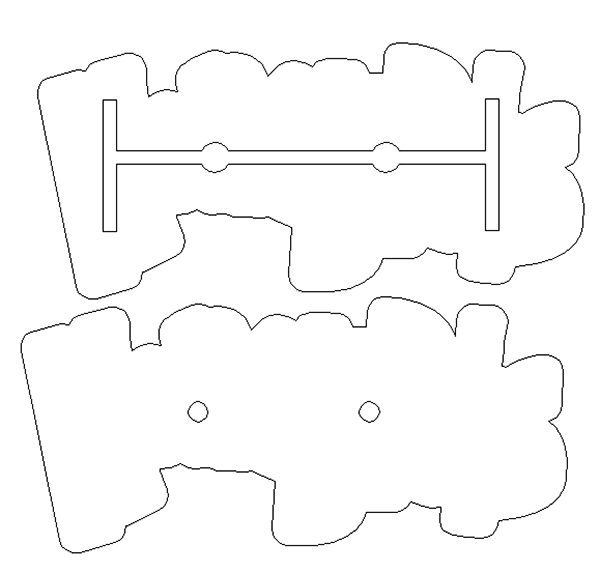
I designed the routing files in Enroute. The sides had the Coastal enterprises logo routed into them. I'll be hand texturing the faces and top and adding rivets. For the feet of the robot I drew the vectors of the few on top of the base top to get the scale right and to make sure it didn't overlap our company ID.


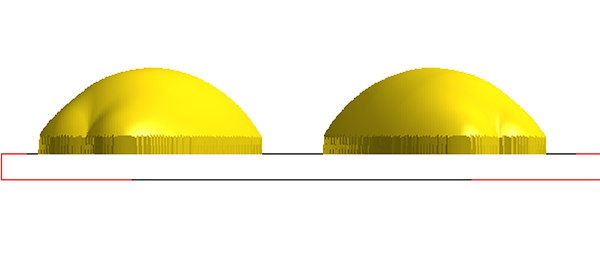
Then I used the dome tool to round the tops.


I then went to the front view as I knew they were a little shallow. It was a simple matter of grabbing the center top node and pulling it vertical until I had the profile I needed.


I then created a couple of zero height reliefs which were merged lowest with the feet reliefs to drill holes in the center. This allowed the few to slip over the structural steel which protruded from the base plate. This steel structure provides the armature for the robot sculpture.


I tool pathed the files and sent them off to the MultiCam router. The sides and top of the box were routed from 1" thick 30 lb Precision Board.


The sides of the base were screwed to a plywood box which I had previously built.. It was fastened to a 1/4" stem plate which I cut on the MultiCam CNC plasma cutter, The few were done as two pieces which stacked on top of each other to give me the 1.5" depth I wanted. These were fastened to the base top. I then hand sculpted the detail over these forms using Sculpting Epoxy.

Since we were going out to see the Star Wars movie this is as far as I got today. Tomorrow I'll do a little more on the project. Stay tuned...

Saturday, December 23, 2017

Just having fun!

The thing I love the most about having our MultiCam CNC machines and many other fancy tools in the shop is that I can dream up a part (no matter how complex) and then design and build it in short order. For a project like my Sign Invitational feature this is done on an ongoing basis as needed.

I had a pretty good idea of what the machine would look like when iI did the first sketches but the vision was somewhat fuzzy. I started with the base plate, designing each piece, cutting it and then welding it together or fastening it in place. There's quite the mix of materials including steel plate, Precision Board, various sized pipes, fittings, bearings, shafts, sprockets and pulleys along with lots of sculpting epoxy too. There's a few antique bits and pieces as well. It's quite the collection.

As always it will be the paint that ties it all together visually. I did a little some time ago on a few of the pieces that needed to be painted before assembly. Yesterday, Janessa started painting the base coats on the rest. The colour quickly changed the piece in a dramatic fashion. It's far too bright, monochromatic and new looking for the story I'm telling at this point. Over the next week I'll age things down dramatically. Stay tuned for the fun...


Sunday, December 17, 2017

Progress on my 2018 Sign Invitational piece

I jumped into the building of my 2018 Sign Invitational piece as soon as I returned from Las Vegas nine months ago. The theme for the 2018 invitational is 'MARVELOUS MACHINE'  I posted pictures of my progress perviously on the blog here. The last post was July 1. Since then we've been slammed with lots of creative projects in the shop as well as numerous business trips to Trinidad, Orlando, Salt Lake City, Atlantic City and more. That meant the piece has been mostly collecting dust since then. But with the holidays and New Year quickly approaching it was time to get back to work once more.

In the last few days I've been out in the shop after hours helping Phoebe with a school project she's working on. While I was mixing sculpting epoxy for her I also found time to work on my Sign Invitational piece once more. The piece is coming along pretty well, with the bottom two thirds almost done, with the exception of paint. I also mounted the 'human interface device' (HID) today. I used parts off an old antique typewriter I had laying around.

This coming week and over the holidays I hope to put in a little more time and hopefully will finish the sculpting. It's going to be fun!

For anyone who wishes to enter this year's fun contest drop me a line as it is time to seriously get going. dan@imaginationcorporation.com

Wednesday, December 13, 2017

A honey of a sign!

We'll be building two copies of the HoneyPot sign. One will go on the operator's booth while the second (With a sculpted bee) will be positioned at the start of the queue.

The routing file was created with three layers, rather than the two the concept art suggested. This is so the sign will better match the many others already in the park.


The sign is to be fabricated in three layers with a welded steel frame laminated into the center layer.


Once the file was created in EnRoute I threw a scrap piece of 30 lb Precision Board onto the router nd set the machine in motion.

It's the little things


Our MultiCam CNC plasma cutter has dramatically changed the way we fabricate our themed pieces. In the process it has ramped up the quality and durability of our work. The handy machine has also increased out productivity in a large measure.

Often it's the small hidden things that have made the most difference. A current project is a good example.

We are currently fabricating an operator's booth for a theme park ride. It is similar to many we have done previously with a few small differences. The design of the booth matches the ride. It has there legs/posts to ensure the installation is quick and easy. Three legged objects never wobble - even if the concrete pad happens to be a little uneven of off level.


Each leg needed a base plate for a couple of reasons. First the steel plate serves as a method to fasten the structure to the concrete deck. By having it extend to the outside of the sculpted concrete it protects the brittle material from chipping or cracking during the moving in the shop, transport and setting up stages. Having a CNC plasma cutter in-house means we can do custom plates in a hurry and still stay within budget and our timeline. Steel plate is relatively inexpensive. I designed the cutting file in EnRoute in a few minutes.


Cutting the there plates was even faster. Being small in size I cut them from scrap pieces which we save for this purpose. The there plates were then welded to the bottom of the legs of the operator's booth. The pencil rod will be extended down and welded to the plate. Galvanized lath will then be tied onto the pencil rod armature. A skin of fibreglass reinforced concrete will then be troweled onto that and then sculpted to look like a wood post, just like the concept drawing illustrates.


Starting a new project

Having just pushed a massive project out of the big shop doors we are doing what new always do at a time like this. First it is time for a deep clean, sweeping out the far corners of the workshop. Everything is returned to it's rightful place. If we can we take the time to go through things that don't often get done, like sorting out the piles of odd bolts and repairing cords and hoses that need attention.

It is also a time to review the job just finished. How did things go? What could we do better next time? It is all about continually raising the bar.

Then we turn our attention to the next projects. Materials are ordered and files are built. That process began today.

The first piece we are building is a windmill, but not of the ordinary kind. Our client who owns an adventure golf requested this traditional mini golf fixture and approved our version.


Since the windmill will be added to an existing golf we decided to fabricate it on a sturdy steel plate base which is cut from 3/8" thick steel. I designed the cutting vectors in EnRoute after first figuring things out with a napkin sketch.


Cutting the 3/8" thick steel plate on our MultiCam plasma cutter was a quick process. I'll do an ongoing design-build process from this point as it is the easiest way for me to create this type of complex project. I'll keep the concept firmly in my head as we work out the design from the base upwards.

Sunday, December 10, 2017

Some projects take a while

A like more than three and a half years ago I designed the primary sign for Skallywag Bay adventure Park. I designed he routing files a short time later but it would be another year before we started to build two copies of the sign. That process was chronicled here.


We routed he hulls of the ships from multiple layers of 2" thick 30 lb Precision Board.


These were glued together and hen we sculpted the details onto the two copies of the ship.


Two and a half years ago the two signs, along with hundreds of other features were carefully packed into eighteen shipping containers and then shipped through the Panama Canal to Trinidad.


Yesterday, one of these signs  was the last piece to be carefully lifted into it's final home.