WELCOME!


It is hard to believe that it was almost ten years ago I witnessed a CNC router in action for the very first time. I was fascinated with what I saw and simply had to have one! Although I had been in the creative end of the three dimensional sign business for most of my life I didn't really know what I would do with one - but I just knew it could do fantastic stuff.

Through extensive research and LOTS of hands-on practice I quickly found out that my MultiCam router was capable of just about anything imaginable.This journal will chronicle that journey to date and continue each week with two or three entries as I continue to explore just what is possible with this wonderful tool... -dan

Wednesday, April 13, 2011

More blue sky

Last night I found myself thinking about the new four axis MultiCam that is on the way to our shop soon. My first project immediately came to mind and as I tried to concentrate a little on the TV show I scribbled in my sketch book - working out some changes and details to my original drawing. This is a normal process for our projects. The original concept remains true, but details quickly come into focus as the deadline approaches to actually get to work.

As I worked things began to change. The balloon became fancier and the new fangled wheels gave way to old fashioned skids. The propeller pylons came straight out from behind the seat instead of off the bottom frame.


In the next series of drawings the engine got duel exhaust  and foot pegs made it easier to scramble into the cab. The balloon gondola also became a single seater.


As I continued to draw everything came tightly into focus in a hurry. A driver appeared and the two cylinder motor moved from the front of the body to behind the seat and exposed instead of under a hood. This will allow for some fun detailing with the sculpting epoxy. Everything now looked balanced at last. With the last changes the idea at last was going to fly!


I decided the balloon would be puffy and quilted. Difficult to fabricate by hand I reasoned this tricky task was a snap for EnRoute and the four axis CNC router. I have already built most of the EnRoute file a few days ago, but that work and the processes involved is still under wraps so I can't show it here quite yet. Basically our hope is to build it flat and then wrap the file around an imaginary cylinder to form the balloon. I'll post the results as soon as I can.

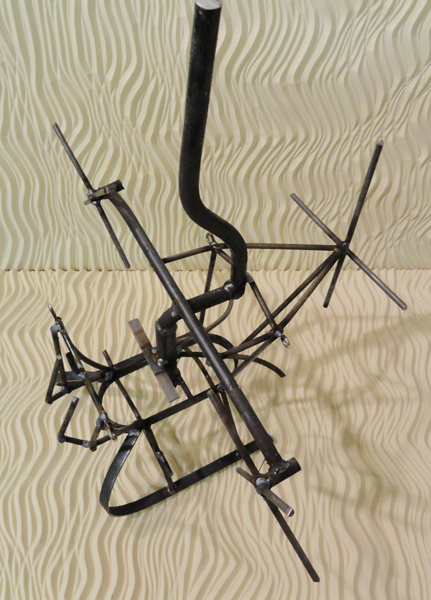
The scale of the balloon was established by the parameters of the rotary attachment on the new CNC, meaning it could be 20" in diameter. I settled for 18".  This will make the balloon about 26 inches long. So After supper today I snuck out to the shop to put in a little time welding up the steel frame that will form the basis for the gondola. I drew the rough shape out in soapstone on my welding table and then sketched in the motorized gondola underneath it. 


Then I set to cutting, bending and welding up the frame. In about three quarters of an hour my task was complete. The heavy rod is 5/8" bar, plenty strong to hold the gondola in place. For the skids I used 1/8" x 1/2" flat bar, the frame 1/8" x 3/4" flat bar. 1/2 " & 1/4" pencil rod made up the balance. 


Stay tuned for more developments on this part of the project. And as soon as the new router arrives you can count on me kicking the balloon into gear as a test piece. I can hardly wait to see how it performs!

-Stay tuned...

-dan

Sunday, April 10, 2011

Finishing strokes.

Every project needs a couple more brush strokes to finish it off. This project was no exception. Once the gold leaf was on the white lettering immediately needed a couple of brush stroked of white to brighten a couple of dull areas and balance the sign.  

Now at last the sign is done, It will need a couple of days of dry heat to cure before it goes out the door, later this week. I can hardly wait to see it hanging proudly on the brick building it was designed for.


Now it is on to the next project...
-dan

Friday, April 8, 2011

On the home stretch

The last color (which we call plum crazy) made the sign absolutely pop in a hurry. It was applied sparingly in key areas to enhance the depth and wonderful shadow areas of the sign. Dimension looks even better if it is painted right.


I let things dry for a while and went out to the sunshine to mow the lawn and enjoy the spring weather. When I came back I found the sign needed a little more dark glaze in the crown molding and in the lower areas of the top portion of the sign. Then it was time to put on two quick coats of the cream color on the lettering. The sign came together in an instant with the focus on the correct elements - the lettering. It is a sign after all and needs to do it's job. 


Tomorrow the gilding of the primary copy will be the crowning touch.

Stay tuned...

-dan

Officially now a dot com

www.imaginationcorporation.com
We've owned the dot com version of our name for a few years with the intent to slowly convert our web presence from dot ca which we were forced to use early in our web presence. But, like many things it has languished on the back burner for years while I was busy with other things. This year, at last, the task moved to the top of the pile. I decided a simpler web presence that I could continually update and add to was more important than a fancier website that required the expertise of my web guy. Changes are now easy and instant - something I like much better.

I built the new dot com website some months ago and have been continually adding to it as I could fit in the time. Now at last we will begin to officially make the switch. Today I'll post a notice on my old .ca blog redirecting people to our new .com journal. Soon that old site will merely redirect people to our .com one. I've ordered new business cards and the lettering will be switched out on the truck. We are now a dot com company at last.
-dan

ISA - Las Vegas

Trade shows are a great place to see what is new in the sign industry, in equipment, materials and software. We can find just about everything pertaining to our industry at that kind of event. But I go to trade shows for much more than that. I go for information and education. Through trade shows I discovered CNC routers, the best software to build my files, and the materials I use to create my signs.The trade shows are also a great place to find inspiration and ideas. 

The biggest sign industry trade show is the ISA show, to be held this year in Las Vegas, April 28-30, only a few weeks away. I'll be there!


It was six years ago, at this same trade show I first saw a CNC router in action for the very first time and watched it work with total awe. That show was where I started my quest for knowledge about routers, software and materials to route best with.

I have been asked to attend the trade show this year on behalf of MultiCam. I'll be at their booth, speaking about my experiences with my MultiCam 3000 router as a user of the machine. I'll have my computer there, both to show my portfolio of routered signs and also to show first hand, to those interested, just how I go about creating the files and putting together the signs. I'll be there to answer any and all questions about what I feel is important when looking for a router, base on my own personal experience.

I am looking forward to seeing lots of new things this year, meeting up with lots of long time friends and acquaintances. I'm also looking forward to meeting lots of new folks.

See you in Las Vegas!

-dan

Thursday, April 7, 2011

Coat after coat

The Back Forest sign is now into the paint stage... and it is getting coat after coat of paint. The first was the primer coat. This went on thickly with a small brush to introduce just a little more texture. The primer texture evened things out nicely. This was followed by two coats of off white, but this color was far from the final. A slightly darker warm white was next and it was lightly toweled off. The sign looked pretty good at this point, but this was but a starting point for the sign needed to be fairly dark for the white and gold leaf lettering to stand out from the background.


A brighter orangish-yellow was next to provide some bright highlights after the dark glazes were put on. The sign looked pretty garish at this stage but I knew not to mind as the sign would tone down as we proceeded.


A slightly purply brown was the next glaze to be applied... not my favorite color by a long shot, but it was what was needed for the colors to follow. 


The fans are now on the piece once more - as they have been for the last twenty four hours. Tomorrow I'll be applying the last of the glazes and then we are on to final touches.

-dan

Wednesday, April 6, 2011

Bracket done and sign primed!

For the last few days my nephew and his family were visiting. Luckily Duane and his ten year old son Sid love to work in the shop and they insisted they would give me a hand. Together we finish the sculpting parts of the sign and yesterday put on a textured coat of Coastal Enterprises primer. The primer evened out the texture over the entire piece and made it impossible to tell which parts were routed and which were done by hand. The three of us made quick work of that part of the sign, leaving plenty of time to knock off for the rest of the day. After they turned in for the night I snuck back out to the shop and painted the bracket.


The sign now looks positively massive, and after we paint it to look like sculpted stone it will be even more so. This afternoon the painting and glazing will begin.

-dan