WELCOME!


It is hard to believe that it was almost ten years ago I witnessed a CNC router in action for the very first time. I was fascinated with what I saw and simply had to have one! Although I had been in the creative end of the three dimensional sign business for most of my life I didn't really know what I would do with one - but I just knew it could do fantastic stuff.

Through extensive research and LOTS of hands-on practice I quickly found out that my MultiCam router was capable of just about anything imaginable.This journal will chronicle that journey to date and continue each week with two or three entries as I continue to explore just what is possible with this wonderful tool... -dan

Wednesday, November 11, 2015

Building the vehicles - part one

The Sign Challenge sculpture will have five hover vehicles circling around a central rocket. I built some common part files and then modified them to make each vehicle unique. I began by drawing up the concept art for two of the vehicles.


The file was built entirely in EnRoute. I built the vectors and then the reliefs as individual pieces, and then nudged them up or down in the front view to make everything work.


After I had built the reliefs I went into the front and side views to see how the pieces looked height wise in relation to each other. As needed I nudged them up or down.


I also rendered the piece after every operation to make sure I was achieving the results I wanted.


The round reliefs were then modified by dropping the center  about a quarter inch to form a pocket. The translucent lenses will be dropped into this space.


All of the reliefs were combined by using the MERGE HIGHEST command.


I then created a center relief with a zero height. This was merged lowest to form the hole in the center.


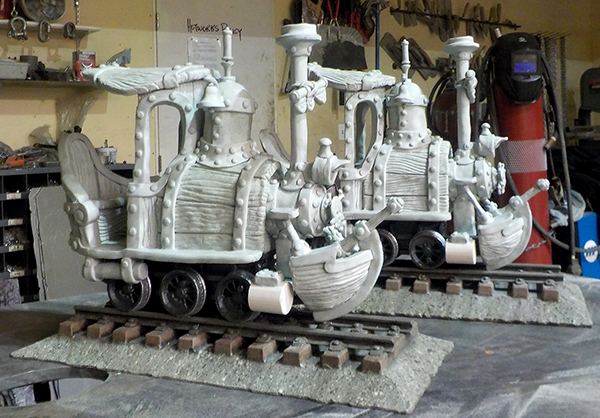
I duplicated these parts to form five pieces. Three were done in the size I built. Two were modified by scaling them, one shorter and one narrower. They were then tool pathed and sent off to the MultiCam to be routed from 1" thick 30 pound Precision Board.


Once the pieces came off the router I dropped in the lenses and I brushed on two coats of paint used a little sculpting epoxy to permanently fasten them in place. When the paint was dry I put the LED lights behind for a test run. It looked great!


Monday, November 9, 2015

Anchoring the dinosaur

The plasma cut dinosaur is definitely a bit top heavy. We needed him to be somewhat movable and thus a sturdy (and heavy) base was required. We decided he would be perched on a well weathered log made from concrete. Matt had been bringing in some pretty cool samples of gnarly wood which would serve as the perfect inspiration. He welded up the intricate armature and wired it up in preparation for the mud. Today Matt started the fibreglass reinforced concrete sculpting. It is looking fabulous!


Sunday, November 8, 2015

Pirate train model

We are building a pirate train for Scallywag Bay. We have partnered with one of the best train builders in the world for the project. Hillcrest Shops, from California is building the chassis of the engine and rail cars. It all started with a concept drawing. The first version was an 0-40 meaning it didn't have any forward wheels, but had four driving wheels. No trailer or tender wheels were present.


As we progressed through the design it became an 0-6-0 to ensure it was stable on the winding track.

The chassis is coming along quickly in the shop in California. Look close at the picture below and you'll see a Disney steam engine in the background. It is undergoing a full rebuild.


As we talked about endless things with the chassis builder we decided the easiest way to get our ideas across was to build two models. One would be for our permanent collection and the second would go the Hillcrest shops.  Because the real chassis is so precise the model needed the same treatment. It was routed from thirty pound Precision Board.


Once the mechanical bits were in place it was time for some sculpting. I did the first bit on the first model to set the tone and scale. 


Then Jenessa took over with minimal art direction from me. She did a fabulous job on every detail.


On Friday Jenessa finished the sculpting process. I still have to stick on the rope rigging and the connecting rods and running gear. Then we are on to paint.


Wednesday, November 4, 2015

Sign planet

I painted the gold size, on the letter faces, waited for it to tack up and then applied the 23K gold. That added a whole lot of bling in a hurry but I wasn't finished yet. I applied another layer of size to the upper portions of the lettering with a ragged lower edge and then applied some variegated leaf to that area. The lettering instantly came alive!  When the gold had cured I mounted the lettering to the lid top and used sculpting epoxy to form the gravel and rocks radiating out from the center of the rocket blast.


After this cured I applied the two coats of metallic copper, two blends and then a glaze to tome it all down. When that had dried a little subtle dry brushing with some orange metallic gave the rocks a nice sheen. The piece looks like a giant cake ready for a deluxe topper. Now the real fun begins!


Tuesday, November 3, 2015

Starting the color

Before I could do the final assembly of the 'SIGN' letters and the rounded top of the planet I needed to do the painting and gilding. It would be impossible to do once they are in place.  I started with  two coats of plain copper metallic over the entire letters and background. I allowed things to dry in-between coats.


Then I did a blend coat of black cherry on the bottom, through copper and into a metallic orange on the upper portions. The top letters are the example. The bottom letters have a greenish brown glaze we call 'SWAMP' brushed on and then wiped off. Once the glaze is on the letters are ready for gilding.


Monday, November 2, 2015

Assembling the sign planet

It's not often we do simple cutouts with a fair amount of assembly in our shop but because this is a detailed display piece that will live out it's life indoors I tackled things a little different this time.  The 'sign' portion of the sign will be fastened to the top of the lid, and then turned upside down and slipped inside for transport. The lid has a raised oval which will house the transformer for the LED lights. The plasma cut 'steel ODYSSEY' letters were positioned and welded to this raised oval.

The letters are simple cutouts with a dropped center. The center portion is layered vertically with the letters glued on. All pieces are cut from 30 lb Precision Board. Because of the structure for the top portion goes through the 'planet' base I can't put the lid (top layer) on until it is all fastened in place.


I temporarily screwed on the top portion to shape it with valleys going down between the letters.


Once the rough shaping was done I used the die grinder to do some more shaping. There will be a rocket landed on top of the letters and I wanted to simulate the texture of a rocket blast radiating out from the center, taking off a layer of the earth and tops of the letters with it. I added rocks and small stones to the edges of the letters and areas between with sculpting epoxy.  One side is now ready for paint and gilding. In the next days I'll show that process and then move on to the upper reaches of the piece.


Sunday, November 1, 2015

That's a box!

With all the pieces perfectly cut on the MultiCam CNC plasma it was a snap to fit them together, tack everything in place to align all the pieces and then weld things up solid.


Once everything was welded it was time for some serious grinding and polishing. It is now a serious and heavy duty box.


Once the grinding was done and the lid was fit I sprayed on the reacting acid and watched the rust begin to form instantly. A few hours later the whole piece had a beautiful patina. Now it is time to begin the fun stuff that fits inside!