WELCOME!


It is hard to believe that it was almost ten years ago I witnessed a CNC router in action for the very first time. I was fascinated with what I saw and simply had to have one! Although I had been in the creative end of the three dimensional sign business for most of my life I didn't really know what I would do with one - but I just knew it could do fantastic stuff.

Through extensive research and LOTS of hands-on practice I quickly found out that my MultiCam router was capable of just about anything imaginable.This journal will chronicle that journey to date and continue each week with two or three entries as I continue to explore just what is possible with this wonderful tool... -dan

Sunday, November 28, 2010

Finished excavator sign

Yesterday Rebecca put the finishing touches on the excavator sign. She did an awesome job on the paint!  This thing looks like it has been digging holes for a long while! It has a lot of character.


I'll be at the USSC (United States Sign Council) show in Atlantic City this coming week doing three seminar presentations there. One of the presentations will be a lecture on how we create our dimensional signs using modern materials, software and tools. I'll be using this sign as the project and I'll be going through the process step by step from start to finish.

When I'm not presenting I'll be on the floor show most likely around the EnRoute or MultiCam booths. 

If any readers are going to that show I'd love to meet you!

-dan

Friday, November 26, 2010

Horsing around

 I could see as the sign routed that this was going to look pretty special when it was assembled. The details looked great! I pulled the pieces off the router table this morning and dusted them off before I started gluing them up.

Gluing the pieces together only took minutes. I used PB Bond 240 from Coastal Enterprises which is a single component glue activated with a simple spritz of water. I used screws instead of clamps as the pieces were so irregular in shape. The screws will come out later and the holes filled as I begin the sculpting process. As I sculpt I'll diminish the thoroughbred look and add a little more of the nag feel we are after on this project.


I'll also add the woodgrain to the slat ends at that time. While I could have easily programed the woodgrain into the ends, the reality is that it is just as easy to do it by hand with a die grinder. From here on in it will be all about hand work.

-dan

Thursday, November 25, 2010

Paint progress on excavator sign

Since the last time I posted about this project we've made a little progress. First a coat of Coastal Enterprises heavy bodied, water based primer was brushed on. Extra texture was created in key areas, such as the lettering, in the process.


Then base coats of color were brushed on. Finally layers of glaze were brushed on and gently wiped off to create the weathering, grime and dirt we needed to make this sign look believable.  In this shot Rebecca is putting the finishing touches to the load of gravel in the bucket.


I couldn't resist showing a closeup of the tracks and pile of dirt to show the rich colors Bec was able to achieve. It makes me smile every time I walk by!


Tomorrow the lettering will get its last coats of paint, making the sign ready for it's debut (in pictures) just in time for my talks at the Atlantic City United States Sign Conference next week.

-dan

Dimensional pub sign

As Christmas quickly approaches its the time to make signs that will appear under trees Christmas morning. This client asked for a small pub sign for her husband. The budget mandated that we couldn't get too crazy but my client really wanted a dimensional sign. It would measure just over 4 feet wide and almost 24" tall. The horse's head would protrude from the sign. I first created the vectors in the appropriate scale. The barrel head would be created as a separate layer which will be glued on after routing. The horses head will be sliced and also glued back together after routing and then mounted to the sign.


The first item of business was to create the barrel head. Its a simple oval with a bitmap woodgrain applied. Then I created the stave ends by simply making them into 1.5" tall reliefs and then merging them to the barrelhead. A smaller oval was also raised to provide a mounting point for the horse's head.

The banner file was a pretty basic exercise. The layers of the banner were done at different heights, then merged together along with the oval for the barrel. I created a raised relief around the lettering and then the lettering was created as a bevelled relief. With the raggedy font it looks pretty cool with lots of texture.


I found a great looking horse's head in a STL file at www.3dmodelclub.com It was only $30.00 to download. The detail was pretty good. I'll make the horse a little more like a nag as I detail it by hand later. With the budget allowed for this sign I knew I couldn't carve the horse from scratch. 

The file was sized by eye and then rotated to suit the sign. I then created a zero height block and merged lowest to cut the back of the horses head off nicely. Using the slice tools in EnRoute and a zero height relief I cut the bottom plate off the horse's head. Then I sliced it again to fit in two slices in a 1.5" sheet of Precision Board.


I didn't bother with the small pieces of mane as I would recreate this easier with my sculpting medium after assembly/ I created a copy of the two layers and flipped these for the back side of the horse. I then nested them for routing with the other pieces.


The file is on the MultiCam now and I'll post pictures as things progress.

-dan 

Wednesday, November 24, 2010

Office now fossilized

We are still awaiting the glass top for the desk and coffee table but today I put up the wall eye candy. The flat fossils are understated and low key - perfect for an office setting. Rebecca painted them to look like they had been discovered in different places and were composed of different kinds of rock. With the varied textures built into the routing files it is very believable.


As a group they work together nicely, balanced on the other side of the room by the Triceratops skull. The LED lights underneath highlight the lettering in a subtle way especially with the lights on in the room.


The big overstuffed leather furniture pieces compliments the decor nicely. All that is left now is the desk and coffee table which will be moved into place next week.


After this all that is left are the room way finding signs...

-dan

Wednesday, November 17, 2010

Dino fossil comes to life.

This morning I worked up the file in EnRoute for the background panel for the triceratops skull. The MultiCam logo appeared on the bottom of course. It was routed from 30 lb Precision Board and then backed with a piece of 1/2" plywood (for strength) which was about 2" smaller in diameter than the HDU. The raised rectangle area is where the triceratops head mounts to the back piece.


I could hardly wait for the afternoon when our new employee Kirsten would start. She works for us after school. Her task today would be to mix the sculpting epoxy while I had a little fun. I first applied a thin layer over the routed Precision Board, then added a little more where needed. Scrunched up tin foil and a sharpened stick were the tools of choice to create the texture.  I used the photos I had gathered off the internet for reference.  In less than an hour we had the skull half finished and looking pretty fine.
After Kirsten had gone home I fastened the head to the backboard and mounted a hanger. It will make it easier to sculpt tomorrow. I also mounted the blue LED lights under the neck at the base of the skull which will shine on the lettering and give it a wonderful blue glow. The transformer is hidden behind the bone shield above, making future access a breeze. 

Tomorrow we should be able to polish the sculpting off leaving only the paint which will also go quick.

-dan

Tuesday, November 16, 2010

A little bit of progress

Today was an exceptionally busy day... with only a little physical work to show for it at the end. But a lot did get done, even if there wasn't much to show. We replaced the truck today with a new vehicle. That turns the page on the loss of the old one. And I had a couple of good meetings with new clients that will bring some very exciting and large projects in the near future. I even got a free lunch out of the deal too. It doesn't get much better than that. While I was out meeting with clients the MultiCam was busy whittling out the four fossil plaques. They look pretty cool unpainted and should look even better when we are done! They measure 16" x 16" x 1" thick.


And when I finally got back to the shop I needed to get my hands dirty - after I returned a few phone calls and emails of course. Then it was time to make a little dust.  I had snuck in the time to route and glue up the triceratops this morning. The rough shape was there but it was time for a little hand work...


I used my favorite tool for the job... a die grinder with a large bit. It just vaporizes the 30 lb Precision Board. In about 40 minutes I had done what I needed to satisfy my need to make some dust. I'll study it for a bit and then hack away a little more before we do a little sculpting to add some detail. I've got the mounting plate in the design stage. It's going to look very imposing hanging on the wall - as every triceratops tends to do without even trying.  :)


-dan

Monday, November 15, 2010

Jurassic eye candy for the walls

 After months of thought (and no real need to proceed) it was at last time to get down to the business of creating the files for the Jurassic theme office. I wanted to wait until the desk was built and I could get a better sense of the scale of the room. On one wall there will be a series of four 16" square panels, which will look like flat rock fossil specimens cut to shape. To create the files in EnRoute I first created an irregular square vector shape, created a relief and then added a series of bitmaps to make the fossils. The magic will happen as we paint them up to look like real rock. They will be routed from 1" thick 30 lb Precision Board.Stay tuned for the step by step process.


For the opposite wall I want to create a dramatic fully dimensional skull of a triceratops - my five year old grand daughter Phoebe's favorite dinosaur. I'll most likely create a second one (slightly smaller) as a birthday present for her. First I found a good image of a skull on the internet. It provided all the information I needed.


I pulled this image into PhotoShop and then traced five silhouettes of the image which would form the layers we would route from 30 lb Precision Board. Each silhouette represented a 1 1/2" slice of the triceratops skull. These will be glued up and then quickly carved to shape with a die grinder. It's the fastest way I can think of to build such a piece without a full blown 3D file which would take far longer to create - at least for me. These bitmaps of the silhouettes were imported into EnRoute and using the trace function the vector files were generated in a fraction of a second. The vector files needed no cleanup.

I junked the original JPG file and duplicated the vectors (one for each side). Then using the nesting tool I put them onto the smallest board possible and generated the cut file. I'll run the file tomorrow morning.


Then the fun begins. Stay tuned...

-dan

Sunday, November 14, 2010

Go ahead... put your feet up!

We've always been pretty informal at our house but I've been in plenty of places where I didn't dare put my feet up on the coffee table. I didn't want to get yelled at.

When it came time to design the office furniture for the Sean's MultiCam office I wanted to make sure it was a comfortable setting. I wanted it to be classy but warm and inviting and informal enough that I could sit there and put my feet up too if I felt the need. Most of all it had to show off the capabilities of the CNC plasma cutters they sold.

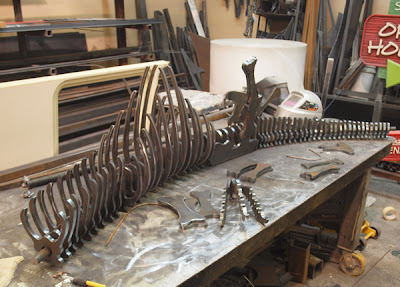
Sean's desk was shown in an earlier post. Now it was time to do a matching theme coffee table. It had to be low and simple. I decided I would go with the Jurassic bones once more, but not a complete skeleton this time. I'm not at all sure what kind of beast it was but it was definitely a good size. The rib cage measures 20" x 28" x 17" tall. I've sprayed the steel structure with acid and the rust is just beginning to form. The 3/4" glass top is yet to be put on.


It's welded solid and it's plenty heavy - perfect for putting one's feet up when relaxing after making a deal on a new CNC machine. I can hardly wait to see it in Sean's shiny new office!

-dan

20 seconds of magic!

I remember well the first time I witnessed a CNC routing machine cutting out parts. It was pure magic! Yesterday I saw a CNC plasma cutter in operation for the first time. Better yet it was cutting out some steel for a project I had long been waiting for. With seemingly no effort it cut through half inch steel like butter. The 4' x 8' sheet was so heavy we needed a forklift to load it onto the table. In only a few minutes it reduced the entire sheet to small pieces of dinosaur shaped bones. It was pure MAGIC!

Here's 25 seconds of the process for your viewing pleasure...


-dan

Saturday, November 13, 2010

A desk of a different kind.

For the upstairs office it was time to go way back into history. This room would showcase the MultiCam Plasma Cutter as well as the CNC router. All the files would be created using EnRoute including their just released plasma cutting software. I located a plastic T-rex model kit online and then downloaded the detailed instructions. Those instructional photos gave me the information I needed to build the files for the individual bones. There were a bunch!  I knew the height of the desk and simply scaled everything up to that size. Amazingly they nested on one sheet of 4' x 8' x 1/2" thick steel. The plasma cutting file was generated using the brand new EnRoute Fab software. Since I don't have a plasma cutter nor the new software Jeff Hartman was kind enough to generate the files for me.


To present the concept to my client I used the component file of the pieces to create this drawing. It was all that was required to sell the project. From here on in we would wing it, designing as I built.


The steel was cut using a factory fresh 3000 series MultiCam CNC plasma cutter, still on the showroom floor. I watched in amazement as it sliced through the heavy steel like butter with perfect precision. As the machine cut I removed the pieces, wearing gloves of course for they were very warm.


I ended up with 312 pounds of dinosaur pieces. They filled the trunk of my small rental car pretty good. and weighed it down in a significant fashion but I made it home safely with the dino bones tucked away in the back.

Since it had been better than a year since I had designed the dino desk, I wondered if I would remember how it was supposed to go together. It was quite the pile of parts! But after I had sorted them and arranged them in order of size it came back to me how it was supposed to go back together. I printed out the plastic kit directions just to be sure but ended up not using them.


I went through my scrap bin and found a 1" steel rod that was the perfect length. I put it though our hydraulic press to bend it to the right shape then arranged the plasma cut parts over the rod and began the welding. The easiest way to align the parts was to build the dino flat on his back.


Once the rib cage and tail of the T-rex were welded up I used the chain hoist to lift it into the upright position. An adjustable stand at each end held things steady while I did my measurements and lined things up. From here on in I would weld up the various smaller assemblies on the bench and then fasten them to the large piece permanently. It came together pretty quick!


There is still a little grinding to do and I have to figure out and source a way to fasten the tempered glass plate to the top but it is pretty much together in only a couple of hours. It's a desk like no other! The desk will dramatically display the awesome cutting abilities of the MultiCam 3000 series plasma cutter using the new EnRoute Fab software.


Once again I had pushed the boundaries of our experience. As I worked on the dino desk my mind was racing, thinking of all the things now possible. But before I begin something new first I'll fabricate the matching coffee table for Sean...

-dan

Thursday, November 11, 2010

A little closer

The board room is now finished save for the plexiglass insert in the table. The sheet of plexiglass sits by my router and waits for the final dimensions of the electrical inserts that have proved hard to source. But I think we now have a handle on things.

The LED's under the valance have now been activated, the last of the ceiling tiles repainted (some for the third time) and all the little dings and misses touched up. The room is looking pretty special. I love to watch people see it for the first time. It's certainly not what they expect when they come through the doors!


My friend Shawn Cherewick of Protowerx Design Inc. and I spent Wednesday afternoon on our backs on the floor under the board room table. We were fastening the strips of LED lights to the bottom. Shawn had worked hard to program the three colors of lights to fade in and out in a random pattern, simulating the look of being under the sea. We tested it and it looked very cool. Once the plexiglass is routed and in place I will do up a video and post it here showing the cool effect. Thanks Shawn!


On Wednesday we had the bankers tour the building. I was working in the room. In my experience they tend to be a much harder sell when it comes to visual things, but they were blown away and all smiles as they looked around. They simply couldn't believe almost the entire room had been done with a CNC router. They had trouble believing it wasn't rusty steel and copper. The many pieces, done separately over the last months now fit together perfectly, each complimenting and working with the other. The branding is continuous through the entire facility, some subtle, some in your face. While potential buyers of CNC machines may go through different sales offices, this will be the one that sticks in their mind. The things that the software and CNC machines are capable of are evident at every turn.


I had an absolute blast seeing just how many ways I could insert the 'M' brand into absolutely everything. It's everywhere!  This gauge is on top of the white board pen holder. It glows with a red LED inside (turned off for this photo).


As promised, here's one of the gauges on the top of the TV. The 'M' is embossed into the gauge cover and the label on the gauge also sports the MultiCam logo. It makes me laugh every time I see it.


I finally got in the white board and routed it to shape. We installed two pieces - one on the back of the door, and one inside for plenty of drawing area. It will be easy to visually explain how all those 'complex' files are created in EnRoute, how things are tool pathed and how things work in general. The pens are handy of course -under the bright red LED.


By next week we should have the table sorted out, leaving only a few more projects to do on this job. I love it when a plan comes together!

-dan