WELCOME!


It is hard to believe that it was almost ten years ago I witnessed a CNC router in action for the very first time. I was fascinated with what I saw and simply had to have one! Although I had been in the creative end of the three dimensional sign business for most of my life I didn't really know what I would do with one - but I just knew it could do fantastic stuff.

Through extensive research and LOTS of hands-on practice I quickly found out that my MultiCam router was capable of just about anything imaginable.This journal will chronicle that journey to date and continue each week with two or three entries as I continue to explore just what is possible with this wonderful tool... -dan

Sunday, February 27, 2011

Four wheeling fun!

As I work on this latest project it reminds me of my own four wheeling days so long ago. I owned an old Toyota Land Cruiser which we had stuffed a big V-8 into. It sported large tires, a winch, full roll cage and many other modifications. If was a pretty potent vehicle that could go just about anywhere - no matter how steel or rough. I painted it bright yellow and dubbed it 'BIONIC BANANA'. Those were fun days.

We designed and cut the last of the pieces for the Cap-It signs today. The pressure is on to get them to a point I can work on them as for the Sign Magic Workshop. From here on it the piece will involve mostly handwork.


As the pieces came off the MultiCam I couldn't resist mocking them up to see how everything would look. It's still easy to make changes and adjustments at this stage.


I then drilled some holes in the frame and glued in some steel rods. These would be the mounting points for the springs which I fashioned by bending some flat bar. I welded them on securely.


Then I drilled the wheels and inserted some heavy steel rod. More rod formed the lift kits under the springs. Some steel driveshafts were the last step with the metal. A few more steel bits will come tomorrow, like the shock absorbers, tie rods and the exhaust system. After that it will be time to break out the sculpting epoxy to add in the detail. That work will be done during the workshop.


On the body I'll trim out the rear wheel wells, and the open doorways, then start adding the front fenders, windshield, seats, roll bar and anything else I can think of. We'll be bulking out the plywood box with blocks and scraps of styrofoam and then hacking it into rock shape, After that we'll add a coat of sculpting epoxy to give it strength and then add the details. The piece tops out at a little over six and a half feet tall now and will get even higher with the windshield and roll bar. It makes me smile already!


Stay tuned for progress...

-dan


Saturday, February 26, 2011

Slicing and dicing..

In preparation for my demonstrations at the Sign Magic Workshop I continue work on the Jeep and truck Cap-it pieces. I'll show how we put the files together in class and how we add a little hand work to complete in the workshop sessions. I want a certain amount completed before our guests arrive, but I will save similar steps to do there.

The tires only needed a little handwork on the center treads to complete. The die grinder made the task quick and easy. I wasn't worried about them being a little uneven or bumpy. I've done enough four wheeling to know real tires get that way in real life. Once painted they should look pretty good.


The truck & Jeep bodies took a little head scratching to figure out. I decided to slice the pickup in vertical slices, while the jeep was sliced horizontally to facilitate the interior detail. The grill for the Jeep was done as a separate piece as were the inner fender wells and front fenders. The yellow areas were done as fills, while the blue lined are straight cuts. The MultiCam will make short order of these cuts. All of it will be cut from one inch thick 30lb Precision Board.


Study the files until the next time I post. As I glue it together it will begin to make a lot more sense.

Stay tuned...

-dan

Friday, February 25, 2011

Saving the best for last?

Almost 30 years ago I read of a new technique to sandblast wood to raise the grain on the background of signs. The article was written by Mike Jackson. I rushed out and bought a large compressor, a sandblast pot and the gear I needed. I remember watching with AWE as the softer wood melted away leaving he raised grain behind. The very first piece I did was a sample that hangs in my shop to this day.  Five years ago as I explored what was possible with EnRoute and our MultiCam router I looked up at that old sample on the wall and wondered...  could I duplicate the magic of so long ago?  It took me  while to figure out the best way to light and photograph the ancient wooden sample. It took a while longer to figure out how to manipulate and enhance the photograph to best work as a bitmap in EnRoute. I remember well watching in AWE once more as this magical machine turned a sheet of Precision Board into that same beautiful raised woodgrain. More experimentation with modern acrylic paints eventually meant that we could duplicate the rich colors of the original wood as well. Only this time our sample would not split, weather, lose it's finish or deteriorate like the wood did so quickly. This was better!

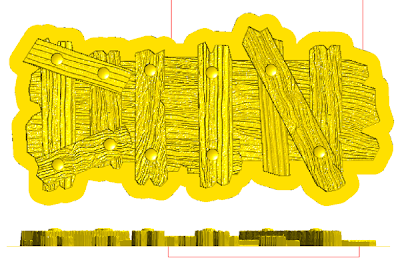
The last name started with the sandblasted redwood bitmap.


Because our name plaque was relatively small I first stretched out the bitmap vertically. Then using the drawing tool I created some board shaped vectors.


I created flat reliefs from the vectors and then added the texture with the bitmap. 


Then I used the rotate tool to build the letters of Don's name. Since he's a cabinet guy (who most likely builds very accurately most of the time) I decided to loosen things up some. Lastly I used the dome relief tool to create some routed nails to 'hold' it all together. I then merged it all together over a zero height background.


In retrospect the back board should have been stretched out a little to the left but it will be OK. We'll use our glazing techniques to build up the rich colors of my sandblasted redwood sign of old.


The name plaques got their base colors today. Over the next few days Rebecca will work her magic on them to bring them to life. Stay tuned...


-dan

Back up and try again...

I was delighted with the little frame of the truck when it came off the router. Detail was good, things looked pretty much as I imagined them. But when I looked at it again this morning when I came in and mocked it up with the large wheels it looked kinda dinky. It was too short. The width looked good however. So it was time to make some adjustments and give it one more go on the router.

I measured things up again by holding the wheels against the frame, opened the frame file in EnRoute and stretched it out four and a half inches. It still looked good! The cross members were a little thicker than what I originally designed but it didn't bother me one little bit. As you've probably figured out I tend to design as I go  - by the seat of my pants and at a full run. Tape measures are used as a last resort for I would rather design by eye, most of the time. It's always been my style. I probably make more mistakes than the average guy, but often the mistakes lead to some pretty cool discoveries. It keeps things exciting too. :)

I tool-pathed it the same as the first go. The rough pass was done in one pass with a 3/8" ballnose bit with a 50% overlap. Then I used a tapered 1/8" ballnose for the final pass, again all in one go, and with an 80% overlap.


Both frames wer 5.25" wide. The first was 13" long while the second try made the frame 18.5" long.

Now we are ready to go for real...

-dan

Thursday, February 24, 2011

Framed

Projects like the two signs I am doing for Cap-it really make me smile. It's a chance to really be challenged. I have to figure out how to use the software and router to make what I need. That's a challenge I relish! It is also a wonderful opportunity to mix and match different materials, power tools, hand tools and all manners of skills to achieve the end result I visualize. It is the perfect project to do as a demonstration piece for the Sign Magic Workshop. I'll be documenting it here too of course.


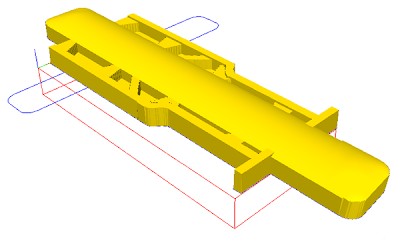
The next thing I am going to create is the truck frame. I'll use the same frame for both vehicles to keep things relatively simple. I've built a few hotrods in the past so I didn't have to do any research on this subject. It was built by eyeball alone. The vectors were created in EnRoute in only a few minutes. The large rectangles going in both directions would be used to create necessary bends in the frame. The frame was created upside down as we would be able to look under the truck as it will be mounted quite high on the displayed.


The frame rails were simple flat reliefs 1" tall. The cross members were 0.9" tall so they would tuck under the main rails. The floor pan was 0.3" thick. Then I created a separate relief with the dome tool using the horizontal rectangle. I then selected the two cross members I wanted to curve upwards and then the big rectangular shape. Bt merging highest The cross members instantly were curved perfectly.


Then it was time to do the rear floor pan and the rear of the frame rails. I created a concave shape with the dome tool and line it up with the top of the frame rails. Using merge lowest the frame rails instantly were curved downwards. I then nudged the concave shape downwards until it lined up with the floor pan and repeated the merge lowest procedure. 


We were almost there in only a few steps. Then I used the various vector shapes with the dome and bevel tools to create the different elements of the engine oil pan and the transmission and transfer case shapes. The rivets on the frame cross members was the finishing touch for this stage. As simple as that I had my truck frames ready to tool-path and send to the MultiCam.


The frame was routed from 1.5" thick 30 lb Precision Board.


While I was busy creating the files for the truck frame the Router was busy carving out the massive wheels. And while the truck frame was being whittled out I glued the wheels up. This thing is going to make one eye catching display piece!  Stay tuned for more progress...

-dan

Things you can do with bitmaps

Parametric textures are cool and I sometimes use them to good effect. But many times the textures I want to create can only be done with bitmaps. In this case for Khai's panel I could easily have created a vector of the design. It was done as an oversize belt buckle sign background. With the powerful tools in EnRoute it could have been traced in an instant, and this file used to achieve pretty much the same effect as the bitmap I used. But this would have only added one more step to the process. The present parametric textures could not create this texture.


When it came to the extra texture on the background and the lettering it could easily have been done with a parametric texture. I find it so easy to use the bitmaps which I am familiar with but I am the first to admit it's not the only way. That is the beauty of a program like EnRoute.


For Kirsten's name plaque we are back in Bitmap texture territory. The vector files were done in EnRoute.


The bitmap file was created in PhotoShop and is a lot simpler than it initially appears.  The leaves are cut and pasted, adjusted for value and rotated randomly. The effect achieved inside EnRoute with the file is amazing! 


Every user (myself included) has favorite methods they tend to use given the choice. The program is powerful enough to allow us to do so. My advice is to try them all and become familiar with all the tools available. As you continually push the boundaries you will find occasion to use them all.

-dan

Two more done

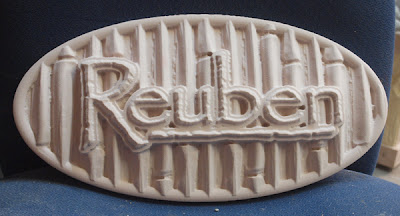
Joyce's and Reuben's panels are relatively simple, but great exercises for those just starting with the textures in EnRoute. The vectors were simple. I needed to build the border and frame separately to make things simple.


I worked on the border first, a simple dome relief with the rivets added in the net step/ I them imported the splotches bitmap and applied it to the file to instantly create a rough surface. 


Then I created a slightly domed relief, added the letter border and texture. Lastly I added the lettering and added the woodgrain texture  to the background


It routed up to become a very cool name plaque. I know Joyce has done a lot of sandblasted signs and I wanted to show her just how easy it is to do with a router.


Reuben's was a similarly simple plaque. I created the border and the background reliefs as slightly domed files. Then I added the bamboo bitmap texture. Since the frame, background and lettering border were separate I could then nudge them up and down into position before combining/merging them together. 


As a final step I added the lettering as a beveled relief.


The files were cut on the MultiCam router into 1.5" thick 30 lb Precision Board.


-dan

Using bitmaps to shape panels

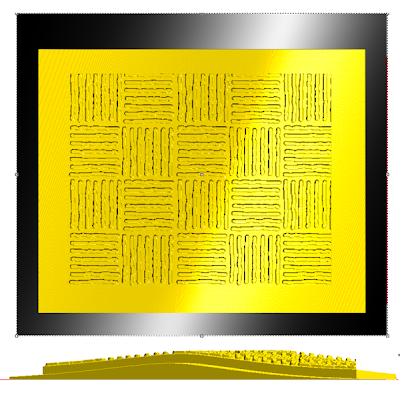
I probably use bitmaps more than most folks who use EnRoute, but they can be used for so many cool effects. This name plaque is another good example. I started with some squiggly lines, sized them so the 1/8" bit would fit comfortably then created my vectors based on this size so no squares were cut. I created a relief and added the squiggly line checkerboard pattern. 


Then I imported the next bitmap. a dark to light to dark fade which I had created in PhotoShop. this creates a pleasing wave when applied to a relief.


I had created a border around John's name which I created as a flat relief, then applied this same wave bitmap. This ensured the two files would match.


I built a panel/border then merged everything. Then I used the dome tool to add the lettering vectors.


The panel was then tool pathed and sent to the MultiCam to be routed from 30 lb Precision Board.


Another panel was ready for the paint shop...

-dan