I imported the quick sketch into EnRoute and used it as a template to create the lettering vectors.
I then took a screen capture and used that as a template to do the illustration which I would use for presentation to our client.
When I was ready to proceed with the sign (later that afternoon) I opened the vector file in EnRoute once again and created the outlines for the sign. But before we could go further the design needed a little tweaking.
I've marked the problem areas on the screen capture below. I wanted to eliminate the 'windows in the background layer of the sign. These were in the 'U's" There was a large negative space between the 'L' in cloud and 'T' in Buster. This was easily fixed by lengthening the bottom stroke of the 'L' a little and stretching out the top stroke of the 'T'. I also stretched out the bottom stroke of the 'E just a little and eliminated the narrow lines between the 'E' & the 'T'.
Once everything was adjusted or eliminated I was ready to proceed once more.
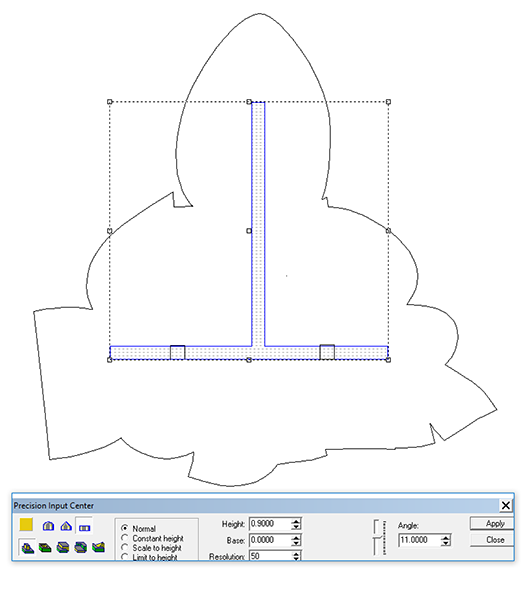
The porcupine character was a simple egg shape which was scaled to suit the size of the letters. Once I was happy I made sure the size of the sign was correct. In this case I wanted it to fit on half a sheet of Precision board and it turned out to be just under 40" wide.
We started by selecting the lowest border layer of the sign and creating a flat relief that was half an inch thick. I then hit render to make sure I had the result I was looking for.
This base relief was then modified by selecting the original relief and the next layer vectors of the lettering outline. I typed in a height of 0.3" and then hit apply. I again hit render to make sure I had achieved the result I was looking for.
I then selected the base relief and the lettering to modify the base relief once more. I again entered a value of 0.3" and hit apply. Once again I did a render to make sure I achieved the result I was hoping for.
I wanted a slight texture on the letters. To do this I imported a bitmap called 'splotches' from my original TEXTURE MAGIC collection. This was positioned over the relief and then I selected the bitmap, the base relief and the lettering vectors. The APPLY bitmap icon lit up and I opened the application. I then entered a value of 0.2" The thing to remember is that whites will raise this amount, blacks will do nothing and greys will do something in-between depending on their light value.
I also used the dome tool to add dimension to the egg relief as a separate relief. Once again I did a render to make sure I had achieved the effect I was looking for.
At this point I wanted to dome the lettering. To do this I selected the base relief AND the oval vector I had drawn around the sign. Using the dome tool I entered a value in the ANGLE box. In this case it was 8 degrees of angle. The oval and this angle value determine how much the dome will rise.
The top view of a render won't give you enough visual information for this operation. You need to check the from t elevation to really see how much things have domed up. I knew I was close because I have used this command many times. Things looked pretty good although I did tweak it a teeny bit to fit within the material.

As a last step I combined the two reliefs. I then duplicated the relief. I used the delete relief tool to make this a vector once more. This would be a second piece which I would route for the back of the sign. I created a vector shape which I would hog out to accept the structural steel. The two small square boxes on the bottom of the upside down 'T' would be cutouts. I created a relief in these areas which effectively made a 'T' shaped hollow in the back piece. A welded steel frame would be inserted into this hollow space. Two legs of the sign would protrude out of the back of the sign for mounting.
I arranged the two pieces, flipping the back upside down to fit better in as small a space as possible. This was arranged to fit on a 4' x 4' x 2" thick Precision Board. I then tool pathed the reliefs. The first pass was a 3/8" ball nose bit with a 50% overlap. The second pass was a 1/8" ball nose bit and an 80% overlap.
I also tool pathed an offset cut around the two pieces and inside the two little squares in the back of the sign.
Here's a shot of the MultiCam starting the second pass with the 1/8" ball nose router.
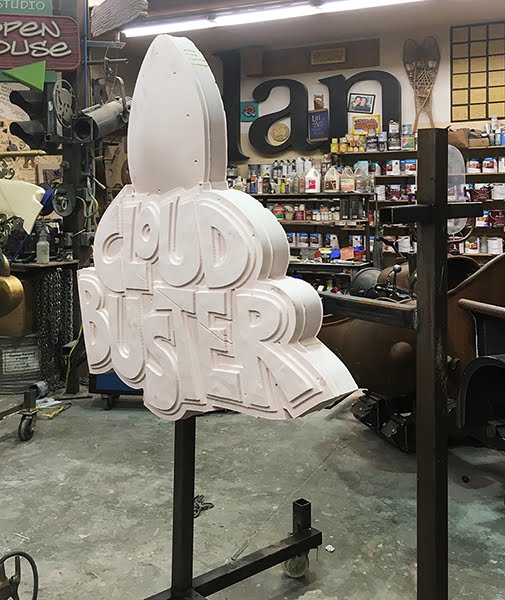
And here's a shot of the two pieces fit together, fresh off the router. Something weird happened as it cut the sign as it did a cut line across the 'T' and 'E'. I'm not sure what happened but no matter for it is easily repaired.
I cut and fit the steel 1" square tubing and then tacked everything with the pieces of steel placed in the cuts of the back of the sign. I then carefully removed the assembly and welded it up solid. A quick blow of the air hose to get rid of the dust and debris and we were ready for gluing. We use Coastal Enterprises' PB Bond 240.... a one part urethane glue. It's a simple matter of spreading the glue, spritzing it with a fine mist to activate it and then dropping on the top piece. We like to use a mechanical bond as well so I screwed through the face of the sign using 2" screws. These holes are easily patched later as we get ready for paint.
We then welded the sign to a temporary working stand using those back protruding tubes. This will be allowed to set up overnight. Tomorrow I'll do a little quick carving and then do the sculpt of the porcupine figure. Stay tuned...


