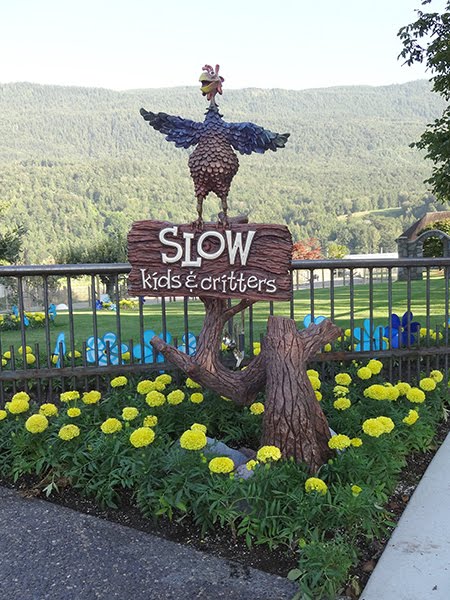
Janis loves chickens but there are no roosters allowed. (they tend to crow early in the morning and wake her up!) I believed we needed a rooster somewhere on the property and so I designed a fun fellow to perch on top of a sign Janis had been asking for in our yard to warn visitors to slow down as they passed through the the shop.
As with all of our projects we would use a variety of mediums and methods to build it.

The sign portion was done on our MultiCam of course, routed from there layers of 30 lb Precision Board. These layers would be laminated over a welded square tube steel frame. The wood grain was created with a custom bitmap wood grain texture. It's called driftwood and is available on our TEXTURE MAGIC - CLASSIC COLLECTION.

While the machine worked at routing the front and back of the sign I got busy doing the rest of the piece. I roughed out an armature using 1/4" pencil rod. It's welded together for extra rigidity.

I used some crumpled up tinfoil to fill the centre cavity of the rooster. Tin foil is lot cheaper than sculpting epoxy!

The next step was to rough out the general proportions of the bird body. This was allowed to cure before moving on.

The sculpt was a fun one to do but there were a whole lot of feathers in this little guy!


I then slid the back piece of the sign over two steel 5/8" thick rods and welded the steel frame for the sign to this rod. The centre section of the sign was next which was glued to the back. At this point the rooster leg framework was inserted into two holes I had drilled through the top of the sign. The cutouts in the centre section allowed me room to weld these rods to the framework. This was followed by the front of the sign which encapsulated the steel support in the centre. The two steel rods protruding out of the back would be sculpted into branches of the tree which held up the sign.

I then welded up the rest of the branches on the tree.

When the glue had cured on the signs I used my die grinder to carve woodgrain into the edges of the sign.

I then used Abracadabra Sculpting Epoxy to sculpt the tree. The bark texture was created by pressing crumpled tinfoil into the epoxy and then using a sharpened paint stir stick to sculpt the random lines in the bark.


The roosters feet could then be carved to look like he was tightly gripping the top of the sign.

Becke did the colourful paint job using Modern Masters metallic paints.


The rocks at the bottom of the tree were done using fibreglass reinforced concrete. The heavy weight of the concrete made the sign more stable. The rocks were hand painted with acrylic house paints and then speckled using an automotive undercoat gun and very low air pressure.

It was placed in planter and a colourful display of flowers was planted around it to finish things off nicely!