WELCOME!


It is hard to believe that it was almost ten years ago I witnessed a CNC router in action for the very first time. I was fascinated with what I saw and simply had to have one! Although I had been in the creative end of the three dimensional sign business for most of my life I didn't really know what I would do with one - but I just knew it could do fantastic stuff.

Through extensive research and LOTS of hands-on practice I quickly found out that my MultiCam router was capable of just about anything imaginable.This journal will chronicle that journey to date and continue each week with two or three entries as I continue to explore just what is possible with this wonderful tool... -dan

Wednesday, March 31, 2010

Throwing a wrench in things...

We have a booth reserved in a car show towards the end of the month. It is a chance to market our three dimensional signs and sculptures to a whole new audience. In preparation for the show I am adding some new pieces to our display. Our MultiCam router will of course be used in a big way to make them. While some of the pieces we have on display are quite large and complex(and expensive) we wanted some things that would appeal to those with somewhat less of a budget. Every car affectionado has a shop of some kind and of course needs a sign to label it as their own. I had to look no further than my own tool box for inspiration.
The vector file took only minutes to make in EnRoute. I made a second copy of the file and then flipped it for the back side of the wrench - except the name so it didn't read in reverse. Once I had the vector files done it was time to create the relief. I built each component of the wrench separately then merged them together at the last minute. Once it was all done I checked it as a preview. Here's a screen capture of that render.
I then sent the cutting file to the router using only a 3/8" ball nose bit with a 90% overlap to make the file run faster while still retaining nice detail. Even though the file was 4 feet by almost two feet it ran in about an hour - while I was off doing other things. I glued it up back to back in a couple of minutes. Tomorrow I'll take it out of the clamps and get to finishing this oversize wrench.

Stay tuned...

-dan

Monday, March 29, 2010

Undersea delight!

The end result was a sign that was a delight to look at from all sides - a truly dimensional sign. The barnacles and heavy weathering screamed nautical. The submarine 'swam' through the center of the sign. It was indeed a sign like no other - an instant landmark.
Each element of the sign worked together, designed to compliment not distract. Cool and warm colors framed the sign. No afterthought, the bracket was an important part of the design.
From the unusual bracket, the submarine, distinctive lettering, this sign had it all. Our MultiCam allowed us to design and fabricate a sign with no limits. Through experience I have discovered it's possible to design whatever is in my head and easily figure out how to build it later.

-dan


A true dimensional sign

When most sign folks think of a dimensional sign they think of a flat board with some type of writing routed into it. At our shop our definition of a sign like that is a board with a hole in it. Dimension goes in three distinct directions and the MultiCam makes that task EASY. A dimensional sign should be just that! Dimensional on all sides. This is a great example.
I first created a routing file for the submarine. I actually created two files - one for the top and one for the bottom. These were routed separately in layers and then glued together. I added the surface plates and rivets with a sculpting epoxy. Once this job was done I set about making the rest of the sign.
I created the file in EnRoute and then flipped it to create a second file for the back that was the same. While it was running on the MultiCam I bent up some steel pipe and welded up the bracket. Since the sign was to be double sided I glued it up with the steel rod running through it and placed the completed submarine in the middle. A compass point was routed separately and glued together around the steel rod on the top of the sign.
Then I used some sculpting epoxy to fashion the barnacles and starfish that add so much flavor and detail to the sign. It was as simple as pushing on little balls of epoxy and then using a sharpened stick to poke a hole in the top and roughen up the sides of each barnacle.

The star fish were formed with the same medium and then balls of sculpt added for detail. A die grinder was used to add a little texture and a weather worn appearance to the edges of the sign and the top arrow. Then we used a small brush to apply a textured coat of Coastal Enterprises thick primer. Next up was the final paint.

Stay tuned...

-dan

THE BELL

Our MultiCam CNC router has allowed us to take on many projects we could previously only dream about. This was one of those projects.

Our local firemen wanted a way to formally honor fallen fire fighters. They had a brass bell which would be rung once for each firemen. It was on a temporary stand. The ceremony was in ten days and they came to us, hat in hand to see what we could do. It was a good cause and with our MultiCam entirely possible. I used their logo as the starting point. Using EnRoute I domed the top and added texture too the logo. I wanted it to appear timeless and feel like an heirloom. Then I designed the bell support to look like an old timber. The pieces were routed separately from 30 lb Precision Board on the MultiCam in a only few hours. Then I glued it all up over a welded steel frame so it would last forever, no matter how it was handled through the years.
I painted it up with copper paints and gilded the scroll and lettering with 23K gold. I then did a glaze over the entire surface except the gold to give it that time worn appearance. The bell was polished up and hung with care. The piece was ready two days before the ceremony. I called the fire chief to let him know. When he dropped in to pick it up there were tears in his eyes. We had met the goal and done it in a way that was a fitting honor to these brave men.

-dan

Saturday, March 27, 2010

DELIVERY DAY!

We had laminated the layers of the sign over a welded steel square tubing frame. This made for safe and secure working conditions while we were making the sign. It also provided a handy way to safely transport the sign to the final destination.

My client had poured a footing below grade as per my specifications. We simply lifted the sign off the trailer and placed it on the footing. A few anchor bolts permanently fixed it in place. Then we backfilled the soil around the legs and the sign was installed in minutes.
While the sign had looked great in my shop it looked ten times better in it's final home sparkling brightly in the sunshine. The sign looked like it had been crafted with time tested hand carving. It looked massive and solid. The reality we had used the most modern tools and materials to complete a project much easier and quicker than ever was possible in the past. It would last much longer too. Our MultiCam had proved it's value one more time.

-dan

PAINT!

It amazes me how a few quick coats of paint change a project so dramatically. We primed the project using Coastal Enterprises thick bodied primer. We had brush our paints and then went back and did one more thick coat on the lettering with a small brush to add a final bit of texture. It would make the gold leaf sparkle just a little more.
After priming it was on to the base colors and glazes. We use all acrylic paints in our shop, applied by hand with a brush. The base color in this case was the yellowy tan... and it looked pretty awful. But I wasn't worried for we were not nearly done. Next up I flooded the sign with a brown glaze and wiped it off judiciously exposing the highlights on the raised portions. It was still pretty bright.
The last layer of glaze toned everything down nicely. The lighter colors peeking though added a richness to the piece. The woodgrain looked pretty convincing at this point.
The 3D graphic was painted in much the same way, with colors that appeared much too bright until the glaze was flooded on and then wiped off with a rag. Then I double coated the borders, edges and back of the sign with the dark chocolate acrylic, leaving one last step before we were done.
Gold leaf is pretty easy to do. It adds glamor and sparkle to a sign that simply cant be done any other way. While it adds tremendous value to a sign it doesn't really cost much to do. This project used two books of gold - about $100 dollars worth when bought in bulk. To do gilding the letters are first painted with the oil based size and then allowed to tack up until most of the stickiness is gone from the size. Then small sheets of gold is pressed in and burnished down. SHAZAM! INSTANT BLING!
Then it was delivery day...

-dan

No sanding here

While the whole sign world around me carefully sands their project smooth to make them appear as if they were made by a machine we take a radically different approach. We use machines to make it look like we did it by hand. We do this by adding texture. I started with the edges and back of the sign. Using an air powered die grinder I quickly go over the entire surface making it look like I used an adze to shape the massive timber. The routed woodgrain on the front of the sign completed the illusion.
The process is quick. Once the flat surfaces were textured it was time to start in on the three dimensional pictorial. Rough, broad strokes defined the mountains and glaciers. Smaller vertical strokes formed the trees in the foreground mountains.
I filled in some gaps and sculpted the crops with a sculpting epoxy medium. The plants were sculpted on to a vanishing point. Once I had finished the sculpting it was allowed to harden over night. In less than a half a day of handwork this large sign was ready for paint. Our multiCam had saved us countless hours of labor.
Next up is the paint...

-dan

Farm sign extraordinaire

We've long wanted to get into the farm sign market for we are surrounded by thousands of farms. We did up some samples for our trade shows and put photos of these examples in our portfolio. Last week we finally saw the results of our marketing efforts. A fellow came up our drive and came into the shop. He had heard 'I were the guy to talk to about a quality dimensional sign.' I did up a design which he enthusiastically approved.
Next came the vector drawings, done in EnRoute. Most of the work on the sign would be done with the MultiCam. The routing file design and tool-pathing was done in less than an hour. The textures were generated with a bitmap in EnRoute.
I decided it would be quicker (and more fun) to carve the mountains by hand rather than creating a 3D file of them. The sign layers were created with cutout profiles which would minimize the hand carving. While I love to hand carve I also LOVE it when I can have our MultiCam to take the hard labor out of the process. The sign covered an entire 4' x 8' piece of Precision Board. The letters were done as separate prismatic 3D shapes to add extra dimension to the sign. They would be glued into shallow pockets routed into the face of the sign.
Once I was happy I tool-pathed the project and sent it to the MultiCam. The machine happily churned away while I other jobs. Next entry I'll show how we continued the project from this stage.

-dan

Monday, March 22, 2010

This time it was DONE!

The sextant, although five feet tall was in my view still a bit underwhelming. The table top was a little low. The fix was easy. I quickly built four compass points files in EnRoute and sent them to the MultiCam. While the machine worked in the back room I started fabbing up the plywood box that would provide the structure.

As each point of the compass came off the router I sculpted them into place. I liked it much better already. Everything was coming together nicely.
This time I was truly happy. The sextant now measured more than 6 feet high and was an imposing display piece in the library. After six years of procrastination it was done! Without the use of my MultiCam router it would have taken far, far longer - if it was even possible. With the machine working hard for me the job was relatively quick and easy. It did the hard parts while I concentrated on the creative, fun stuff.

-dan

Finished! ... well not quite.

I was absolutely delighted as the piece neared completion. It was everything I imagined. As soon as the paint was dry I moved it into my library and took a look. It fit like it was made for this very space. (funny thing).
Everyone who came in in the next few days was blown away. They had never seen anything quite like it. But after looking at it for a few days I wasn't nearly as happy as I was a few days earlier. It needed something more. And I knew just what it would be...

-dan

COLOR AT LAST!

The tough part in any project is not the idea or the making of the piece. It's knowing when to stop. After many hours of adding endless barnacles the piece was ready for paint at last.

I started with the Primer. We used a heavy, thick primer. I applied it with a brtush as it was my last chance to add just a little more texture to the piece. It was to look like a sunken treasure which was seeing the light of day for the first time in a long while. It wasn't hard to make it look the part. Then came the base coats of the metallic paint - also applied by hand with a brush. Although it looked pretty fine at this point it was far too bright and shiney. But I'd soon fix that...
Once the base coats were good and dry I flooded the piece with a series of glazes, wiping off the excess with a soft cloth, leaving the dark colors in the recesses and cracks. It looked instantly old.
I worked from the top down so I didn't ruin the areas already done. I was getting happier by the minute for this was looking pretty good. Stay tuned...

-dan


Looking fine

It wasn't long until the MultiCam had machined all the parts I needed. Assembly went just as quick and before I knew it the table sextant was sitting before me. It looked fabulous already but I wanted to include a little more detail before I started the paint process.
I used a sculpting epoxy and sharpened stick to make barnacles which were placed randomly on the surface. I used reference pictures of some submerged wrecks to guide me... While I was at it I added some star fish too.
Things were coming along nicely. It was almost time for paint...

-dan

Progress


As the pieces were finished I started to glue them up. It was a big complicated assembly. I had machine the pieces in the order I would need them. This gave me something to work on while the MultiCam still worked.

I laminated a steel post into the center to provide structural strength to the Precision Board. The entire piece would be built around this.
Visitors to the shop were still scratching their heads for they did not yet have a clue as to what I was building. I could see it clearly. Stay tuned...

-dan

Finding my bearings

Recently I made the switch to a Mac computer at my workstation. Since I had to get up to speed on the slightly different way of doing things, new shortcuts, and slightly different operating system I decided I would pull out the stops and build a complex piece. Learning by doing is always the very best way. There was a bare spot in my library which I had long wanted to create a special display piece for. And I knew just what I was going to create.
It took four hours to create the routing files. The individual pieces filled one and a half sheets of Precision Board but they looked cool - even in the rendering. I worked in EnRoute and when I was done I could hit the render button for a preview of how it would look when done.
I set the MultiCam in motion. This was going to be cool! I could hardly wait for it to be done. The machine was making two passes - one rough pass and then a highly detailed pass with a 1/8" bit and a high overlap. It would take a while but the results would be worth it. Here's a shot as the rough pass was almost done...
While the MultiCam worked in it's special room I was busy in the shop doing other things. The MAGIC would take a little time. Stay tuned...

-dan

Sunday, March 21, 2010

MISSION ACCOMPLISHED!


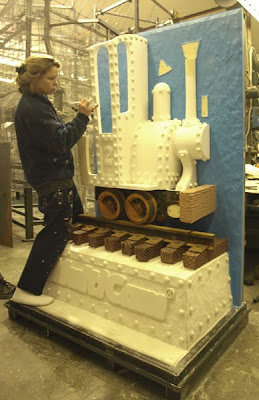
By quitting time on Friday we were indeed done. The diminutive train was ready to ship. The detailing was exquisite - all done with the help of our MultiCam.
The number on the side of the cab was my way of signing the piece. I am a second child. The name on the side of the boiler, Janis Lee is that of my wife. I sneak it into as many of our projects as I dare.
It was hard to believe the rusty old relic was made from Precision Board. It was harder to believe it had been accomplished in only a week in our shop with only two people working on the project at any time. The grab rails were made with PVC pipe - everything else was whittled from blocks of HDU on our MultiCam.
MISSION ACCOMPLISHED!
-dan

Almost there!

Hundreds of rivets, various train parts, tracks, ties and everything else were all made on the MultiCam router. The train was coming together quickly by day four with only a few parts too come at this stage.

By the end of the day we were confident it would be done in the five days we had allotted for the project. The date for it's debut at the trade show in Florida was fast approaching. we had one day left to accomplish what would have been impossible before we bought our MultiCam router.


I had no doubt we would achieve our goal with ease - or at least with as little sweat as possible.
-dan


It's a train already!


The parts were painted with a special paint that actually rusts with the application of a mild acid. Some parts were pre-painted, others after assembly.
My grand daughter Phoebe insisted she help too as she often does.

While were were busy the MultiCam was too whittling more than 400 individual pieces for the train from 30 lb Precision Board high density urethane.
By the end of day three it was looking very much like a train. With the help of our MultiCam this train was coming together in record time.


-dan


GOAL -Train in only a week

When MultiCam saw the types of projects we were doing on our router they asked us to come up with a display they could use at trade shows and in their advertising. It simply had to be one of those projects where one would wonder how it was possible. I did the concept drawing on a Friday. Monday morning I got the green light to proceed.
By Monday at noon the first pieces were coming off the MultiCam. As each file was running I was creating more in my office. Out in the shop we were starting to assemble the pieces. Some were simple cutouts, others detailed, textured pieces.
As we assembled we started the paint process. By the second day things were coming along nicely! Stay tuned for more progress...
-dan